- 动态与公告
- 产品简介
- 购买指南
- 开发指引
- Demo 专区
- 下载中心
- 聊天互动(含 UI)
- 视频通话(含 UI)
- 推送功能
- 智能客服
- 更多实践
- 无 UI 集成
- 客户端 API
- 服务端 API
- 控制台指南
- 常见问题
- 协议与认证
- IM 政策
- 平滑迁移方案
- 错误码
- 联系我们
- 动态与公告
- 产品简介
- 购买指南
- 开发指引
- Demo 专区
- 下载中心
- 聊天互动(含 UI)
- 视频通话(含 UI)
- 推送功能
- 智能客服
- 更多实践
- 无 UI 集成
- 客户端 API
- 服务端 API
- 控制台指南
- 常见问题
- 协议与认证
- IM 政策
- 平滑迁移方案
- 错误码
- 联系我们
本文将介绍如何集成
TUIChat 聊天组件。说明:
从 5.7.1435 版本开始,TUIChat 支持了经典版 UI 组件。
从 6.9.3557 版本开始,TUIChat 新增了全新的简约版 UI 组件。
您可以根据需求自由选择经典版或简约版 UI 组件。
效果展示
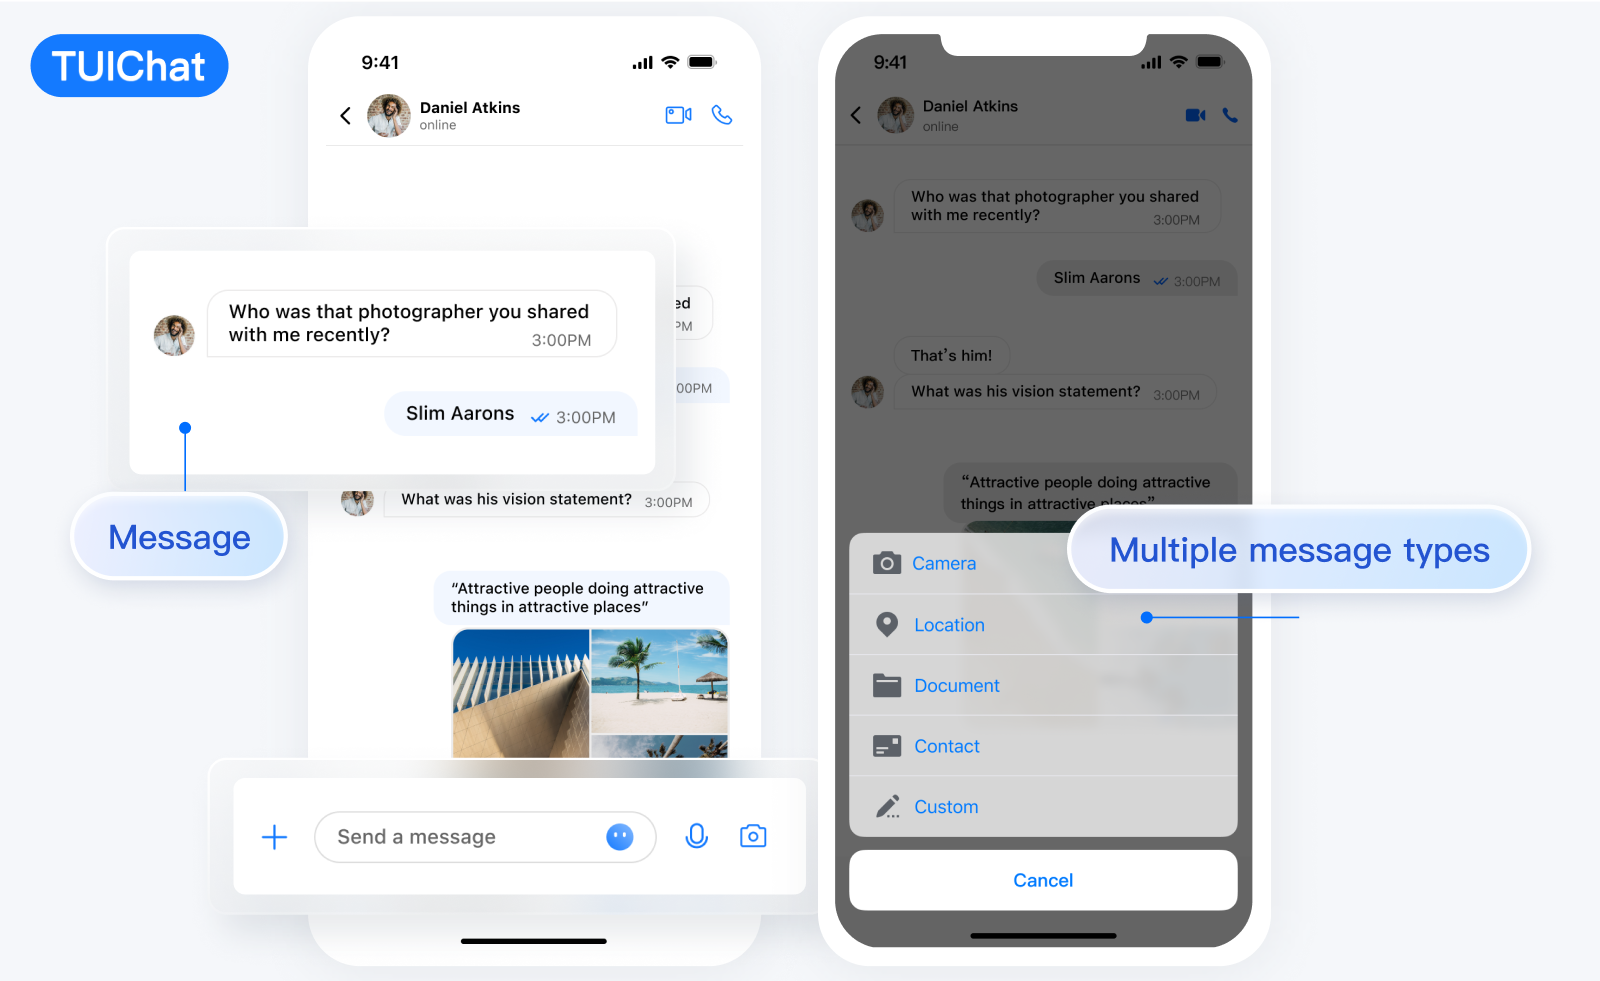
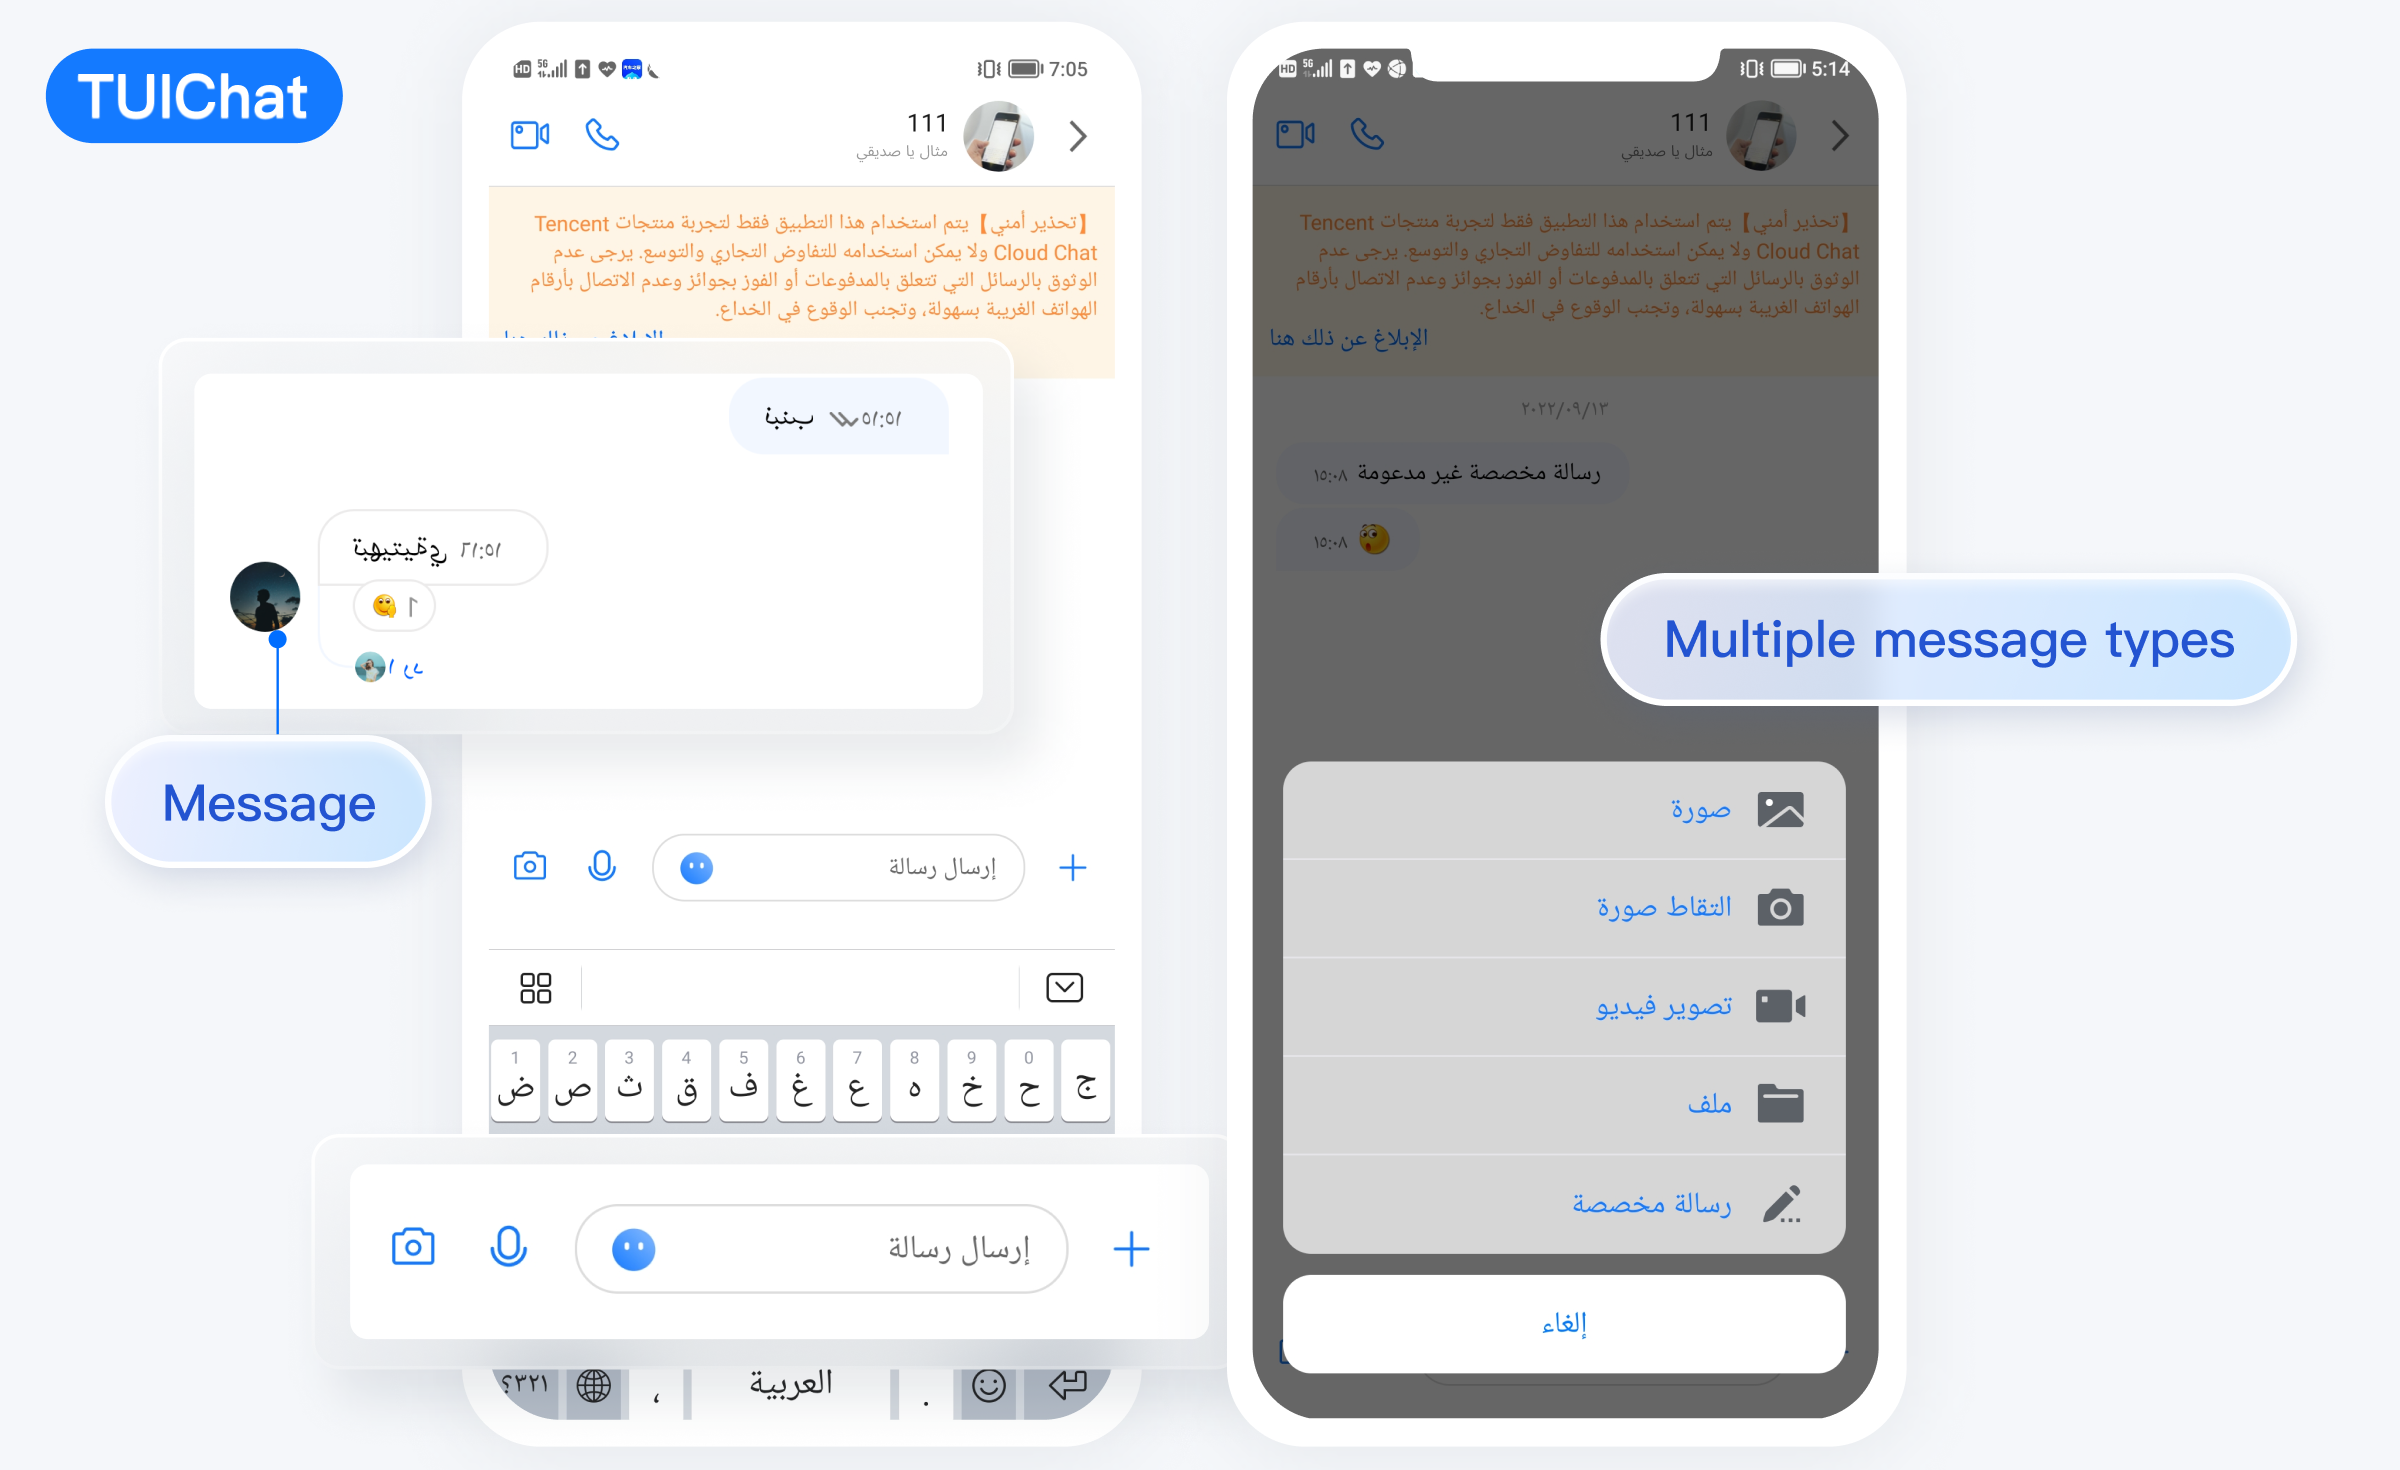
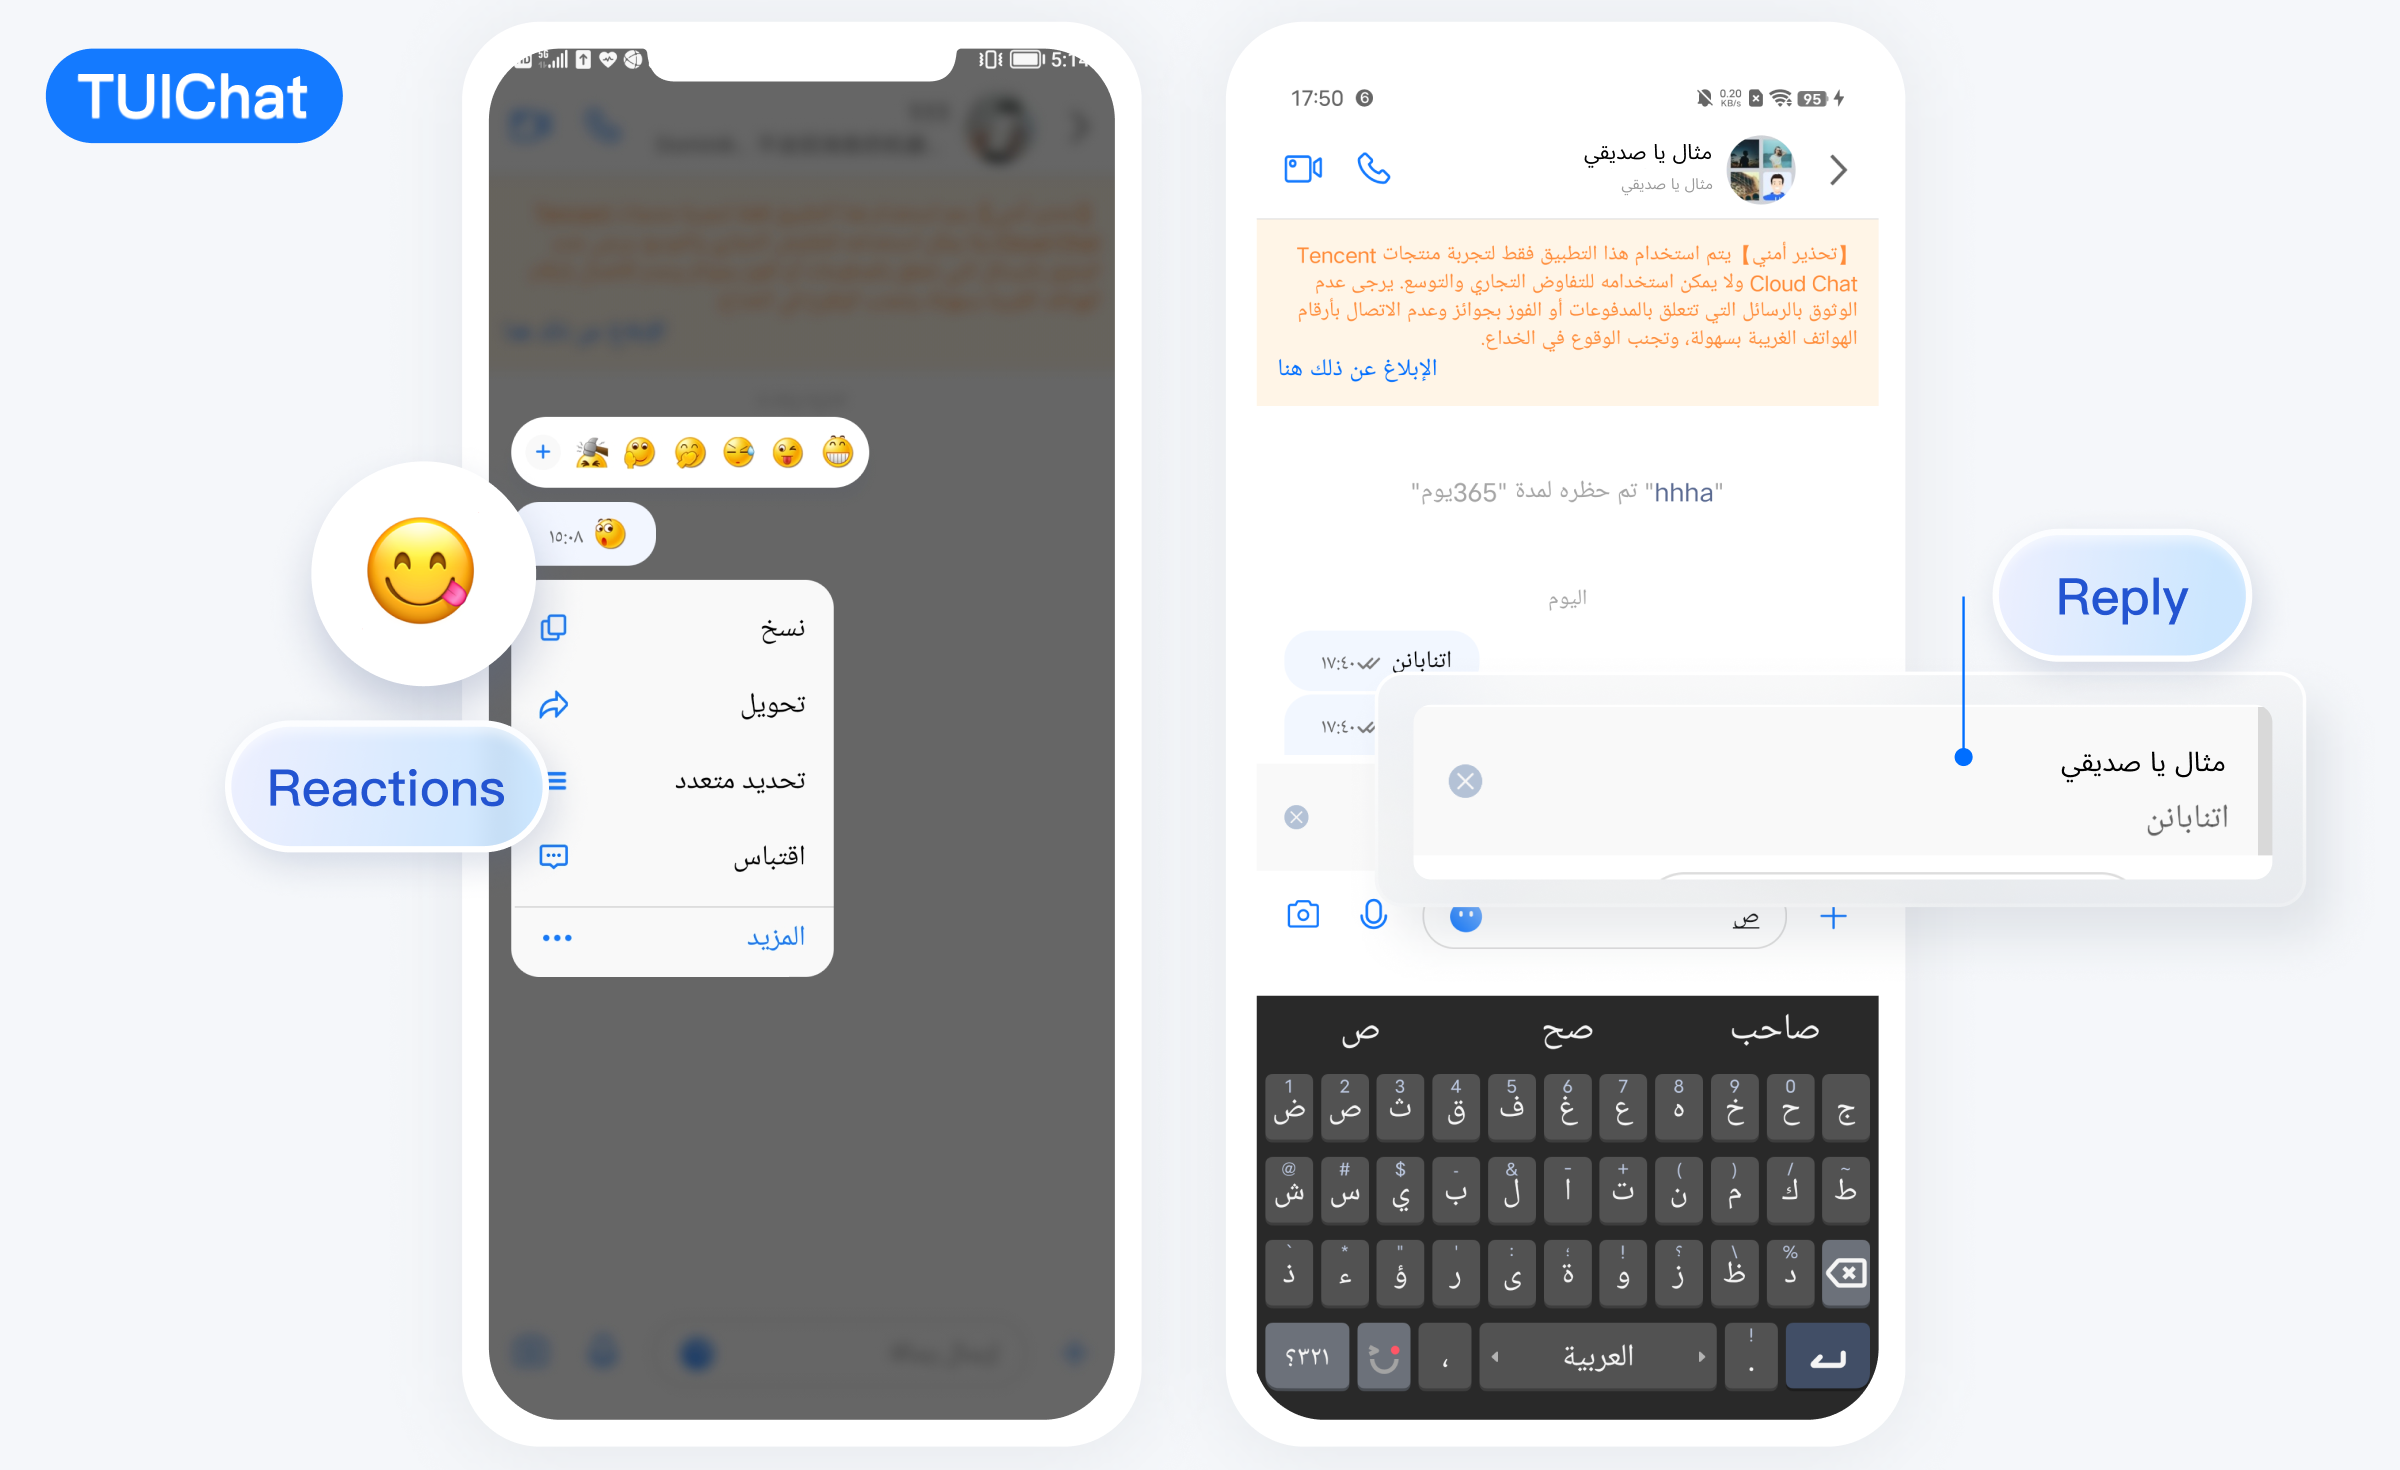
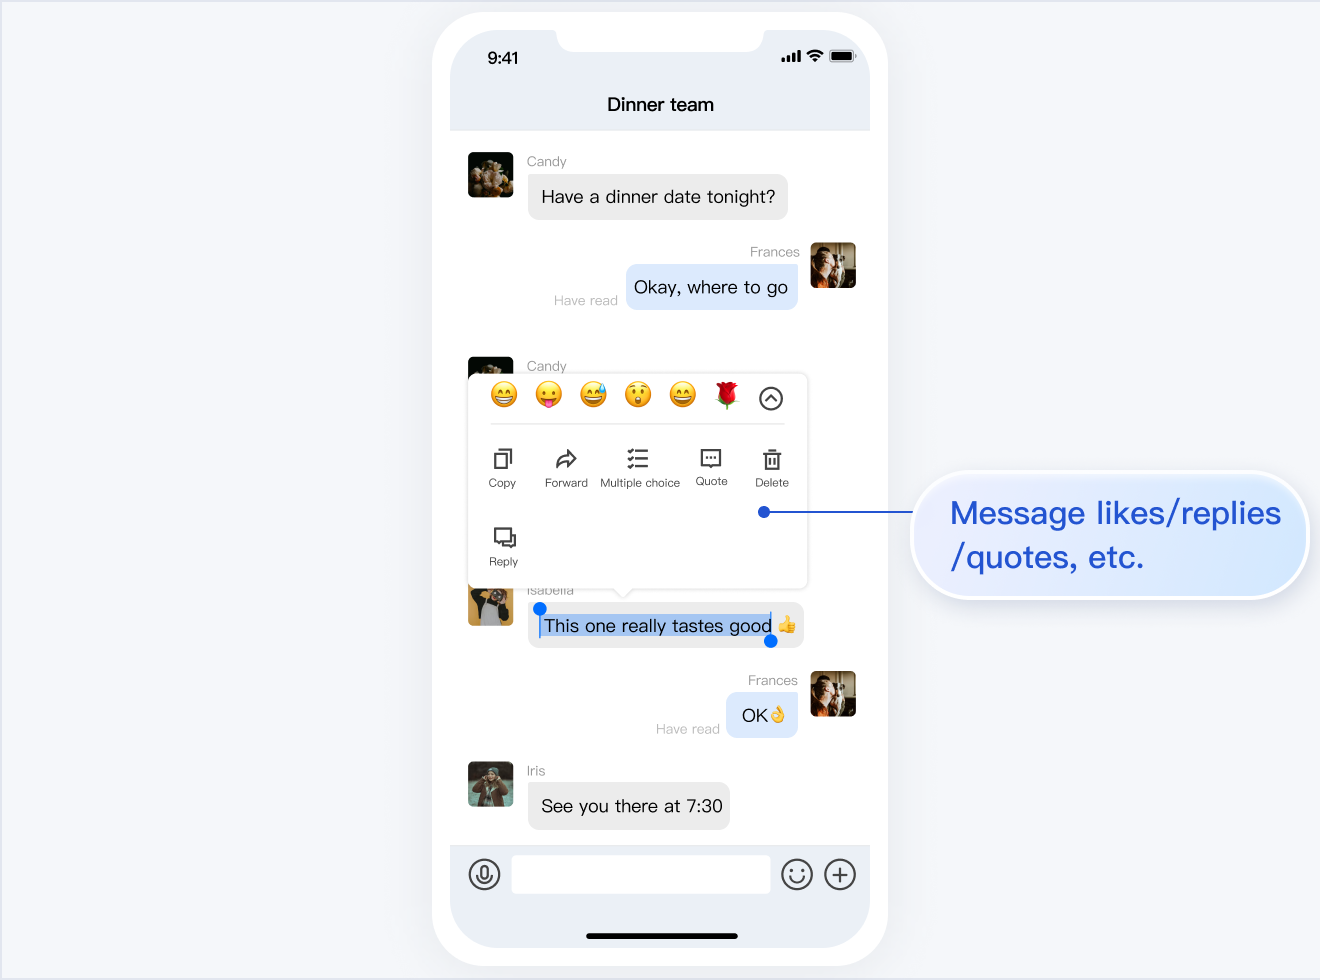
TUIChat 提供了私信聊天(1V1)和群聊(Group)功能,支持对消息的多种操作,例如发送不同类型的消息、对消息长按点赞/回复/引用、查询消息已读回执详情等。您可以仅集成 TUIChat 到您的 App 中。聊天界面使用场景非常广泛,例如房产中介咨询、在线医疗问诊、电商在线客服、保险远程定损等。
界面效果如下图所示:
消息界面 | 发送多种类型消息 |
 |
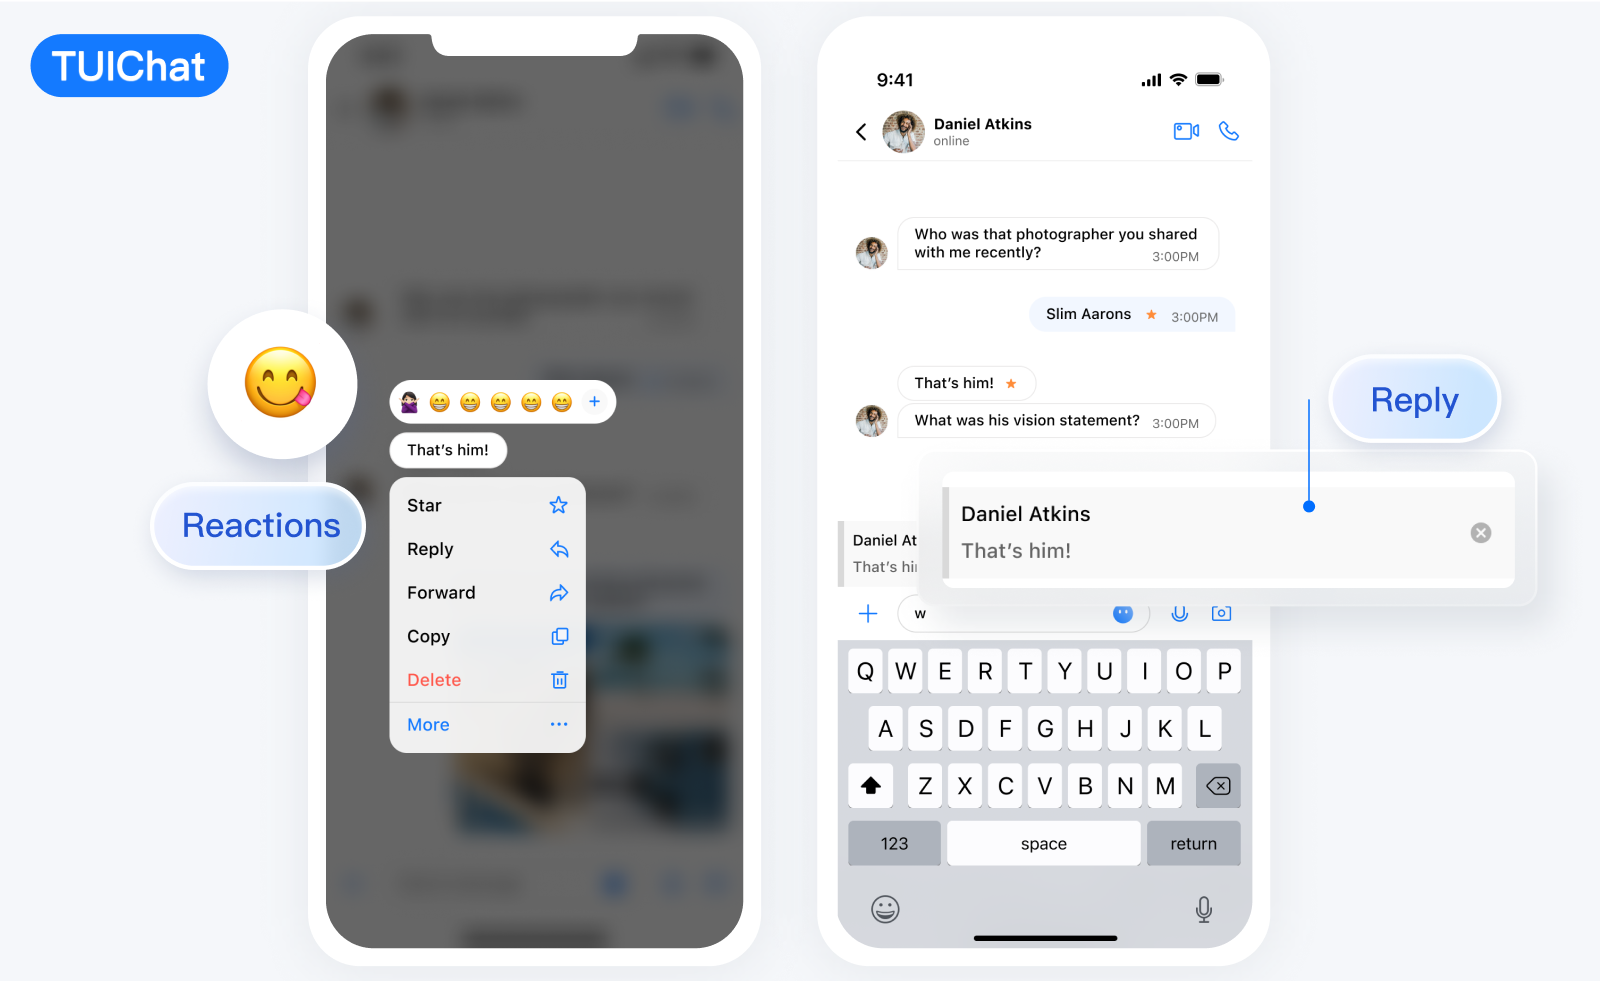
消息点赞 | 回复 |
 |
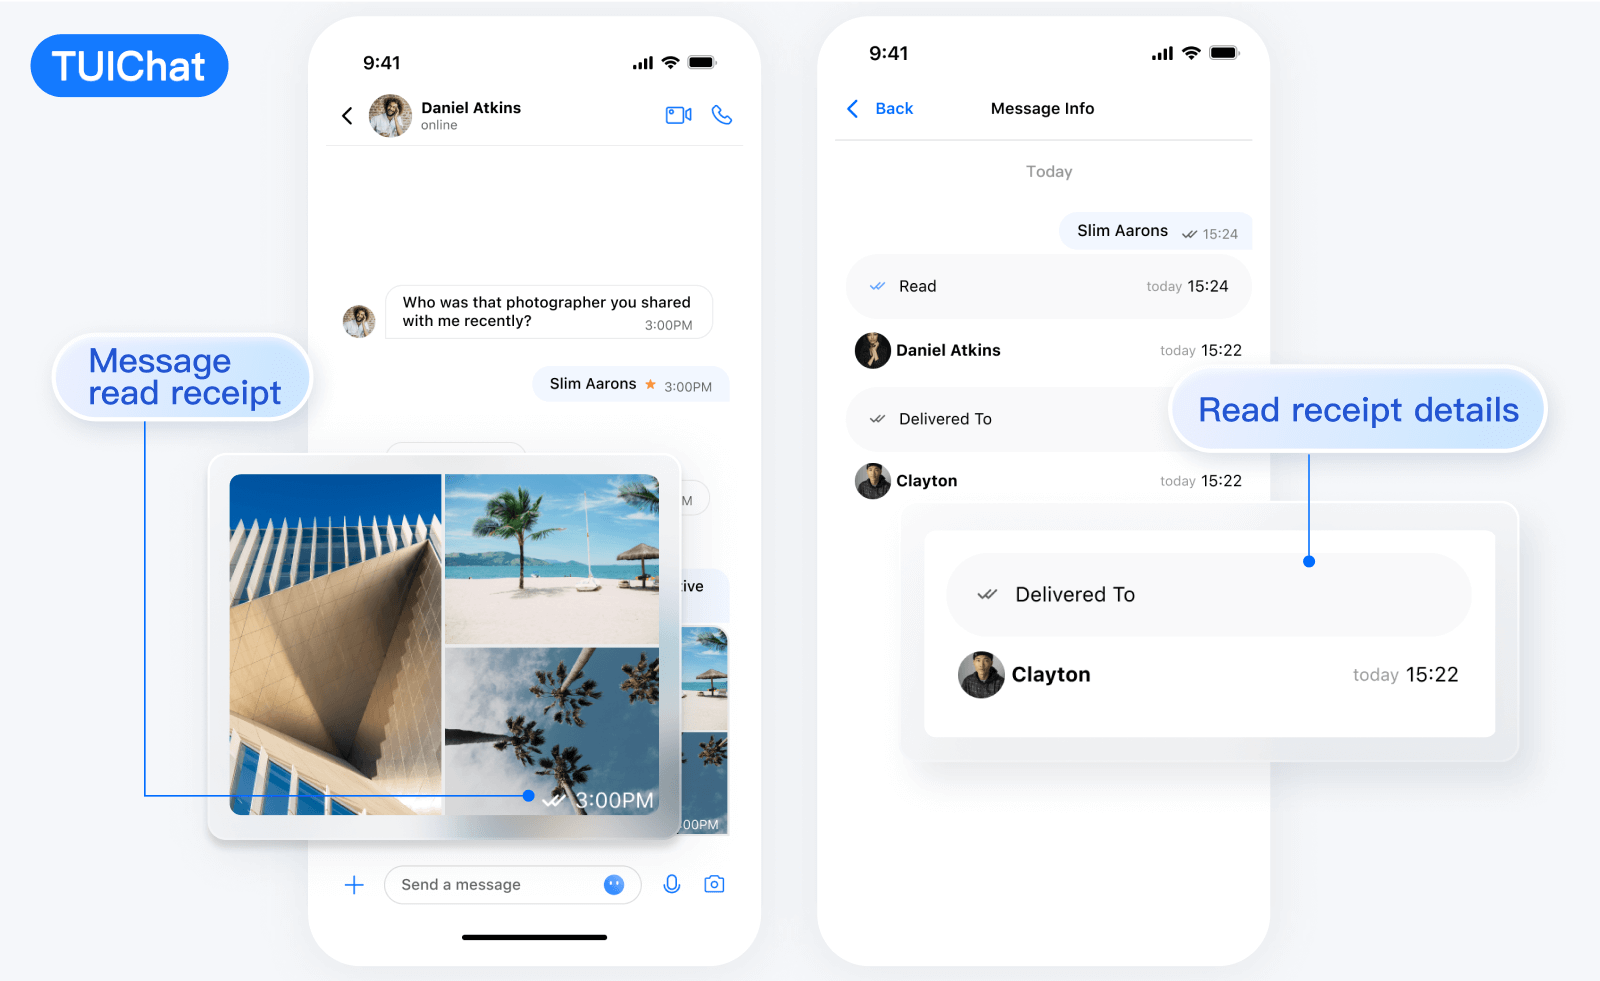
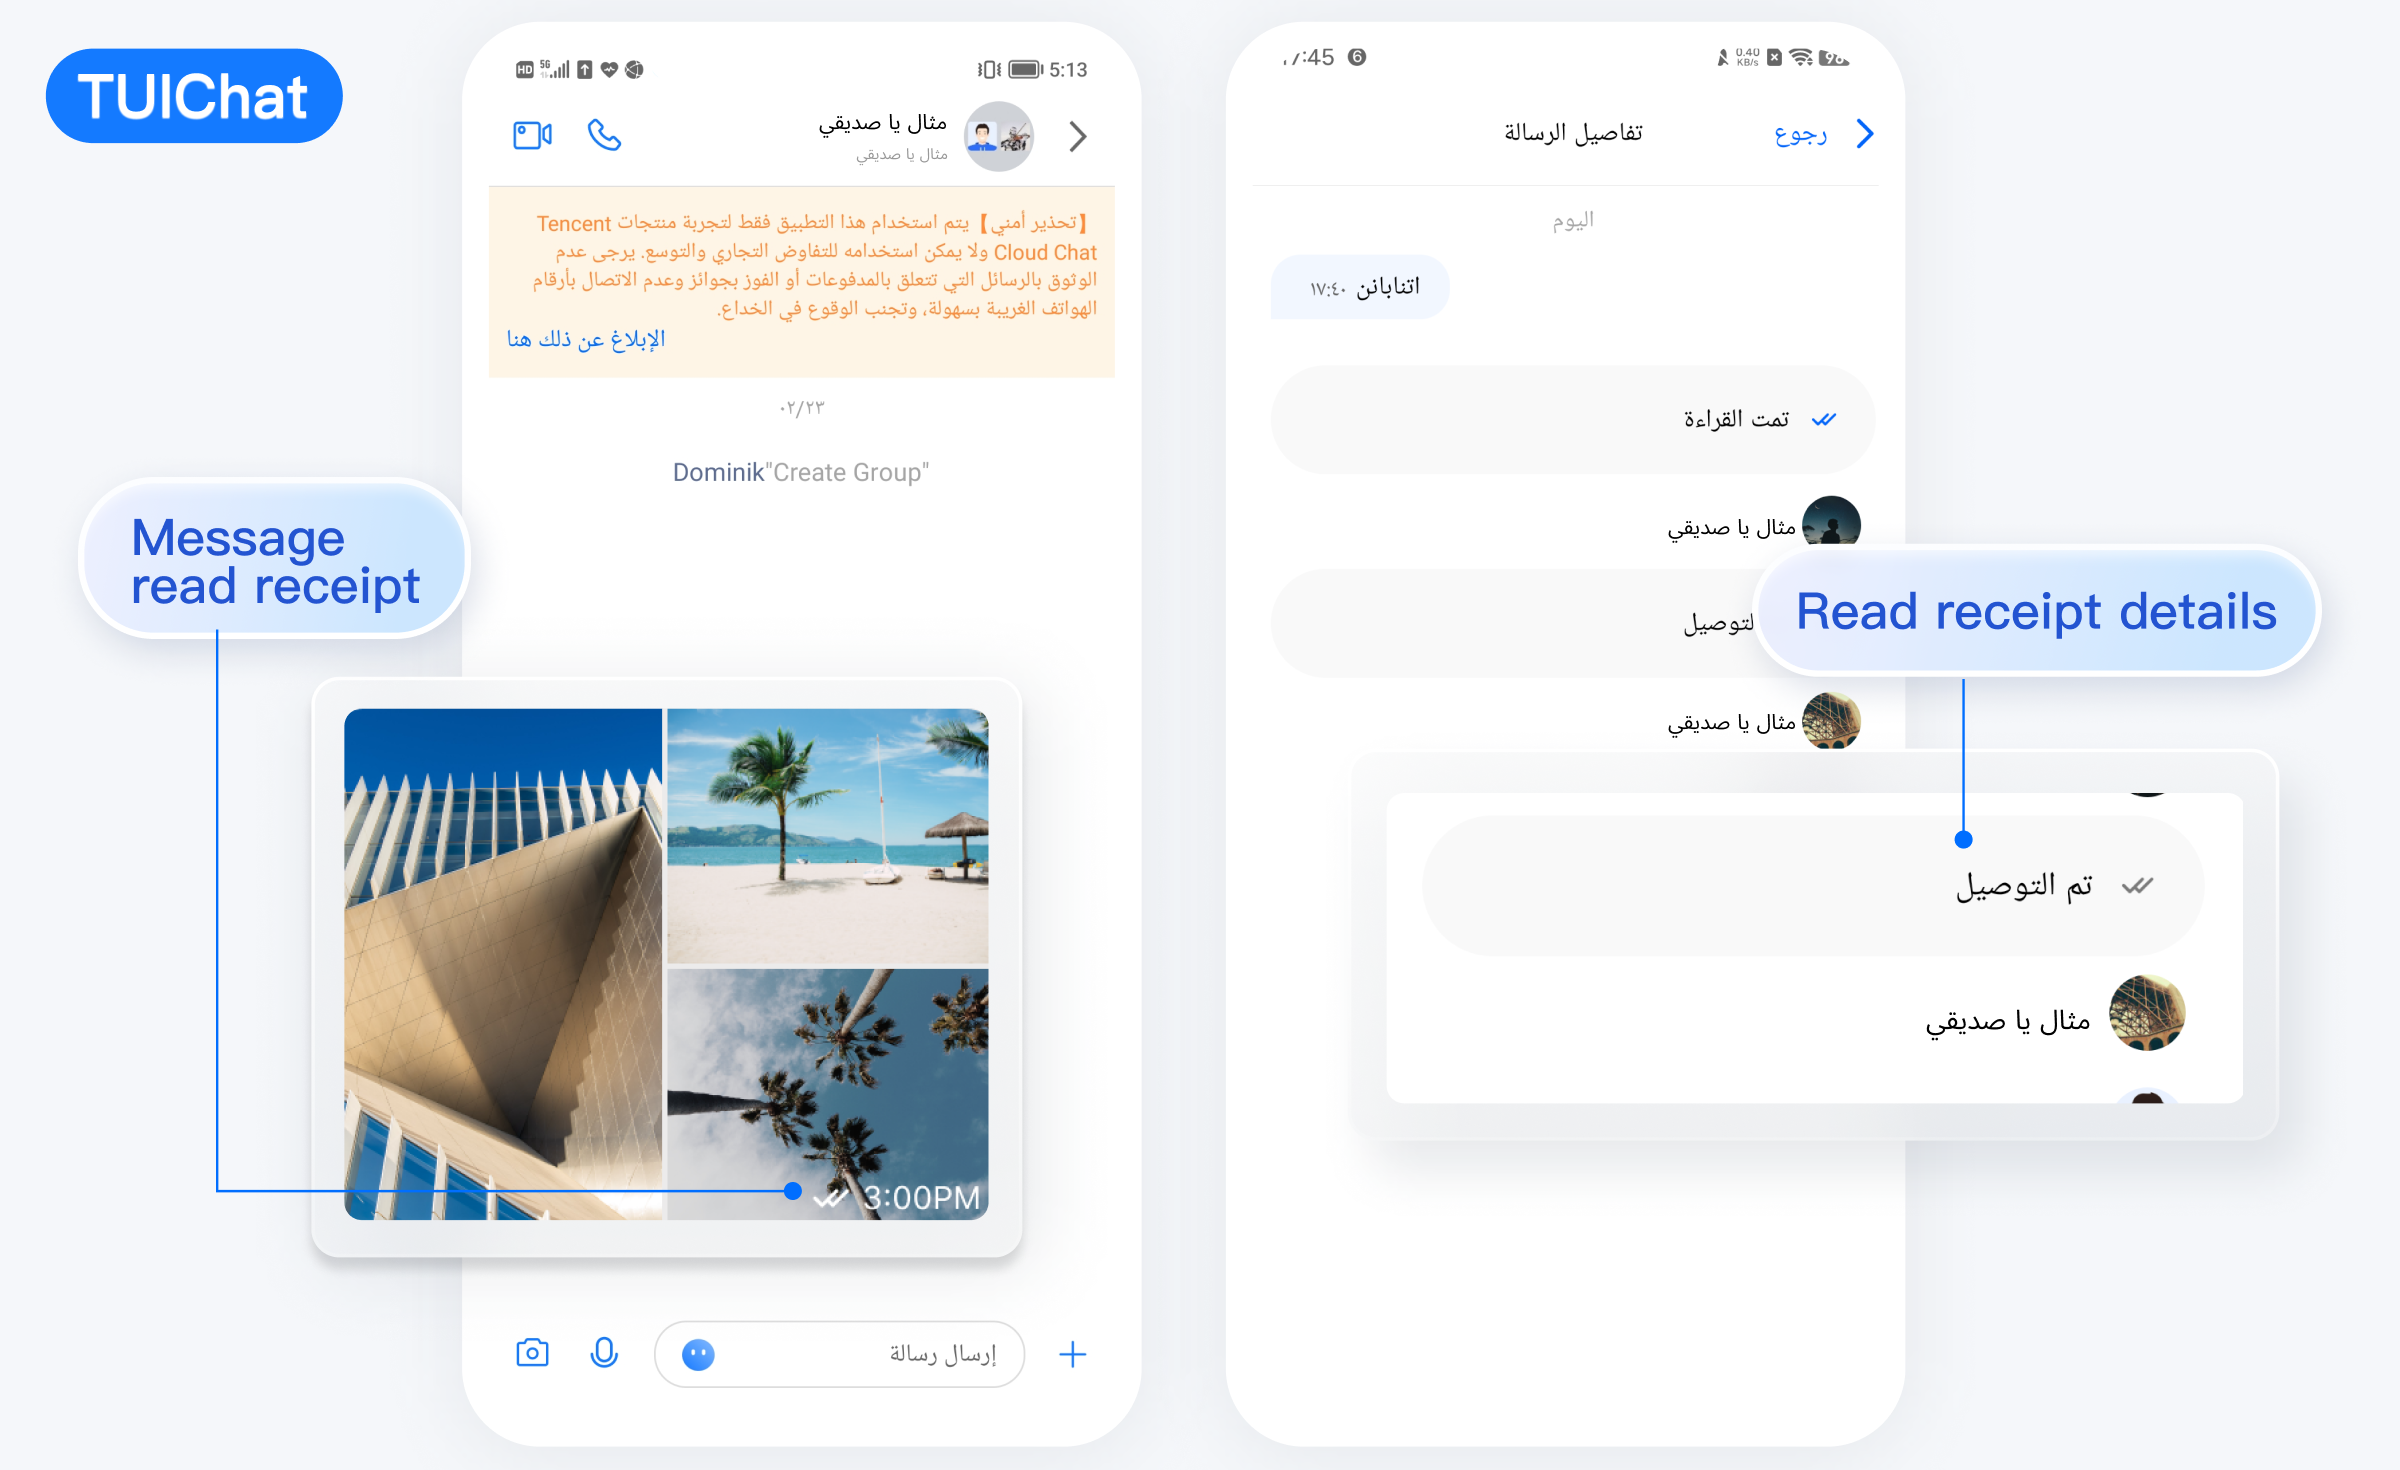
消息已读回执 | 已读回执详情 |
 |
Message Interface | Sending Multiple Types of Messages |
 |
Message Like | Reply |
 |
Message Read Receipt | Read Receipt Details |
 |
消息界面 | 发送多种类型消息 |
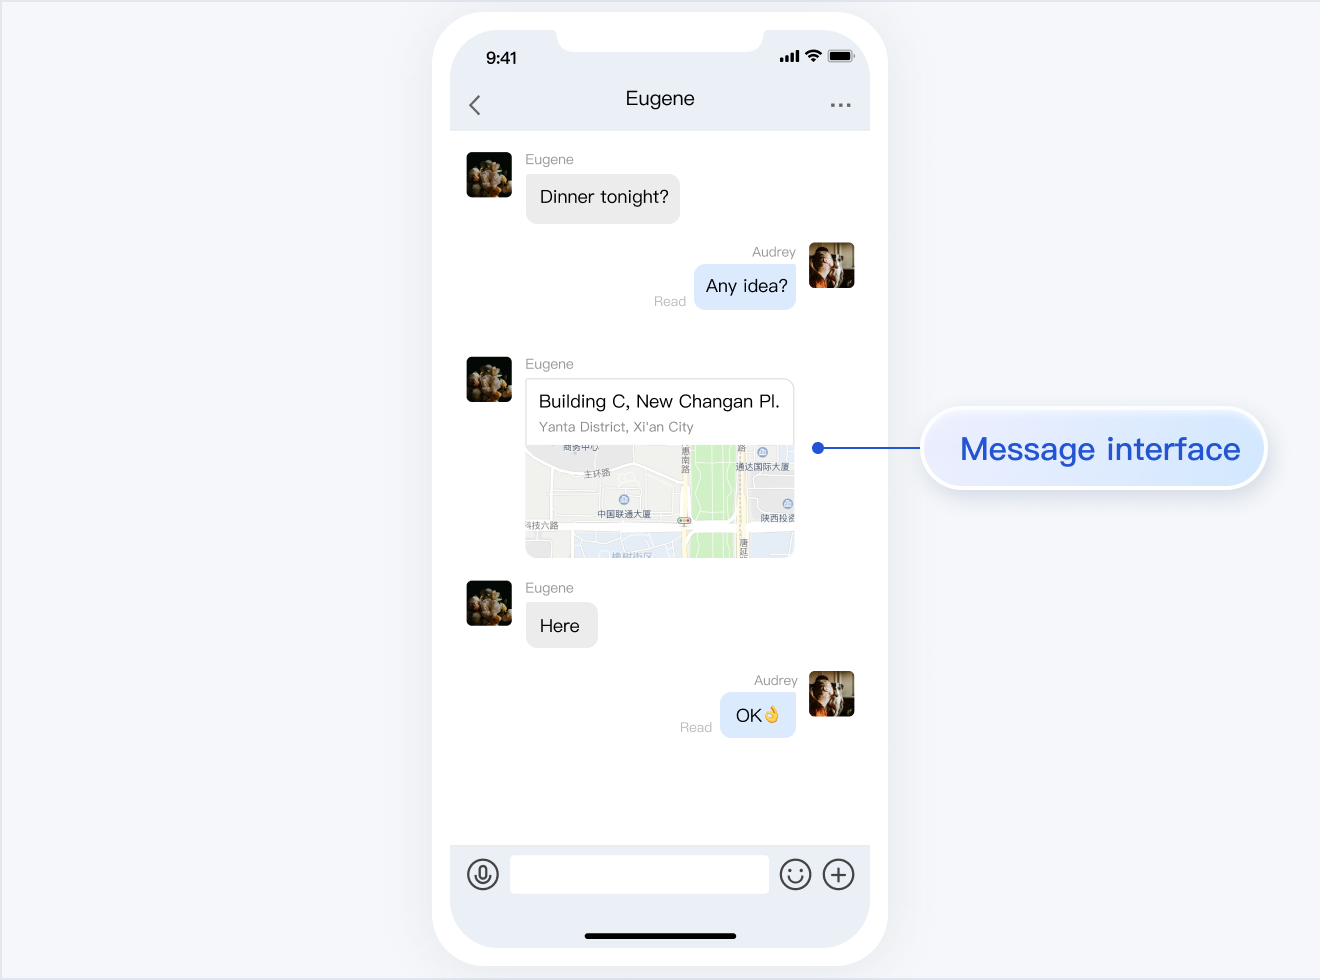 | 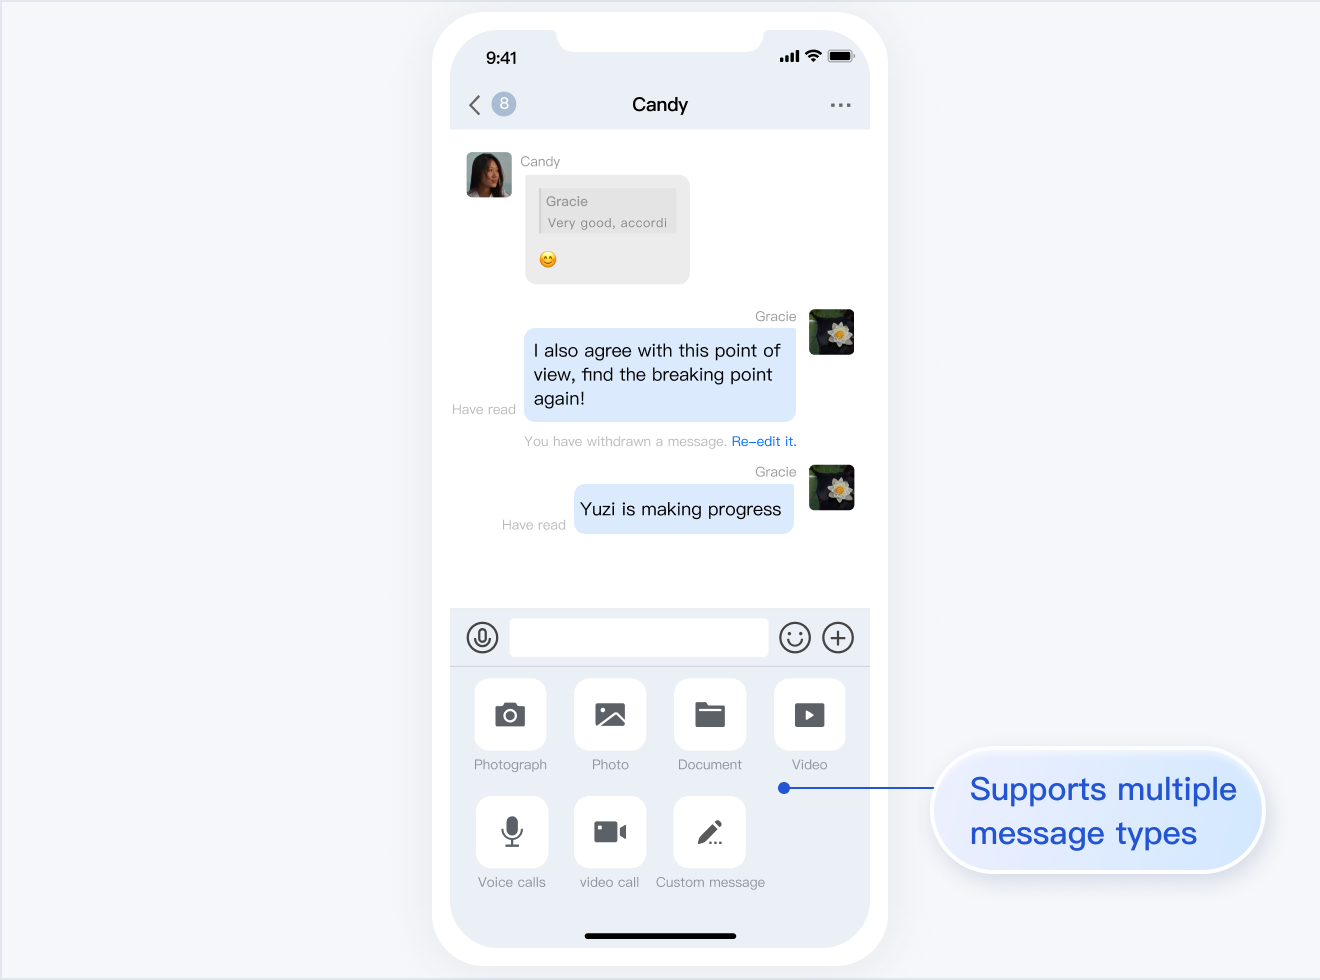 |
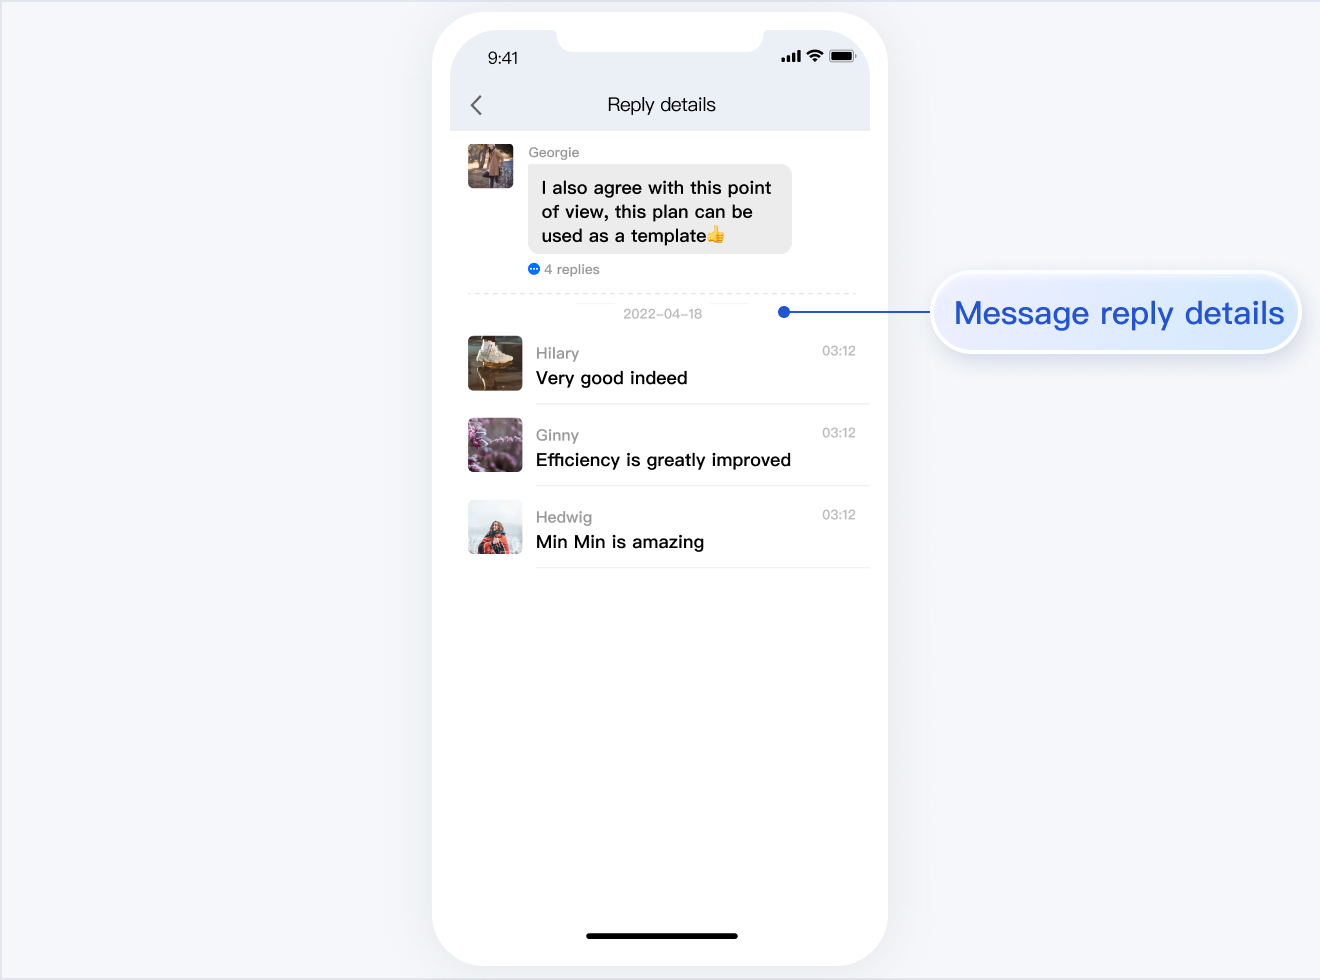
消息点赞/回复/引用 | 消息回复详情 |
 |  |
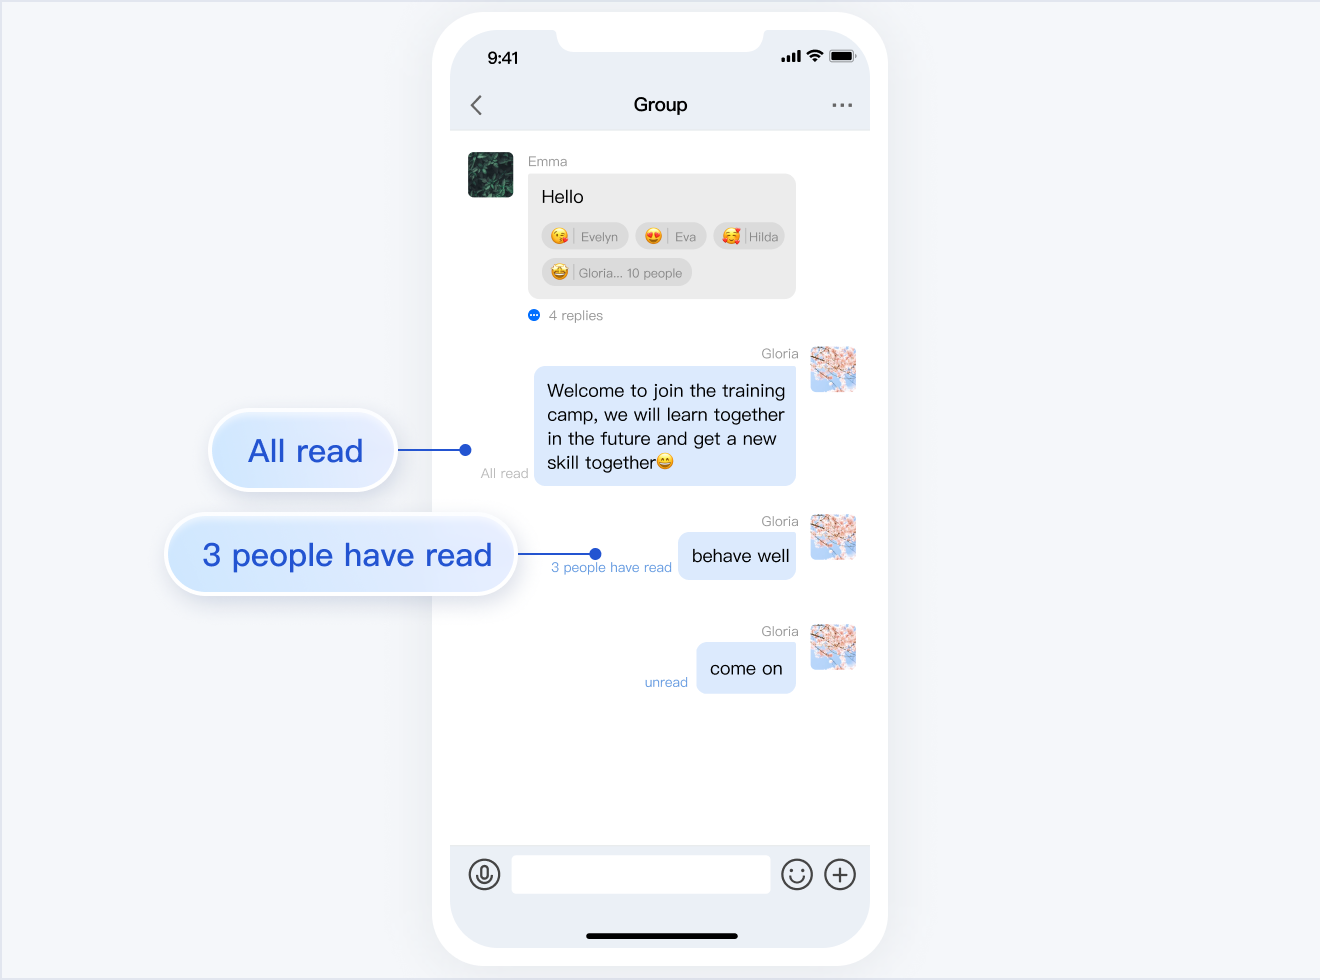
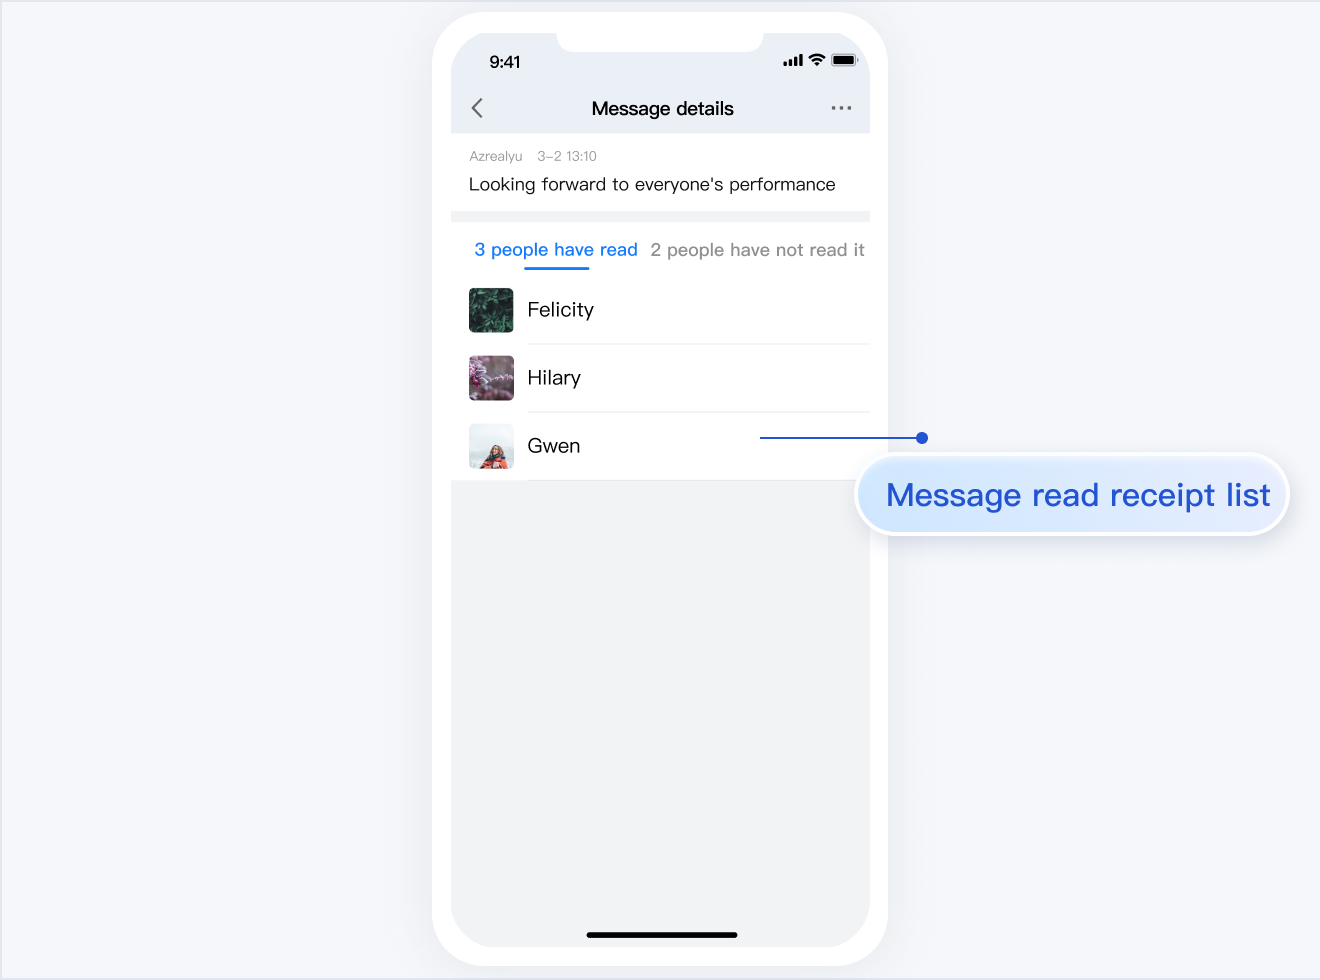
消息已读回执 | 已读回执详情 |
 |  |
开发环境要求
Xcode 10 及以上
iOS 9.0 及以上
CocoaPods 集成
1. 安装 CocoaPods。
在终端窗口中输入如下命令(需要提前在 Mac 中安装 Ruby 环境):
sudo gem install cocoapods
2. 创建 Podfile 文件。
进入项目所在路径输入以下命令行,之后项目路径下会出现一个 Podfile 文件。
pod init
3. 根据业务需求在 Podfile 中添加对应的 TUIChat 组件。您可以按需选择不同的 Podfile 集成方式:
远程 CocoaPods 集成
DevelopmentPods 本地集成
以上两种集成方式的优缺点如下表所示:
集成方式 | 适合场景 | 优点 | 缺点 |
远程 CocoaPods 集成 | 适合无源码修改时的集成。 | 当 TUIChat 有版本更新时,您只需再次 Pod update 即可完成更新。 | 当您有源码修改,使用 Pod update 更新时,新版本的 TUIChat 会覆盖您的修改。 |
本地 DevelopmentPods 集成 | 适合有涉及源码自定义修改的客户。 | 当您有自己的 git 仓库时,可以跟踪修改。修改源码后,使用 Pod update 更新其他远程 Pod 库时,不会覆盖您的修改。 | 您需要手动将 TUIChat 源码覆盖您本地 TUIChat 文件夹进行更新。 |
远程 CocoaPods 集成
您可以在 Podfile 中添加 TUIChat 组件库:
# Uncomment the next line to define a global platform for your project.source 'https://github.com/CocoaPods/Specs.git'platform :ios, '13.0'# Prevent `*.xcassets` in TUIChat components from conflicting with your project.install! 'cocoapods', :disable_input_output_paths => true# Replace `your_project_name` with your actual project name.target 'your_project_name' douse_frameworks!# Enable modular headers as needed. Only after you enable modular headers, the Pod module can be imported using @import.# use_modular_headers!# Integrate the chat feature.pod 'TUIChat/UI_Minimalist'end#Pods configpost_install do |installer|installer.pods_project.targets.each do |target|target.build_configurations.each do |config|#Fix Xcode14 Bundle target errorconfig.build_settings['EXPANDED_CODE_SIGN_IDENTITY'] = ""config.build_settings['CODE_SIGNING_REQUIRED'] = "NO"config.build_settings['CODE_SIGNING_ALLOWED'] = "NO"config.build_settings['ENABLE_BITCODE'] = "NO"config.build_settings['IPHONEOS_DEPLOYMENT_TARGET'] = "13.0"#Fix Xcode15 other links flag -ld64xcode_version = `xcrun xcodebuild -version | grep Xcode | cut -d' ' -f2`.to_fif xcode_version >= 15xcconfig_path = config.base_configuration_reference.real_pathxcconfig = File.read(xcconfig_path)if xcconfig.include?("OTHER_LDFLAGS") == falsexcconfig = xcconfig + "\\n" + 'OTHER_LDFLAGS = $(inherited) "-ld64"'elseif xcconfig.include?("OTHER_LDFLAGS = $(inherited)") == falsexcconfig = xcconfig.sub("OTHER_LDFLAGS", "OTHER_LDFLAGS = $(inherited)")endif xcconfig.include?("-ld64") == falsexcconfig = xcconfig.sub("OTHER_LDFLAGS = $(inherited)", 'OTHER_LDFLAGS = $(inherited) "-ld64"')endendFile.open(xcconfig_path, "w") { |file| file << xcconfig }endendendend
# Uncomment the next line to define a global platform for your project.source 'https://github.com/CocoaPods/Specs.git'# Prevent `*.xcassets` in TUIChat components from conflicting with your project.install! 'cocoapods', :disable_input_output_paths => true# Replace your_project_name with your actual project name.target 'your_project_name' douse_frameworks!# Enable modular headers as needed. Only after you enable modular headers, the Pod module can be imported using @import.# use_modular_headers!# Integrate the chat feature.pod 'TUIChat/UI_Classic'end#Pods configpost_install do |installer|installer.pods_project.targets.each do |target|target.build_configurations.each do |config|#Fix Xcode14 Bundle target errorconfig.build_settings['EXPANDED_CODE_SIGN_IDENTITY'] = ""config.build_settings['CODE_SIGNING_REQUIRED'] = "NO"config.build_settings['CODE_SIGNING_ALLOWED'] = "NO"config.build_settings['ENABLE_BITCODE'] = "NO"config.build_settings['IPHONEOS_DEPLOYMENT_TARGET'] = "13.0"#Fix Xcode15 other links flag -ld64xcode_version = `xcrun xcodebuild -version | grep Xcode | cut -d' ' -f2`.to_fif xcode_version >= 15xcconfig_path = config.base_configuration_reference.real_pathxcconfig = File.read(xcconfig_path)if xcconfig.include?("OTHER_LDFLAGS") == falsexcconfig = xcconfig + "\\n" + 'OTHER_LDFLAGS = $(inherited) "-ld64"'elseif xcconfig.include?("OTHER_LDFLAGS = $(inherited)") == falsexcconfig = xcconfig.sub("OTHER_LDFLAGS", "OTHER_LDFLAGS = $(inherited)")endif xcconfig.include?("-ld64") == falsexcconfig = xcconfig.sub("OTHER_LDFLAGS = $(inherited)", 'OTHER_LDFLAGS = $(inherited) "-ld64"')endendFile.open(xcconfig_path, "w") { |file| file << xcconfig }endendendend
说明:
如果您直接
pod 'TUIChat',不指定经典版或简约版,默认会集成两套版本 UI 组件。 如果您使用的是 Swift,请开启
use_modular_headers! ,并将头文件引用改成 @import 模块名形式引用。Podfile 修改完毕后,执行以下命令,安装 TUIChat 组件。
pod install
如果无法安装 TUIChat 最新版本,执行以下命令更新本地的 CocoaPods 仓库列表。
pod repo update
之后执行以下命令,更新组件库的 Pod 版本。
pod update
集成 TUIChat 组件后的项目结构:
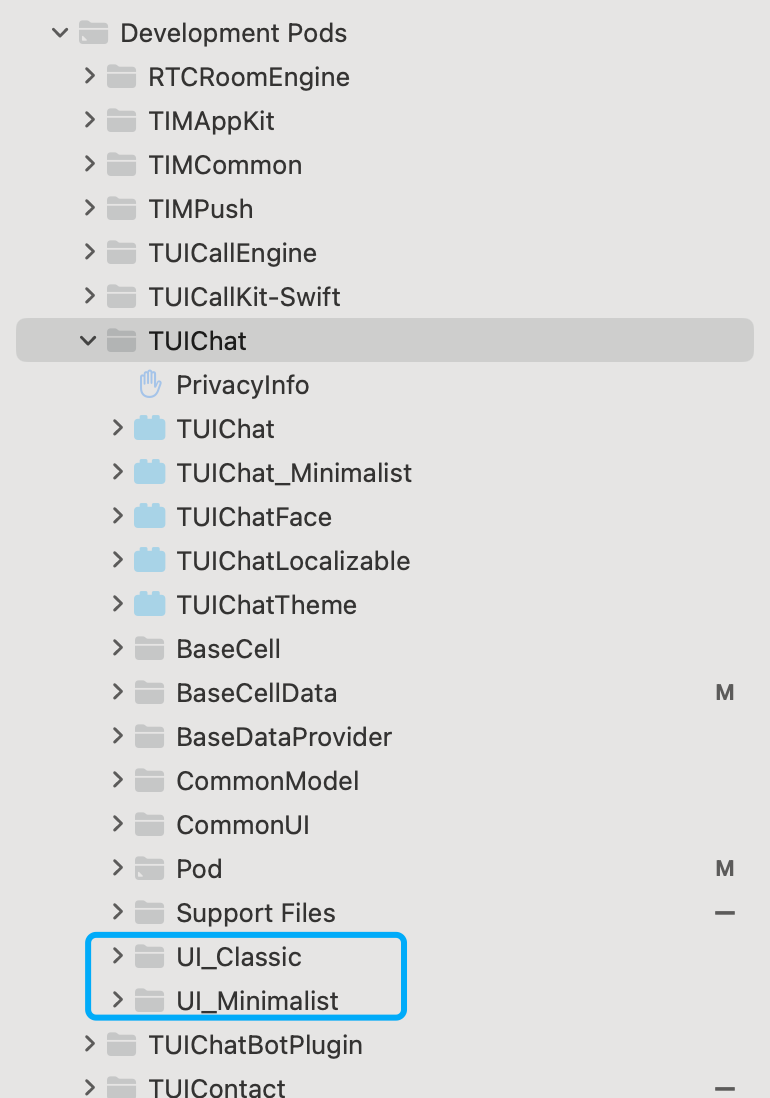
注意:
若您操作遇到错误,可查阅文末的常见问题。
本地 DevelopmentPods 源码集成
1. 从 GitHub 下载 TUIChat 源码。直接拖入您的工程目录下,如:
TestTUIKitIM/TUIKit/TUIChat。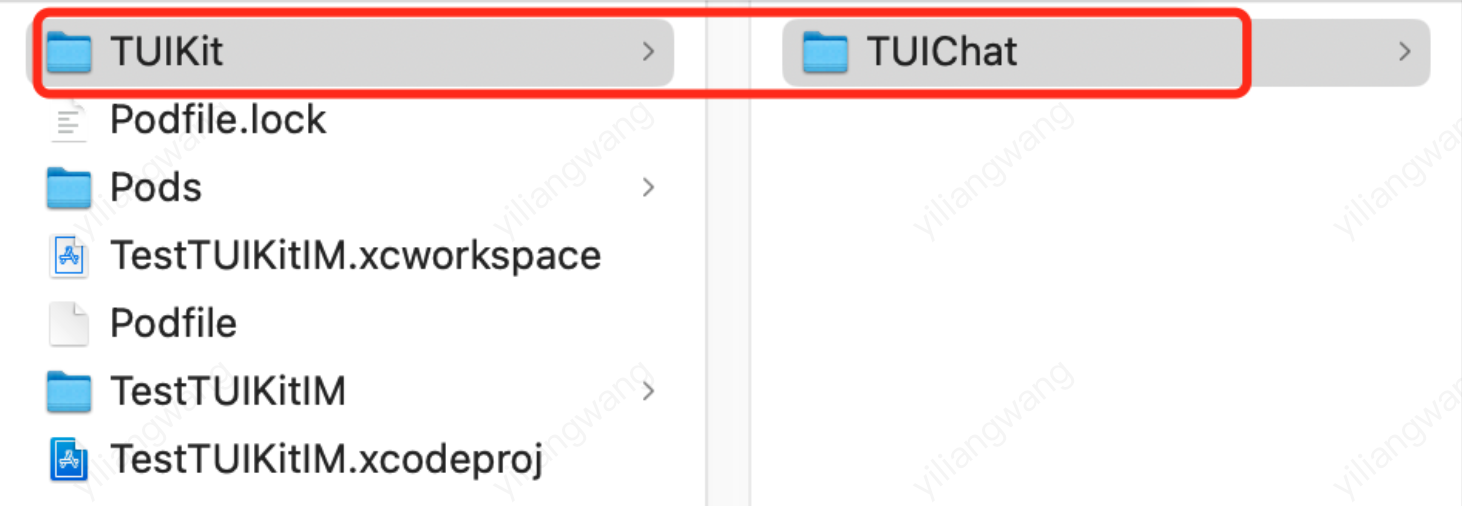
2. 修改您 Podfile 中每个组件的本地路径。path 是 TUIChat 文件夹相对于您工程 Podfile 文件的位置,常见的有:
TUIChat 文件夹位于您工程 Podfile 文件父目录:
pod 'TUIChat', :path => "../TUIKit/TUIChat"TUIChat 文件夹位于您工程 Podfile 文件当前目录:
pod 'TUIChat', :path => "/TUIKit/TUIChat"TUIChat 文件夹位于您工程 Podfile 文件子目录:
pod 'TUIChat', :path => "./TUIKit/TUIChat"以 TUIChat 文件夹位于您工程 Podfile 文件父目录为例:
# Uncomment the next line to define a global platform for your project.source 'https://github.com/CocoaPods/Specs.git'platform :ios, '13.0'install! 'cocoapods', :disable_input_output_paths => true# Replace `your_project_name` with your actual project name.target 'your_project_name' do# Uncomment the next line if you're using Swift or would like to use dynamic frameworks.use_frameworks!use_modular_headers!# Note: When using the local integration solution, upgrade by downloading the latest component code from https://github.com/TencentCloud/TIMSDK/tree/master/iOS/TUIKit/TUIChat# and placing it in the designated local directory, such as /TIMSDK/ios/TUIKit/TUIChat# Note: When private modifications conflict with remote changes, manual merging is required to resolve conflicts.# Integrate the basic library (required).pod 'TUICore', :path => "../TUIKit/TUICore"pod 'TIMCommon', :path => "../TUIKit/TIMCommon"# Integrate the chat feature.pod 'TUIChat', :path => "../TUIKit/TUIChat"# Other Podpod 'MJRefresh'pod 'Masonry'end#Pods configpost_install do |installer|installer.pods_project.targets.each do |target|target.build_configurations.each do |config|#Fix Xcode14 Bundle target errorconfig.build_settings['EXPANDED_CODE_SIGN_IDENTITY'] = ""config.build_settings['CODE_SIGNING_REQUIRED'] = "NO"config.build_settings['CODE_SIGNING_ALLOWED'] = "NO"config.build_settings['ENABLE_BITCODE'] = "NO"config.build_settings['IPHONEOS_DEPLOYMENT_TARGET'] = "13.0"#Fix Xcode15 other links flag -ld64xcode_version = `xcrun xcodebuild -version | grep Xcode | cut -d' ' -f2`.to_fif xcode_version >= 15xcconfig_path = config.base_configuration_reference.real_pathxcconfig = File.read(xcconfig_path)if xcconfig.include?("OTHER_LDFLAGS") == falsexcconfig = xcconfig + "\\n" + 'OTHER_LDFLAGS = $(inherited) "-ld64"'elseif xcconfig.include?("OTHER_LDFLAGS = $(inherited)") == falsexcconfig = xcconfig.sub("OTHER_LDFLAGS", "OTHER_LDFLAGS = $(inherited)")endif xcconfig.include?("-ld64") == falsexcconfig = xcconfig.sub("OTHER_LDFLAGS = $(inherited)", 'OTHER_LDFLAGS = $(inherited) "-ld64"')endendFile.open(xcconfig_path, "w") { |file| file << xcconfig }endendendend
3. Podfile 修改完毕后,执行以下命令,安装本地 TUIChat 组件。示例:
pod install
注意:
使用本地集成方案时,如需升级时可进入 Github-TUIChat 升级。
获取最新的组件代码,覆盖本地目录如:TIMSDK/iOS/TUIKit/TUIChat。
当私有化修改和远端有冲突时,需要手动合并,处理冲突。
TUIChat 插件需要依赖 TUICore 的版本,务必确保插件版本和 "../TUIKit/TUICore/TUICore.spec"中的 spec.version 一致。
若您操作遇到错误,可查阅文末的常见问题。
构建聊天界面
常见问题
Xcode15 常见问题
集成时报错 [Xcodeproj] Unknown object version (60). (RuntimeError)

使用 Xcode15 创建新工程来集成 TUIChat 时,输入
pod install 后,可能会遇到此问题,原因是使用了较旧版本的 CocoaPods ,此时有两种解决办法:解决方式一: 修改 Xcode 工程的
Project Format 版本为 Xcode13.0。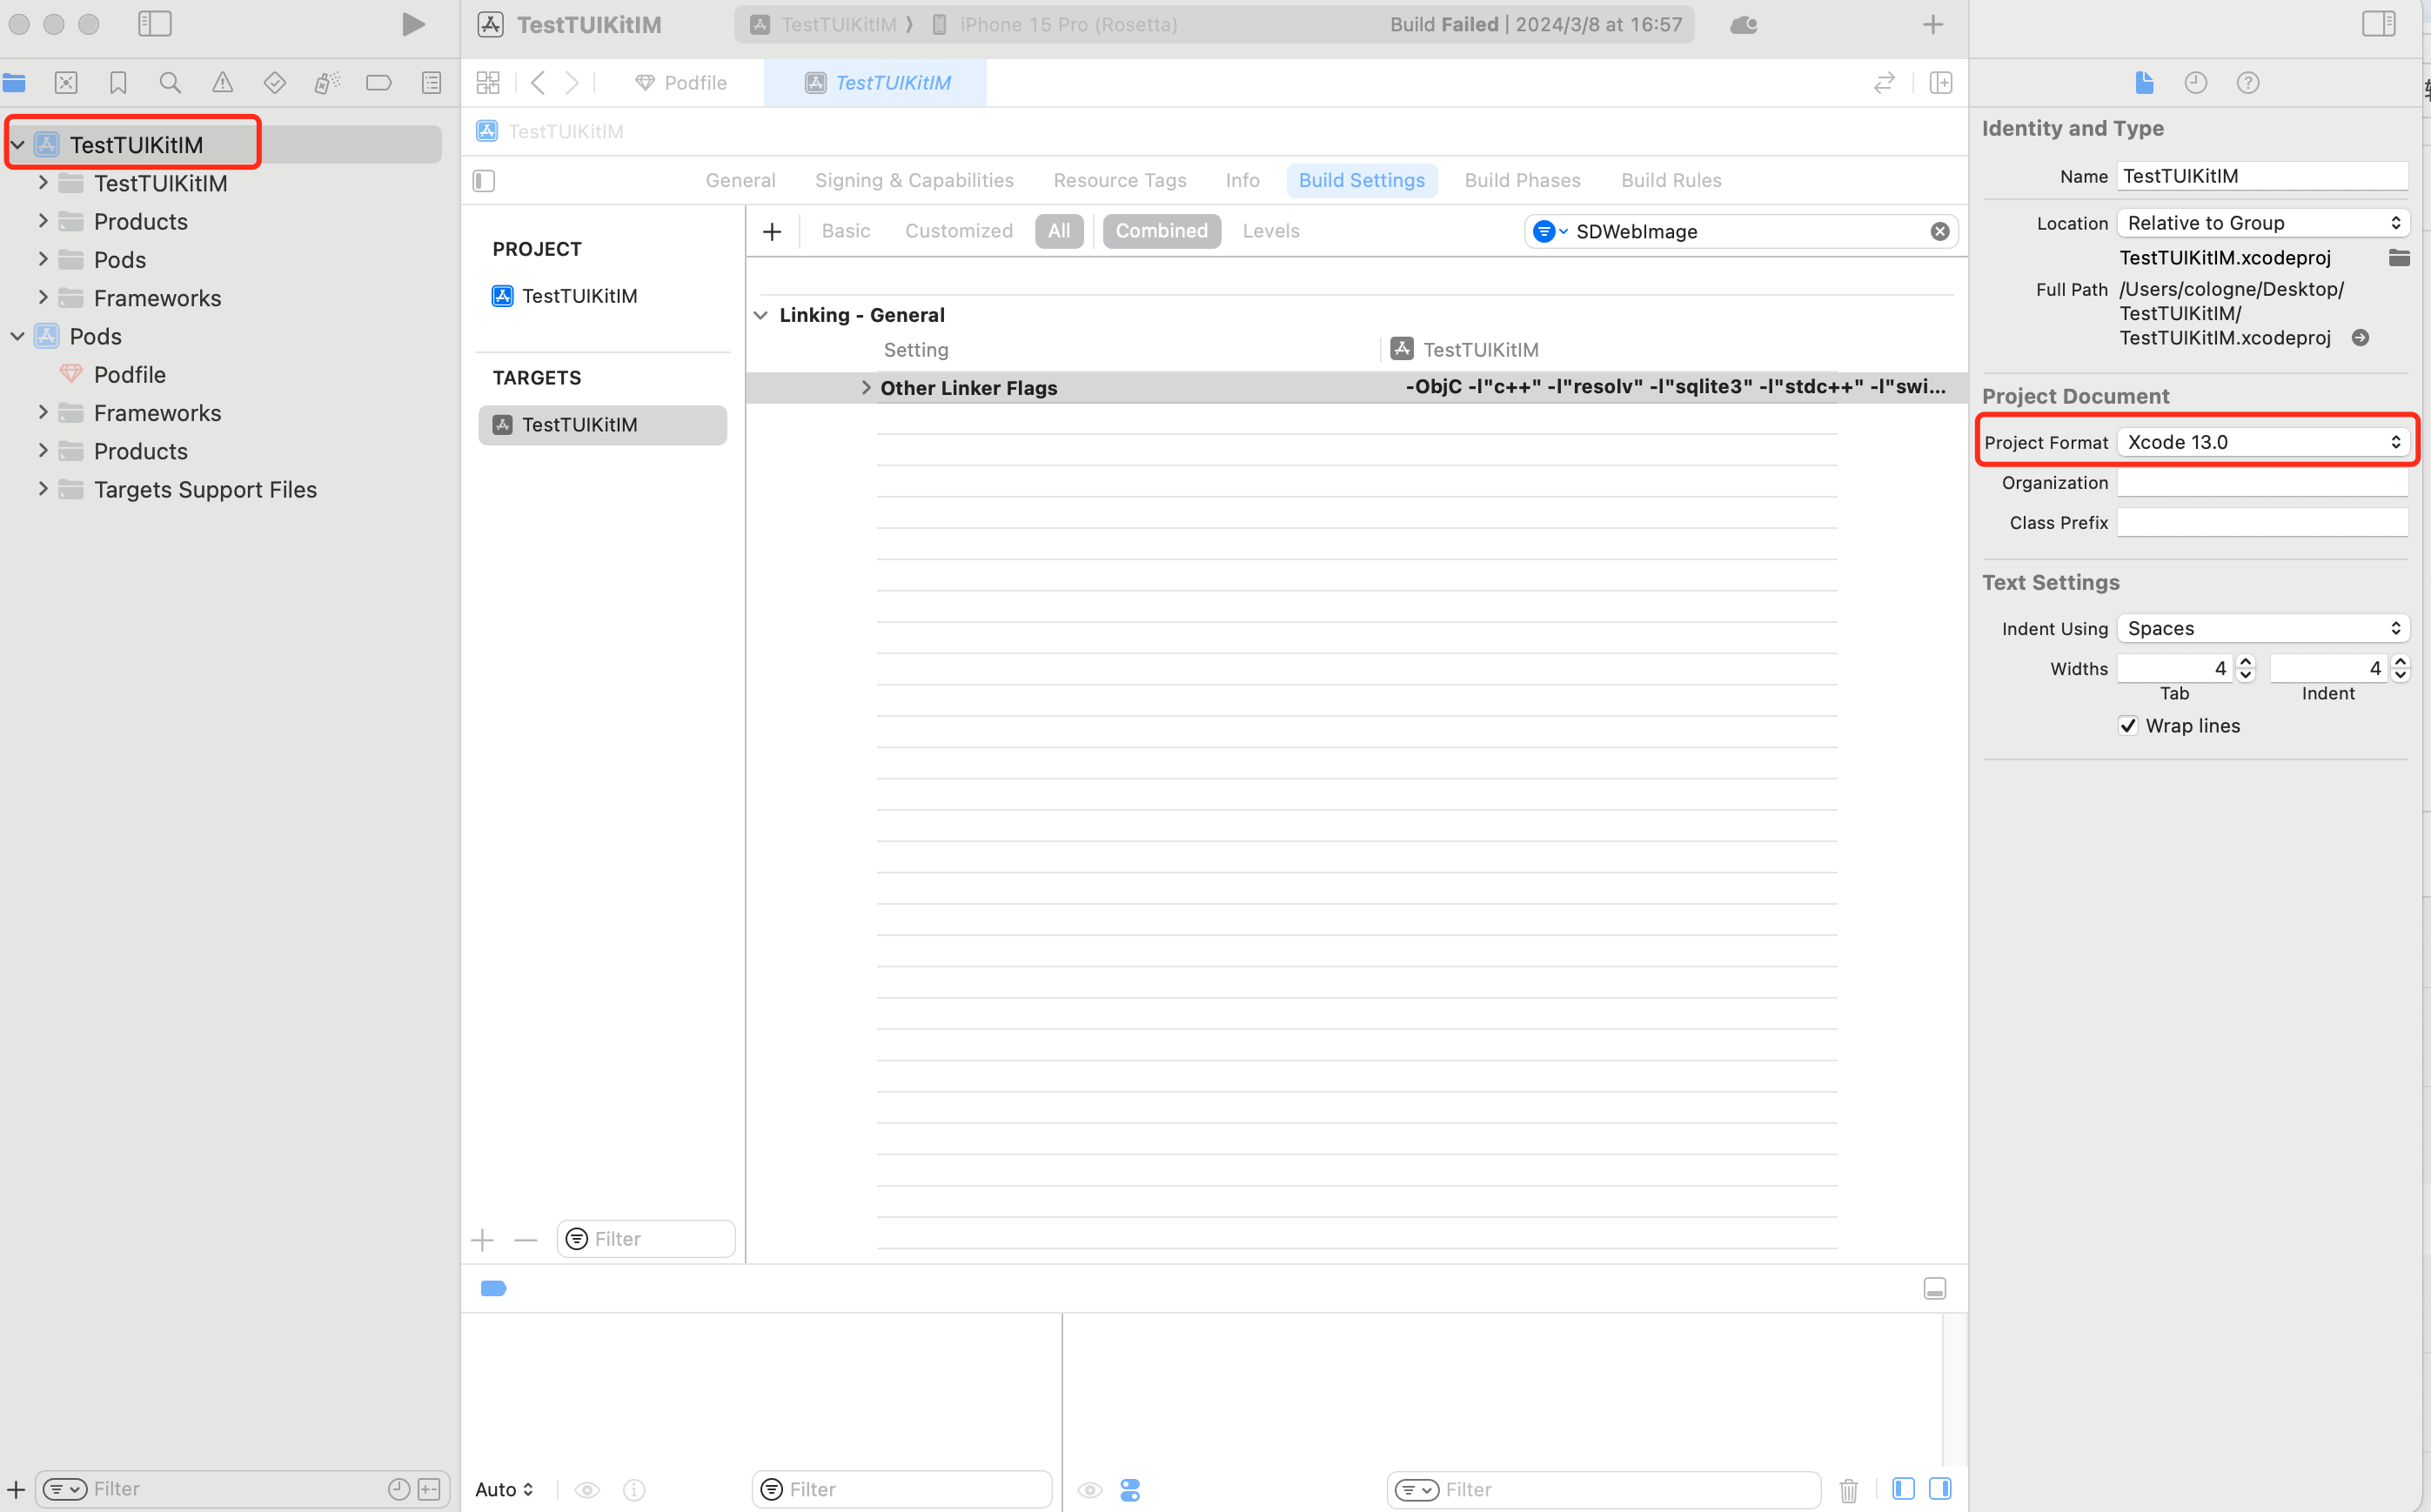
解决方式二: 升级本地的 CocoaPods 版本,升级方式本文不再赘述。
Assertion failed: (false && "compact unwind compressed function offset doesn't fit in 24 bits"), function operator(), file Layout.cpp.

或是使用 XCode15 集成 TUIRoom 时,因最新链接器导致 TUIRoomEngine 的符号冲突,都属于该问题。
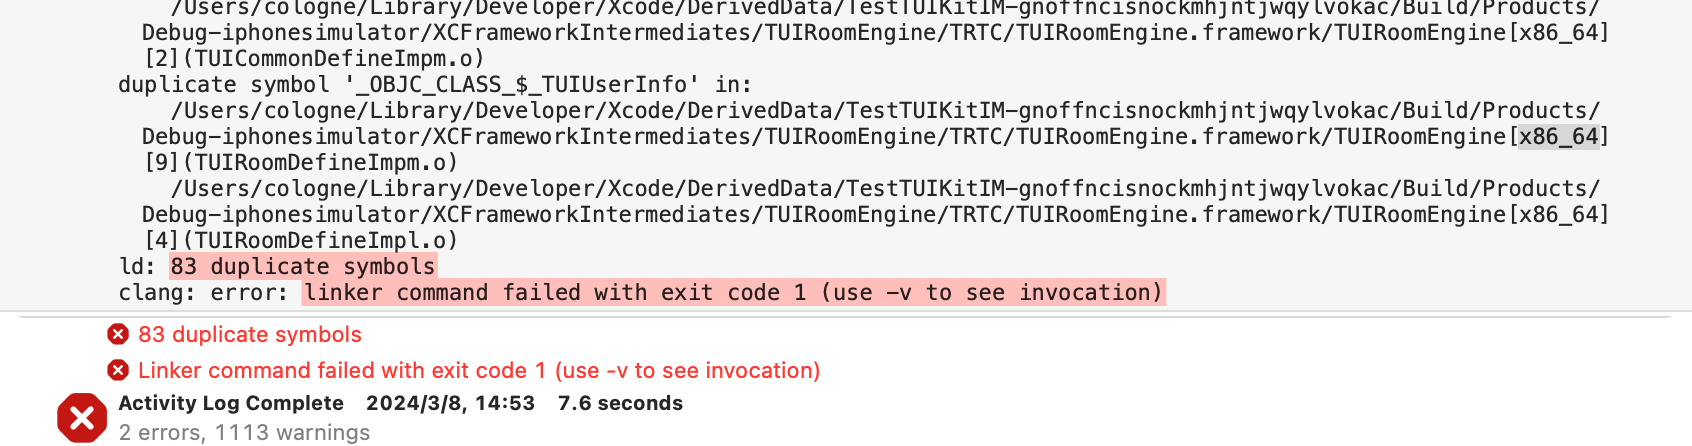
解决方式:修改链接器配置。在
Build Settings 中的 Other Linker Flags 中添加 -ld64。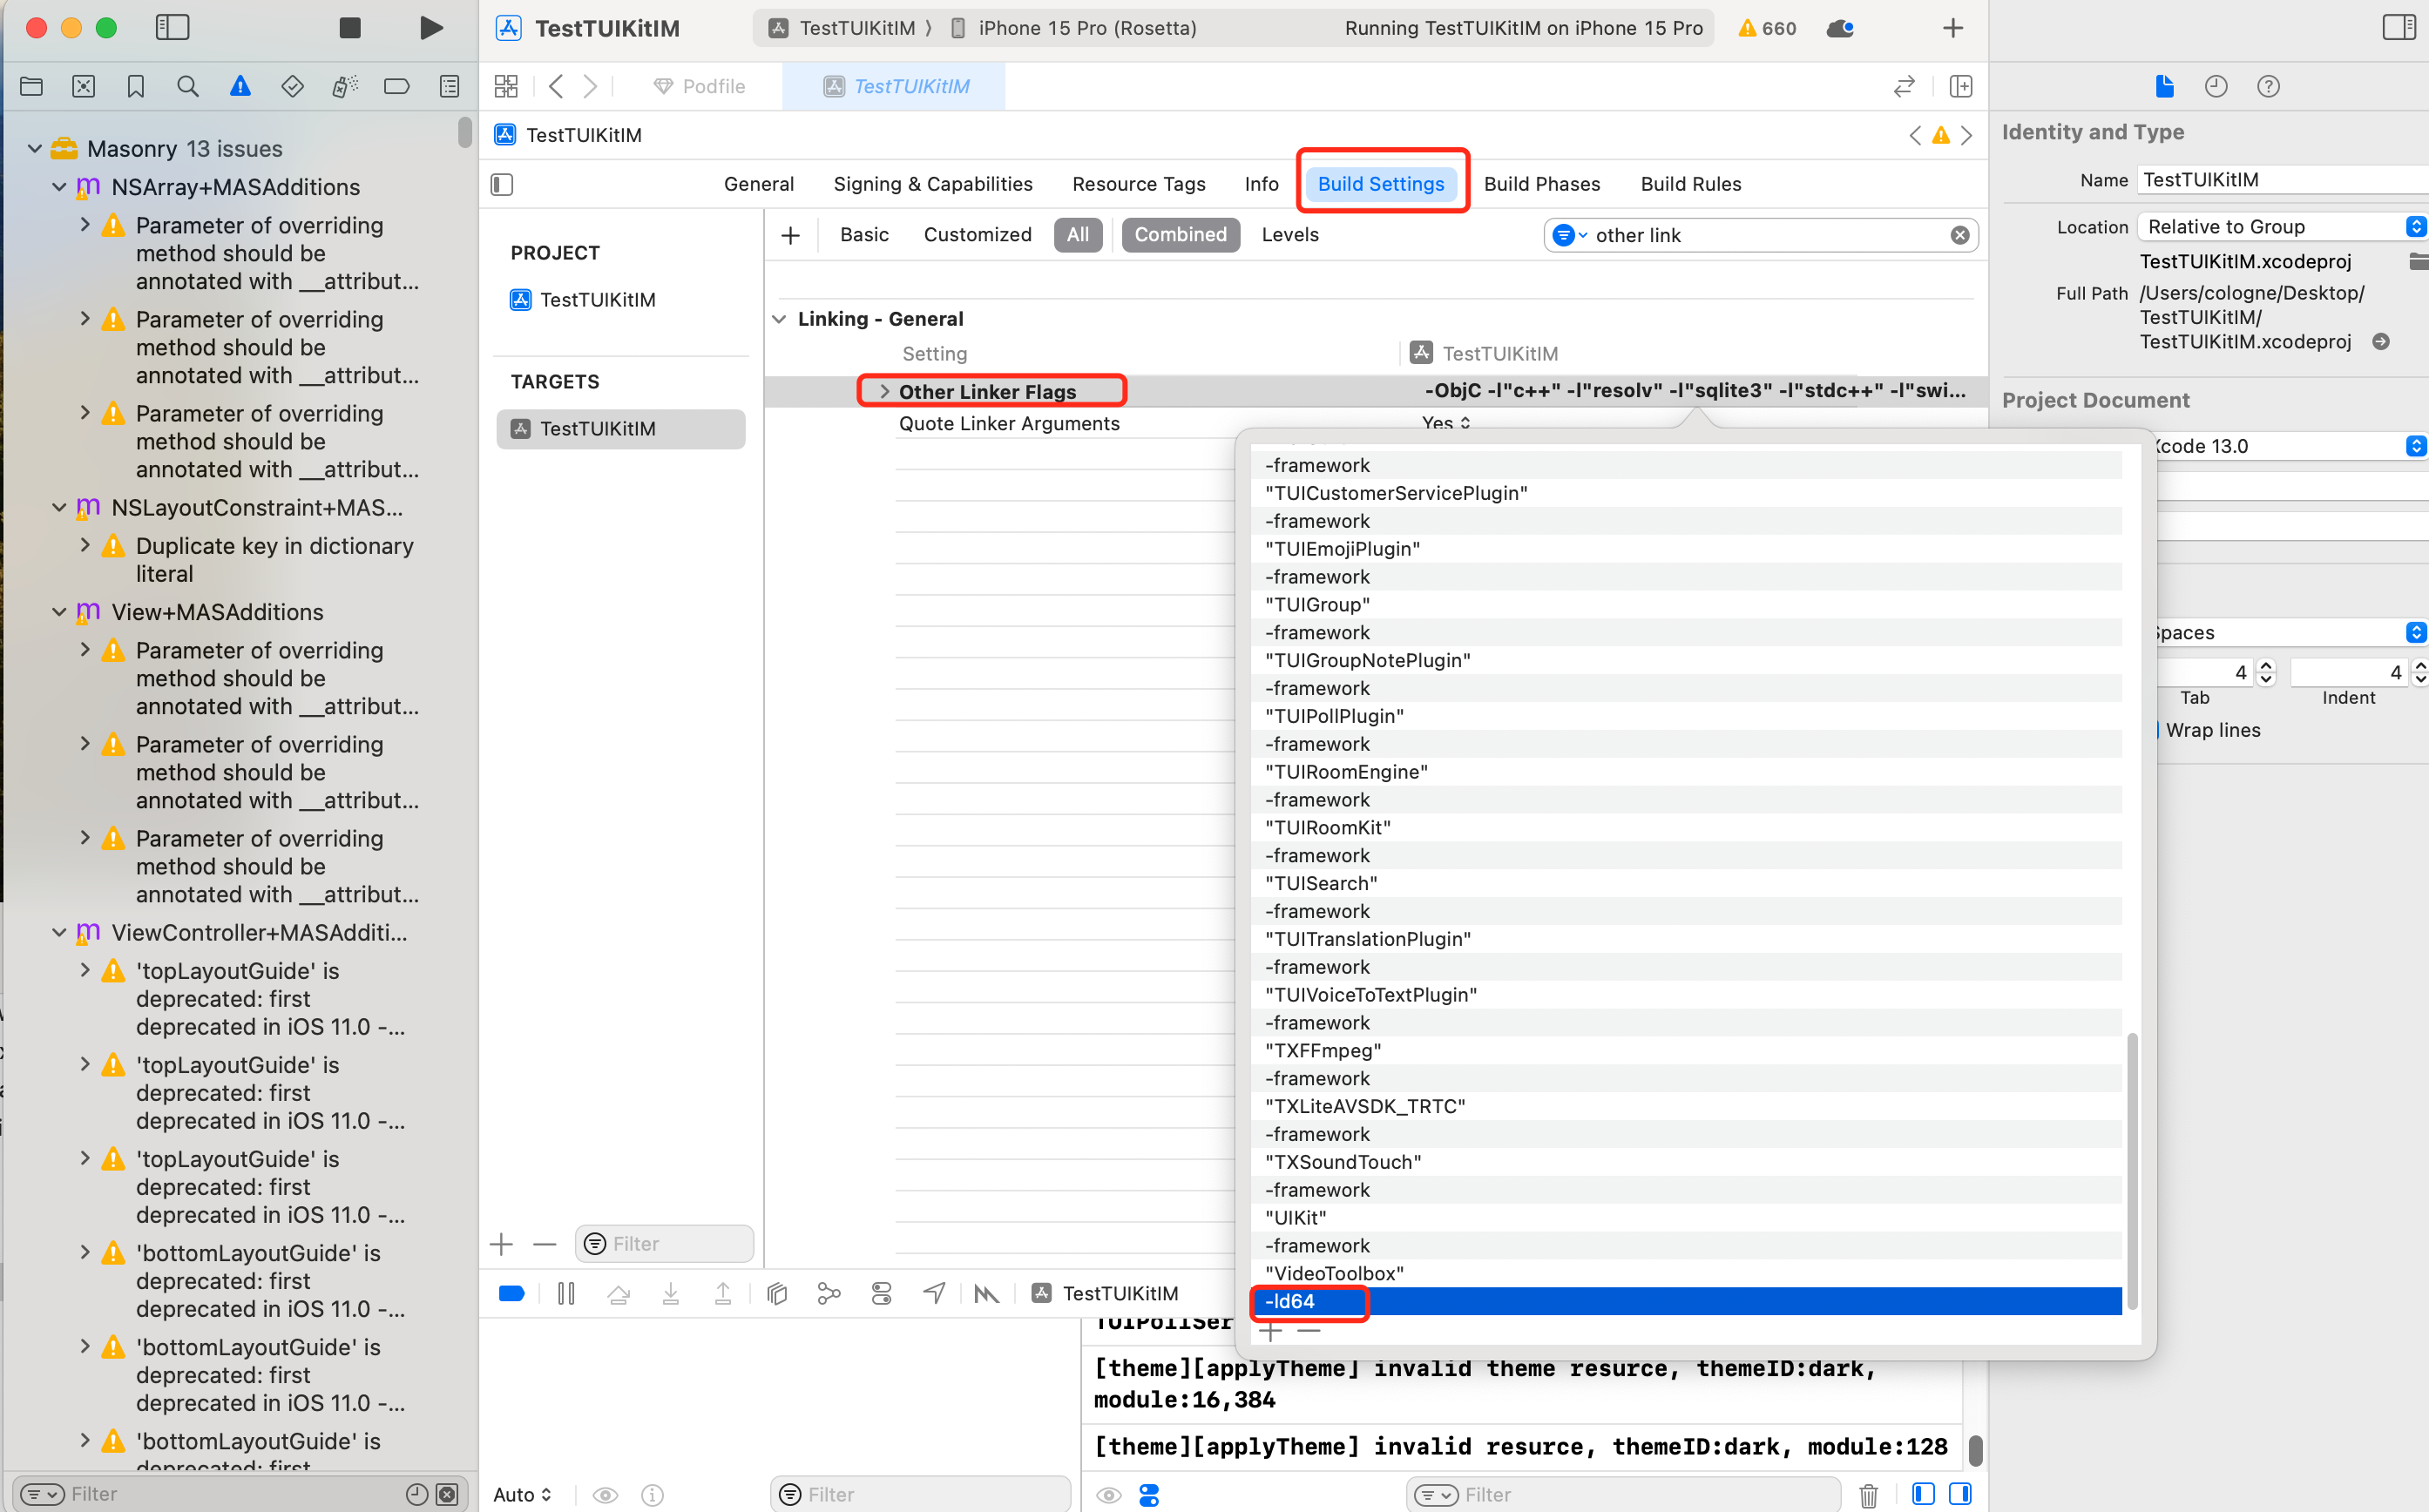
Rosetta 模拟器问题
使用苹果芯片(m1\\m2等系列芯片)时会遇到这种弹框。原因是包括 SDWebImage 在内的三方库,并未支持 xcframework。不过苹果依旧给出了适配办法,就是在模拟器上开启 Rosetta 设置, 一般情况下编译时会自动弹出 Rosetta 选项。

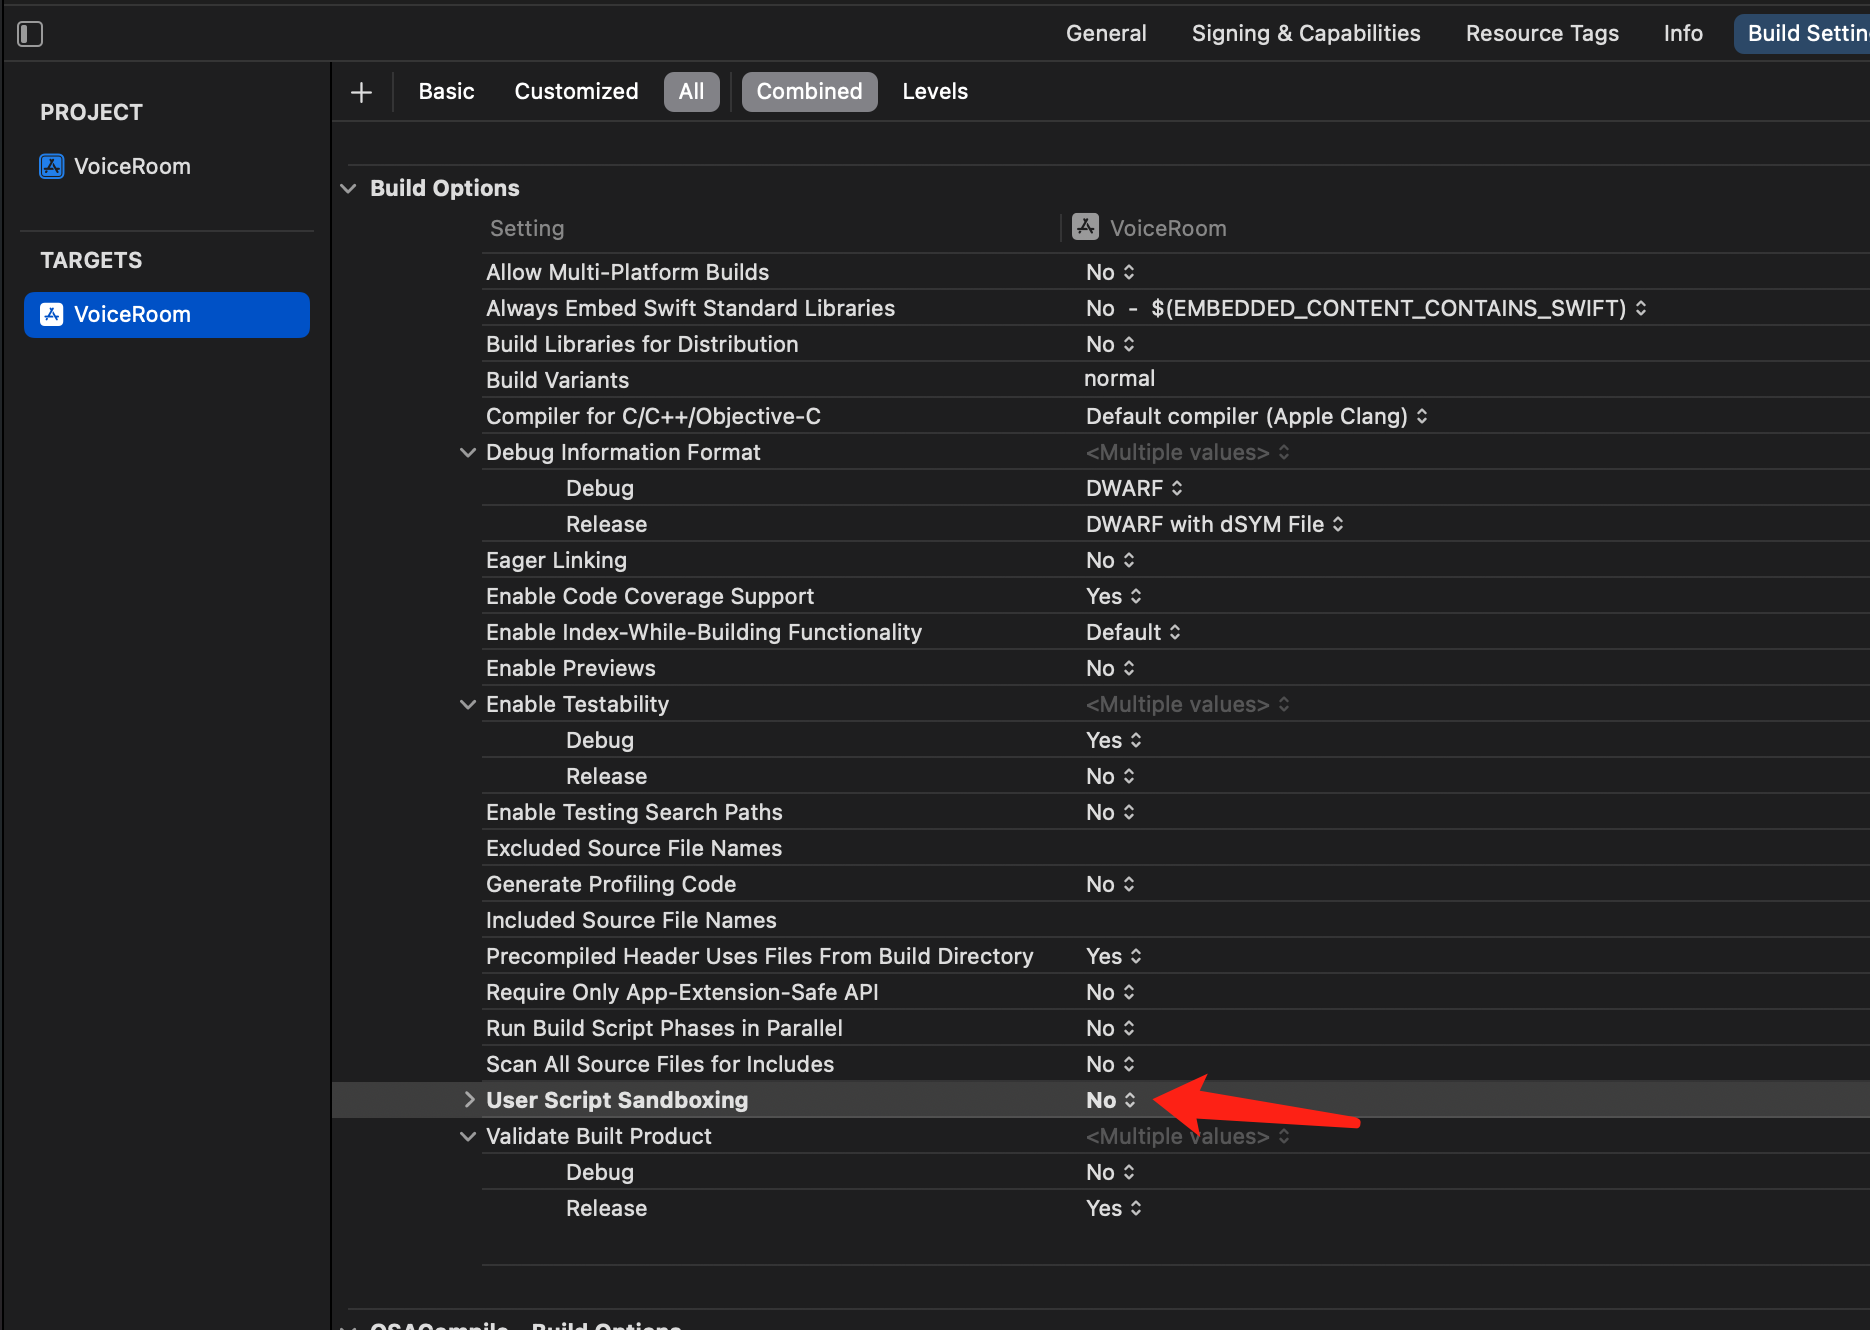
Xcode 15 开发者沙盒选项报错 Sandbox: bash(xxx) deny(1) file-write-create
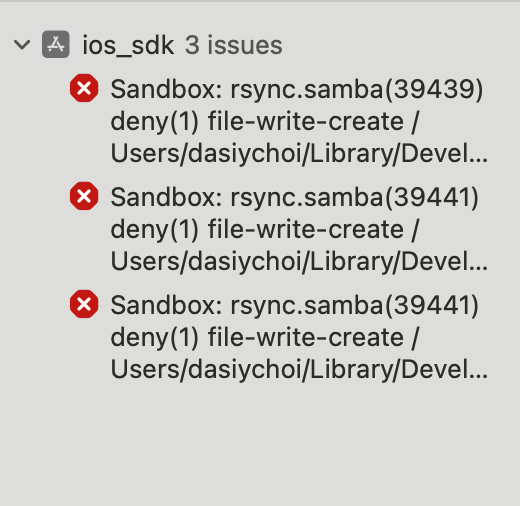
当您使用 Xcode 15 创建一个新工程时, 可能会因为此选项导致编译运行失败,建议您关闭此选项。
CocoaPods 常见问题
使用远端集成时,Pod 依赖版本不匹配问题
若您使用远端 CocoaPods 集成时,出现 Podfile.lock 和 插件依赖的 TUICore 版本不一致时,
此时请删除 Podfile.lock 文件, 并使用
pod repo update 更新本地代码仓库, 之后使用 pod update 重新更新即可。
使用本地集成时,Pod 依赖版本不匹配问题
若您使用本地 DevelopmentPods 集成时出现插件依赖的 TUICore 版本较新,但本地 Pod 依赖的版本号是 1.0.0 ,
第一次使用本地集成时,建议您下载我们的示例 Demo 工程,将 Podfile 文件内容替换为 Podfile_local 的内容,执行
Pod update 后相互参照。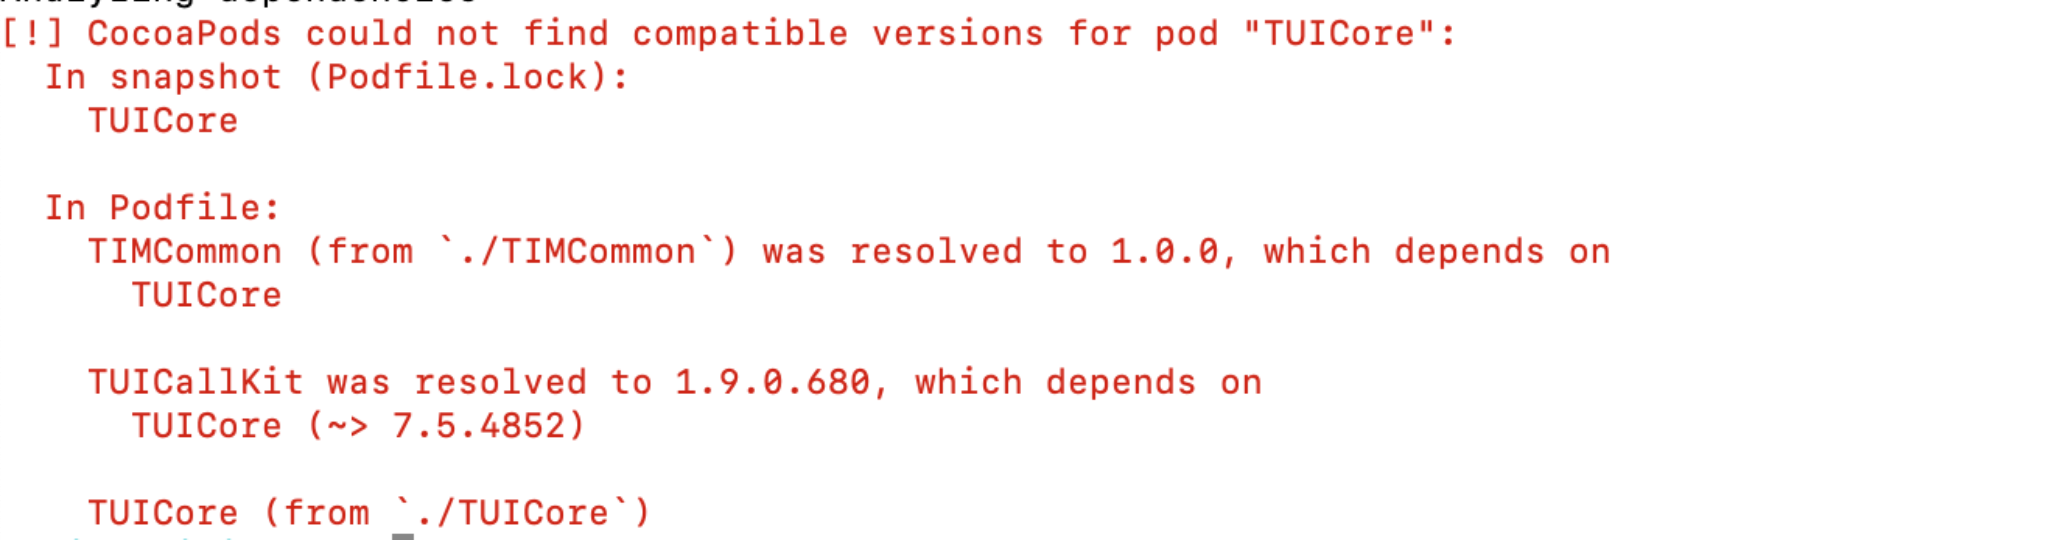
上架常见问题
上架 Appstore 时打包失败,提示 Unsupported Architectures。
问题现象如下图,打包时提示 ImSDK_Plus.framework 中包含了 Appstore 不支持的 x86_64 模拟器版本。该问题是由于 SDK 为了方便开发者调试,发布时会默认带上模拟器版本。

您可以按照下面的步骤,在打包时去掉模拟器版本:
1.1 选中您工程的 Target,并点击
Build Phases 选项,在当前面板中添加 Run Script;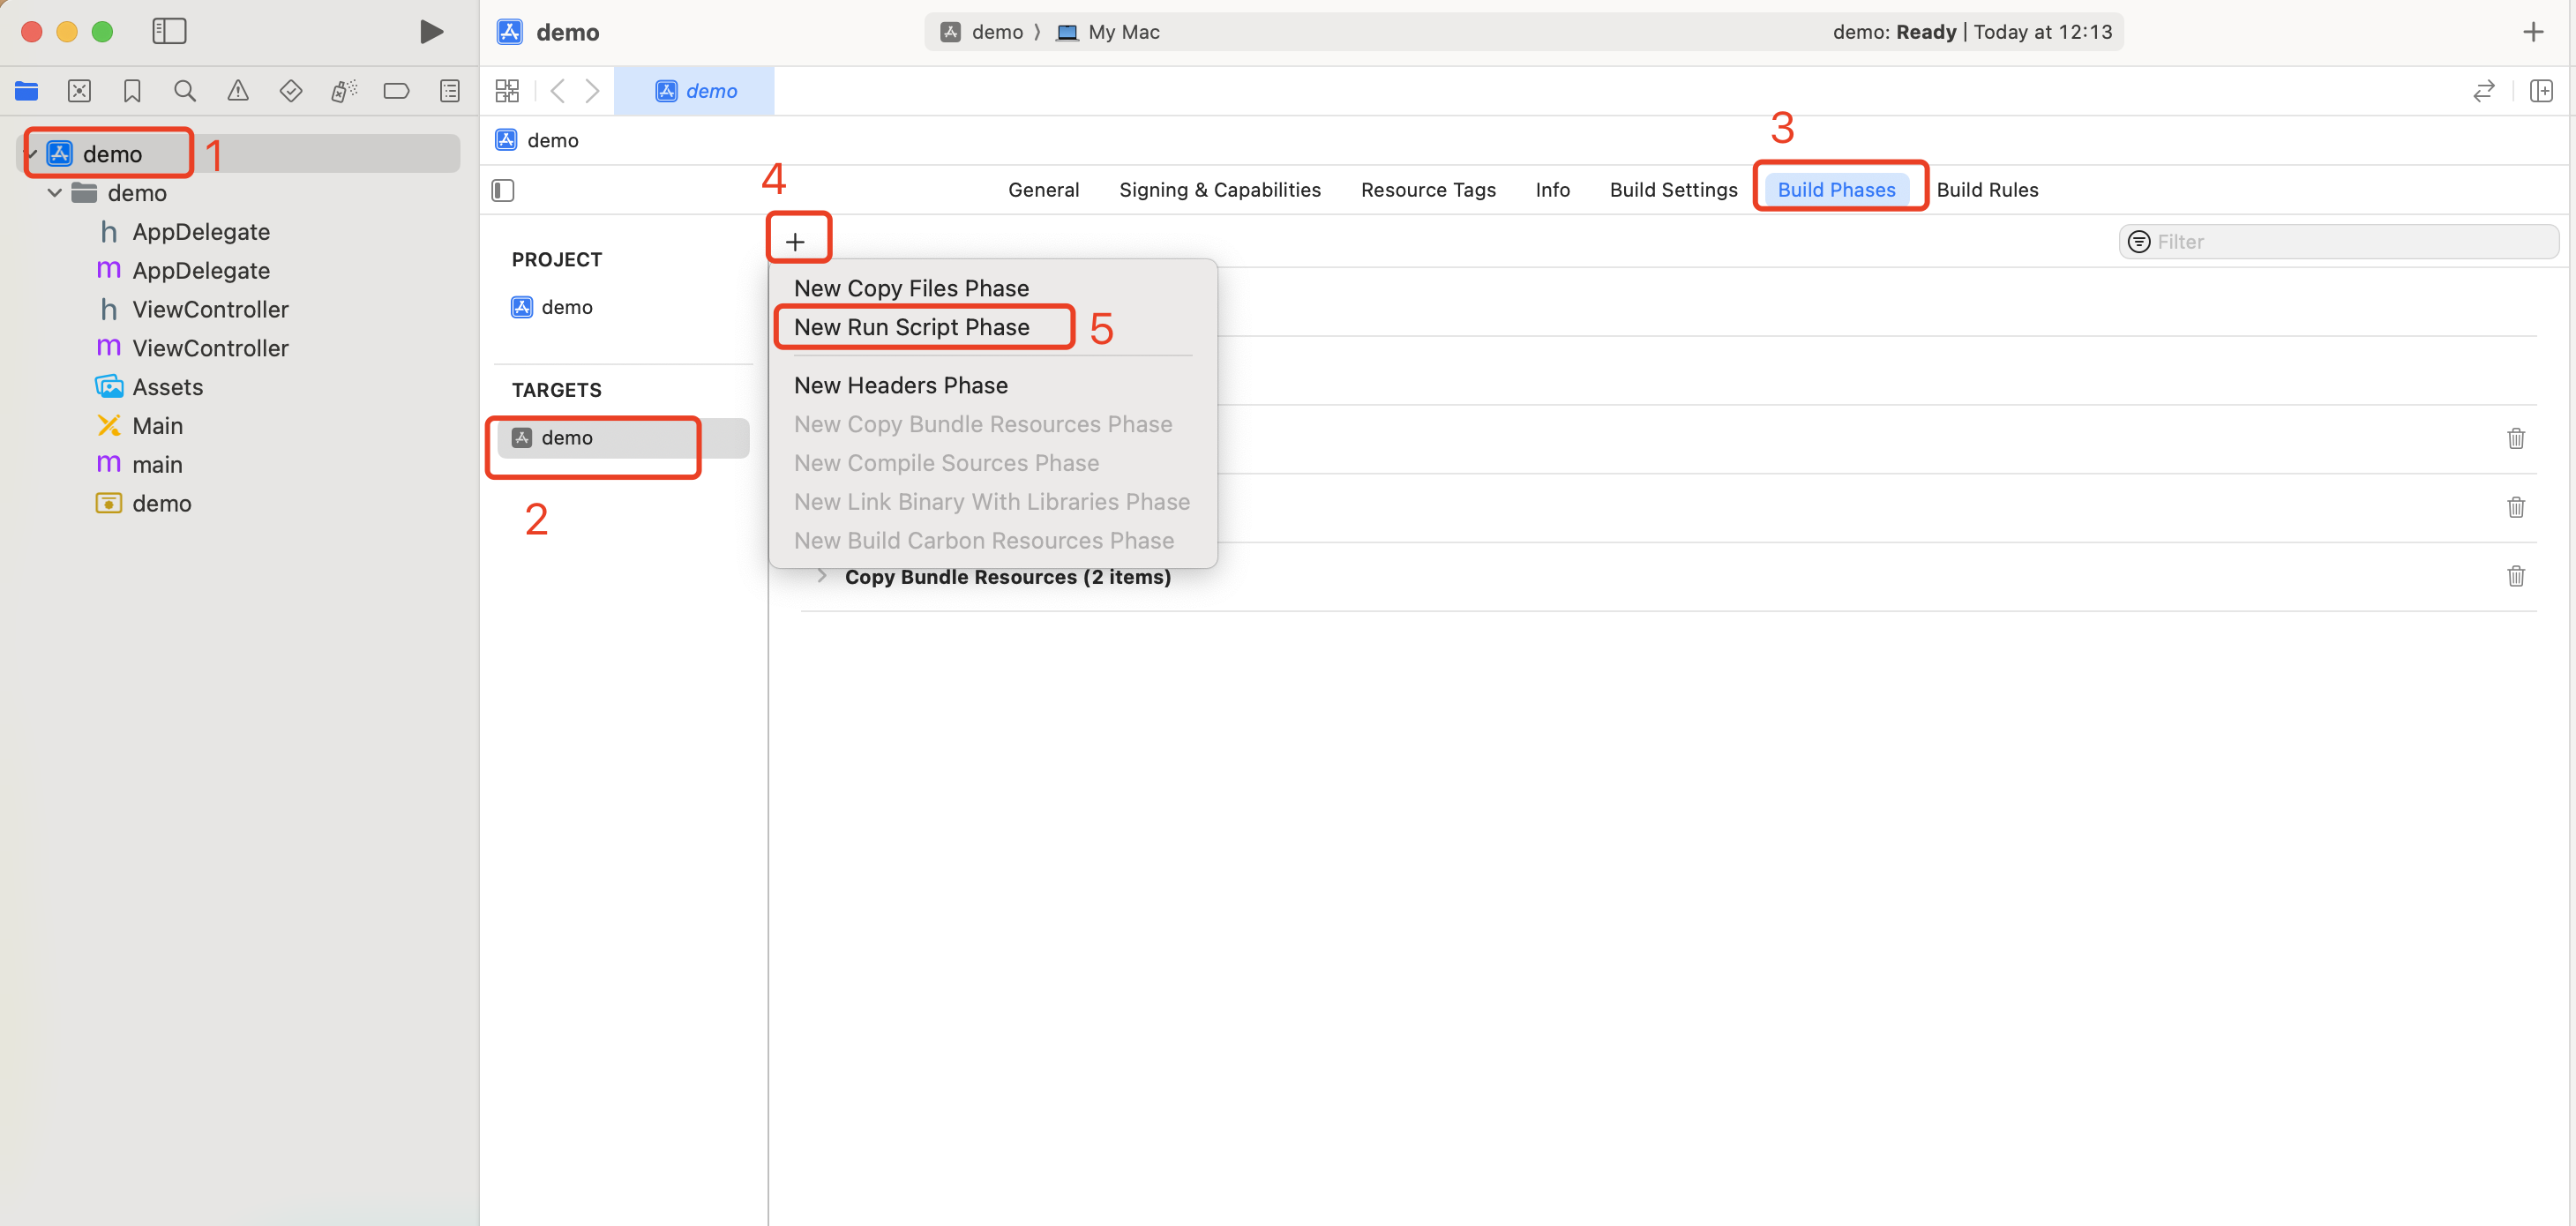
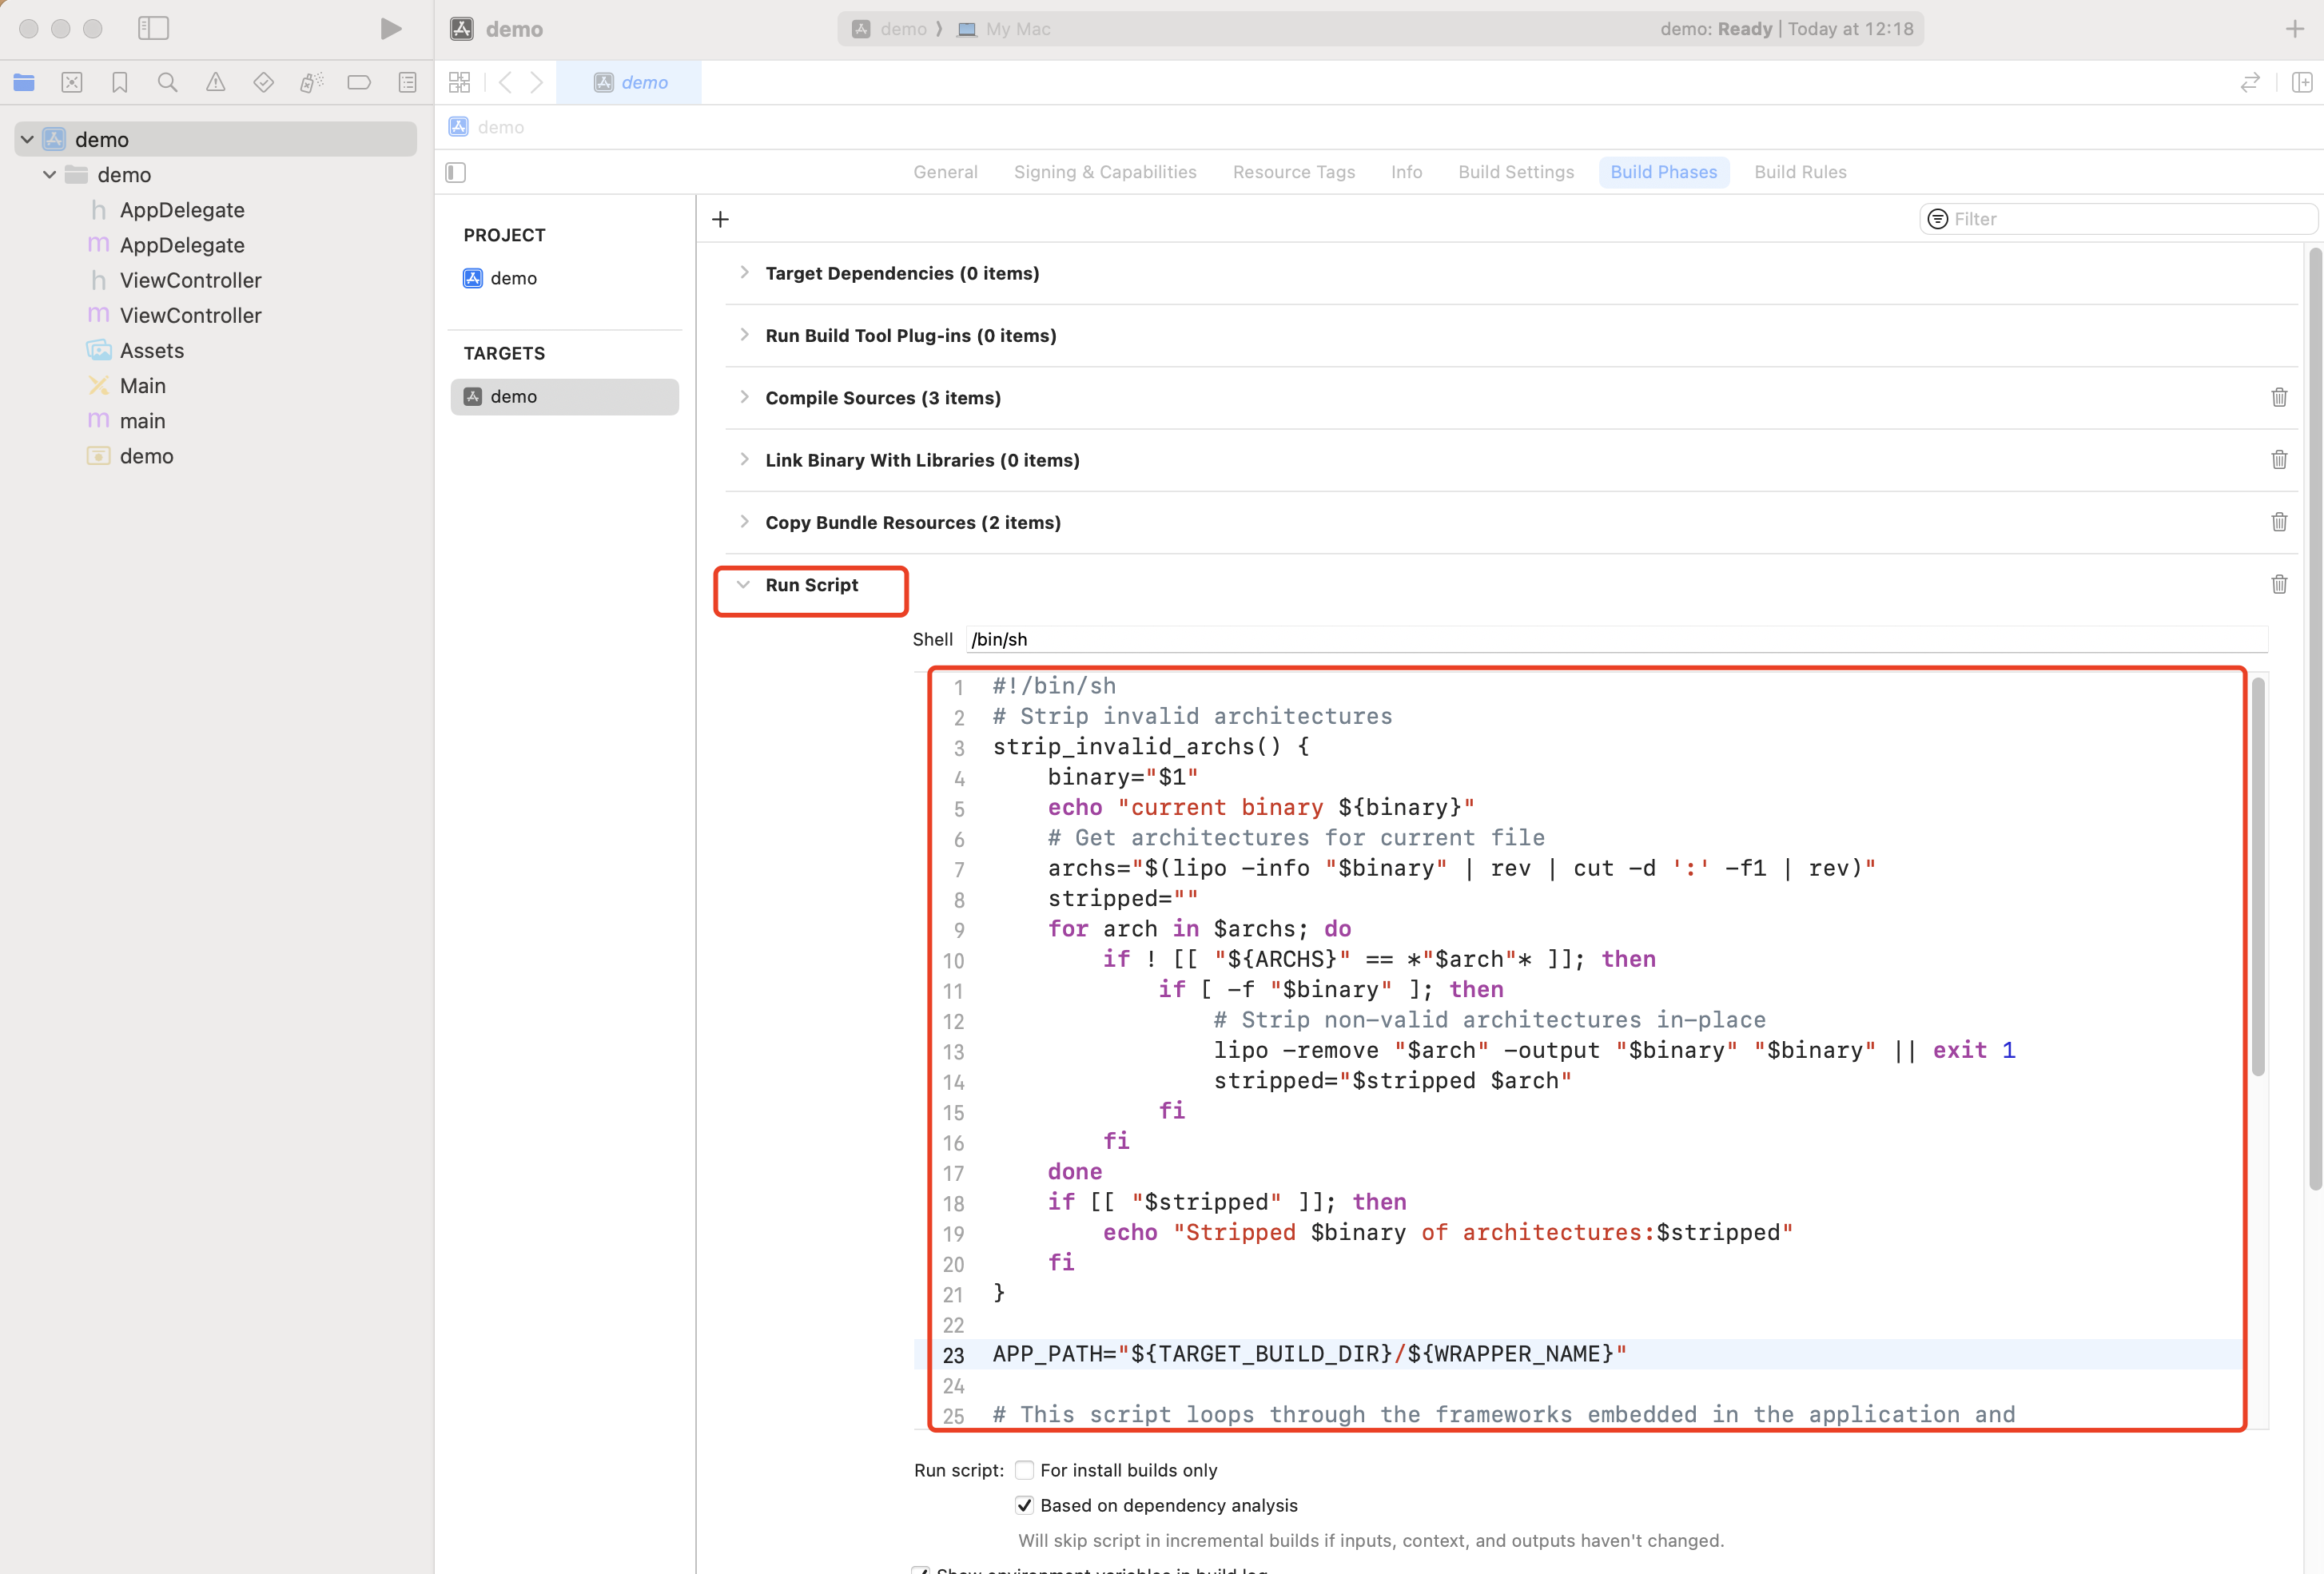
1.2 在新增的 Run Script 中,添加如下脚本:
#!/bin/sh# Strip invalid architecturesstrip_invalid_archs() {binary="$1"echo "current binary ${binary}"# Get architectures for current filearchs="$(lipo -info "$binary" | rev | cut -d ':' -f1 | rev)"stripped=""for arch in $archs; doif ! [[ "${ARCHS}" == *"$arch"* ]]; thenif [ -f "$binary" ]; then# Strip non-valid architectures in-placelipo -remove "$arch" -output "$binary" "$binary" || exit 1stripped="$stripped $arch"fifidoneif [[ "$stripped" ]]; thenecho "Stripped $binary of architectures:$stripped"fi}APP_PATH="${TARGET_BUILD_DIR}/${WRAPPER_NAME}"# This script loops through the frameworks embedded in the application and# removes unused architectures.find "$APP_PATH" -name '*.framework' -type d | while read -r FRAMEWORKdoFRAMEWORK_EXECUTABLE_NAME=$(defaults read "$FRAMEWORK/Info.plist" CFBundleExecutable)FRAMEWORK_EXECUTABLE_PATH="$FRAMEWORK/$FRAMEWORK_EXECUTABLE_NAME"echo "Executable is $FRAMEWORK_EXECUTABLE_PATH"strip_invalid_archs "$FRAMEWORK_EXECUTABLE_PATH"done

 是
是
 否
否
本页内容是否解决了您的问题?