- 动态与公告
- 产品简介
- 购买指南
- 开发指引
- Demo 专区
- 下载中心
- 聊天互动(含 UI)
- 视频通话(含 UI)
- 推送功能
- 智能客服
- 更多实践
- 无 UI 集成
- 客户端 API
- 服务端 API
- 控制台指南
- 常见问题
- 协议与认证
- IM 政策
- 平滑迁移方案
- 错误码
- 联系我们
- 动态与公告
- 产品简介
- 购买指南
- 开发指引
- Demo 专区
- 下载中心
- 聊天互动(含 UI)
- 视频通话(含 UI)
- 推送功能
- 智能客服
- 更多实践
- 无 UI 集成
- 客户端 API
- 服务端 API
- 控制台指南
- 常见问题
- 协议与认证
- IM 政策
- 平滑迁移方案
- 错误码
- 联系我们
腾讯云即时通信 IM 的终端用户需要随时都能够得知最新的消息,而由于移动端设备的性能与电量有限,当 APP 处于后台时,为了避免维持长连接而导致的过多资源消耗,腾讯云即时通信 IM 推荐您使用各厂商提供的系统级推送通道来进行消息通知,系统级的推送通道相比第三方推送拥有更稳定的系统级长连接,可以做到随时接受推送消息,且资源消耗大幅降低。
说明:
在没有主动退出登录的情况下,应用退后台、手机锁屏、或者应用进程被用户主动杀掉三种场景下,如果想继续接收到 IM 消息提醒,可以接入即时通信 IM 离线推送。
如果应用主动调用 logout 退出登录,或者多端登录被踢下线,即使接入了 IM 离线推送,也收不到离线推送消息。
使用腾讯云 IM 厂商推送 Flutter 集成插件的离线推送能力,可快速接入主流厂商(苹果iOS/Google FCM/OPPO/VIVO/华为/小米/魅族/荣耀)的离线推送。
本教程含接入腾讯云即时通信 IM 离线推送全流程。插件已封装上述厂商的 SDK,使用时仅需简单改造调用即可。
说明:
如果您的应用有其他内容的消息需要推送,包括运营消息等,或在接入其他第三方推送 SDK 报错冲突,可参考本部分,使用全员推送,解决问题。建议不要和第三方推送 SDK,如 TPNS,混用。
如果您的应用不需要离线推送,或场景不满足离线推送的需求,请直接看本文最后一节 “在线推送-在本地创建新消息通知” 在线推送部分。
插件 API 概览
说明:
以下 API 若无特殊说明,均可自动兼容 Android/iOS 平台及支持厂商,插件内部进行平台及厂商判断,您直接调用即可。
API | 说明 |
构造函数(TimUiKitPushPlugin) | 实例化一个 Push 插件对象,并确定是否使用 Google FCM |
init | 初始化插件,绑定点击通知回调事件及传入厂商渠道信息 |
uploadToken | 自动获取设备 Token 及证书 ID,自动上传至腾讯云 IM 服务端 |
clearToken | 清除服务端上本设备的推送 Token,达到屏蔽通知的效果 |
requireNotificationPermission | 申请推送权限 |
setBadgeNum | |
clearAllNotification | 清除通知栏内,当前应用,所有的通知 |
getDevicePushConfig | 获取当前厂商的推送相关信息,含机型/证书ID/Token |
getDevicePushToken | 获取当前厂商的推送 Token |
getOtherPushType | 获取厂商信息 |
getBuzId | 获取当前厂商对应的腾讯云控制台上注册的证书 ID |
createNotificationChannel | 为 Android 机型创建通知 Channel 渠道,详见 Google 官方文档 |
clearAllNotification | 清除通知栏内,当前应用,所有的通知 |
displayNotification | 在客户端本地,手动创建一条消息通知 |
displayDefaultNotificationForMessage | 在客户端本地,按照默认的规则,自动为一个 V2TimMessage 创建一个消息通知 |
接入准备(注册厂商)
需要完成厂商开发者账号申请(一般需要企业认证),创建应用,申请 PUSH 权限,拿到 key 信息。
Apple
iOS
1. 请根据该教程,完成 Apple 推送证书申请。
2. 分别将申请到的生产环境和开发环境证书托管至即时通信 IM 控制台。
3. 打开IM 控制台-基础配置 右侧,添加 iOS 证书。
Android
Google FCM
说明:
如果您的应用不面向境外客户,可不完成本 Google FCM 系列操作。
1. 前往 Google Firebase控制台 创建一个项目,无需启用 Google Analysis。
2. 单击您的应用卡片,进入应用配置页面。
3. 单击 Project Overview 右侧的 

4. 将该私钥文件托管至即时通信 IM 控制台。在 IM 控制台-基础配置 右侧,添加 Android 证书。选择 Google 后,请选择上传证书。
OPPO
开通服务
创建消息通道
按照 OPPO 官网要求,在 OPPO Android 8.0 及以上系统版本必须配置 ChannelID,否则推送消息无法展示。您需要先在 App 中创建对应的 ChannelID(例如
tuikit)。请在配置管理-新建通道内,创建一个新通道。通道ID即为Channel ID。
说明:
上传证书至控制台
1. 在 IM 控制台-基础配置 右侧,添加 Android 证书。选择 OPPO 后,请填写相关信息。
2. ChannelID 请填写此前在 OPPO 控制台为通讯能力申请的专用通道,最好是私信,以免到达每日推送上限。
3. 打开方式请选择打开应用内指定页面 > activity,填写
com.tencent.flutter.tim_ui_kit_push_plugin.pushActivity.OPPOMessageActivity。小米
开通服务
说明:
在小米开放平台创建应用,并选择应用服务 > PUSH服务,创建推送服务应用。
小米推送服务应用创建完成后,在应用详情中,您可以查看详细的应用信息。
记录主包名、AppID、AppSecret 信息。
上传证书至控制台
vivo
开通服务
说明:
1. 登录 vivo 开放平台的管理中心,选择消息推送>创建>测试推送,创建 vivo 推送服务应用。
2. vivo 推送服务应用创建完成后,在应用详情中,您可以查看详细的应用信息。记录 APP ID、APP key 和 App secret信息。
说明:
上传证书至控制台
单击后续动作请选择为:打开应用内指定页面。
应用内页面 配置为:
tencent_im_push://${替换成您的包名}/message?#Intent;scheme=tencent_im_push;launchFlags=0x4000000;end华为
获取密钥
2. 在华为推送平台中新建应用,详情参见 创建应用。记录AppID、AppSecret 信息。
说明:
若在应用信息 > 我的应用中无法找到 SecretKey,可前往项目设置 > 常规中查看 Client Secret。
配置 SHA256 证书指纹
说明:
如果您的应用需要经过流水线编译发布,每次编译在不同的构建机上进行,可在本地创建
keystore.jks密钥文件,得到该 keystore 的 SHA256 值,填入华为推送平台中。在流水线的构建脚本中,对完成构建后的产物进行归档对齐,及使用刚才的 keystore 签名。此时该最终产物签名 SHA256 值即可保持一致。代码如下:
zipalign -v -p 4 构建生成的apk.apk 打包生成的apk_aligned.apkapksigner sign --ks keystore.jks --ks-pass pass:您创建的keystore密码 --out 最终签名 完成的apk.apk 打包生成的apk_aligned.apk
获取华为推送配置文件
登录华为开放平台,进入我的项目 > 选择项目 > 项目设置,下载华为应用最新配置文件 agconnect-services.json。放置于
android/app目录下。打开推送服务开关
在华为推送平台,单击全部服务 > 推送服务,进入推送服务页面。
上传证书至控制台
1. 在 IM 控制台-基础配置 右侧,添加 Android 证书。
2. 选择华为后,请填写相关信息。
角标参数请填写 Android 应用入口 Activity 类,如我们 DEMO 的 com.tencent.flutter.tuikit,否则华为通道下发通知的角标设置将不生效。
点击后续动作请选择打开应用。魅族
开通服务
1. 打开 魅族开放平台官网 进行注册并通过开发者认证。
说明:
2. 登录魅族开放平台的管理控制台,选择服务 > 集成推送服务 > 推送后台,创建魅族推送服务应用。
3. 魅族推送服务应用创建完成后,在应用详情中,您可以查看详细的应用信息。记录应用包名、App ID、App Secret信息。
上传证书至控制台
1. 在 IM 控制台-基础配置 右侧,添加 Android 证书。
2. 选择魅族后,请填写相关信息。单击后续动作请选择:打开应用。
荣耀
开通服务
记录下图中圈出的信息,后续需要使用。
上传证书至控制台
单击后续动作请选择为:打开应用内指定页面。
应用内页面 配置为:
tencent_im_push://${替换成您的包名}/honorMessage?#Intent;scheme=tencent_im_push;launchFlags=0x4000000;end使用插件跑通离线推送(全览 + Android)
在您的项目中安装 IM Flutter 离线推送插件。
请注意,我们提供两个版本的消息推送插件,中国大陆版和国际版。iOS都使用APNS通道,但 Android 通道有差异。
版本类型 | 包名 | Google FCM 支持 | 国内厂商原生支持 | 描述 |
中国大陆版 | 否 | 是 | Android 离线推送仅走国内厂商原生通道 | |
国际版 | 是 | 是 | 在配置 Google FCM 相关信息,且当前设备 Google FCM 可用的情况下,优先使用 Google FCM 通道,其次再尝试国内厂商通道 |
请根据目标客户群里,选用合适的推送插件。
// 国内版flutter pub add tencent_chat_push_for_china// 国际版flutter pub add tim_ui_kit_push_plugin
并根据该指南,在插件市场,启用推送插件。
说明:
步骤1:汇总常量类
1. 完成 接入准备(注册厂商)的配置后,可在即时通信 IM 的控制台首页右侧,查看我们后台为您的厂商渠道 App 信息分配的证书 ID。
2. 请将这些信息,配上厂商渠道的账号信息,实例化一个静态的
PushAppInfo类,汇总起来。后续步骤需要传入此对象。3. 该类支持配置所有您需要接入厂商推送机型的信息。无需完整填写构造函数字段。若需要使用某个厂商平台,请完整填写该平台相关字段。
static final PushAppInfo appInfo = PushAppInfo(hw_buz_id: , // 华为证书IDmi_app_id: , // 小米APPIDmi_app_key: , // 小米APPKeymi_buz_id: , // 小米证书IDmz_app_id: , // 魅族APPIDmz_app_key: , // 魅族APPKeymz_buz_id: , // 魅族证书IDvivo_buz_id: , // vivo证书IDoppo_app_key: , // OPPO APPKeyoppo_app_secret: , // OPPO APP Secretoppo_buz_id: , // OPPO证书IDoppo_app_id: , // OPPO APPIDgoogle_buz_id: , // Google FCM证书IDapple_buz_id: , // Apple证书IDhonor_buz_id: , // 荣耀证书ID);
说明:
步骤2:代码中添加厂商工程配置
Google FCM
说明:
兼容 Android 模拟器调试
如果需要使用 Firebase Emulator Suite,请打开
android/app/src/main/AndroidManifest.xml 文件,在 application 中新增usesCleartextTraffic字段。<applicationandroid:usesCleartextTraffic="true" // 增加本行><!-- possibly other elements --></application>
集成 Google Firebase Flutter 能力
1. 请打开 pubspec.yaml 文件,添加对
firebase_core的依赖,使用1.12.0版本。说明:
由于最新版 Google Firebase Flutter 插件最低支持的Dart版本为2.16.0,此处限制为2022年3月发布的1.12.0版本。
dependencies:firebase_core: 1.12.0
2. 执行
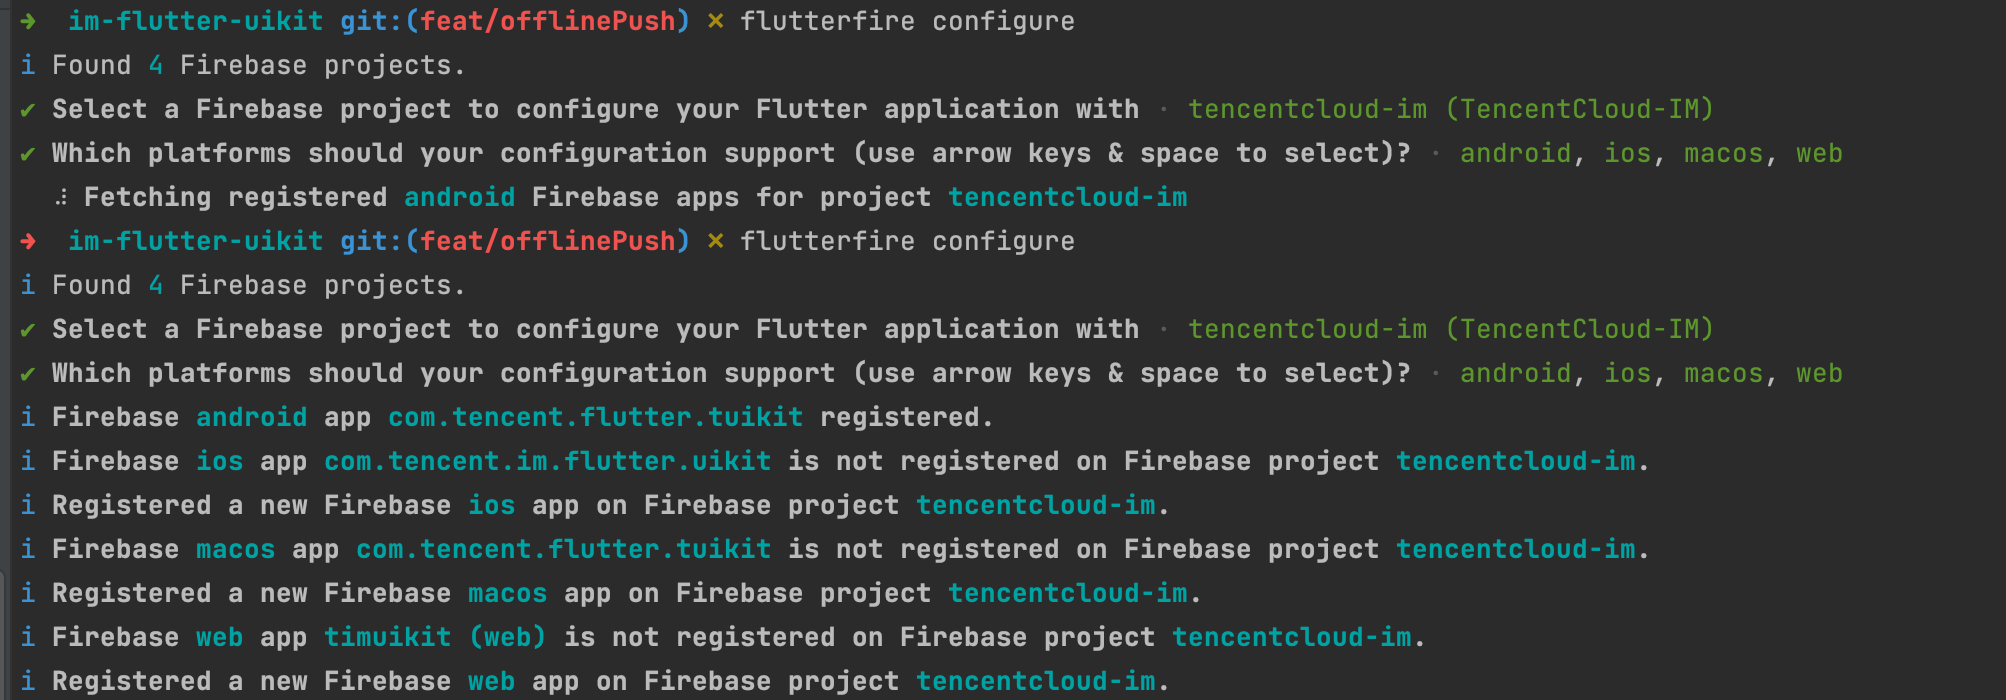
flutter pub get完成安装。3. 在控制台内,执行以下命令,结合操作提示,完成配置 Google Firebase Flutter 项目。
详见 Google FlutterFire 官方文档。
// 安装Firebase CLInpm install -g firebase-toolscurl -sL https://firebase.tools | bashdart pub global activate flutterfire_cli// 生成配置文件flutterfire configure
4. 执行该步骤后,会将此项目与您在 Google Firebase 创建的项目关联起来,执行结果可以参见下图:


main()方法中初始化 FirebaseAPP。WidgetsFlutterBinding.ensureInitialized();await Firebase.initializeApp(options: DefaultFirebaseOptions.currentPlatform,);
华为
1. 打开文件
android/build.gradle 。2. buildscript>repositories & dependencies下分别添加华为仓库地址和 HMS gradle 插件依赖:
buildscript {repositories {google()jcenter()maven {url 'https://developer.huawei.com/repo/'} // 添加华为 maven 仓库地址}dependencies {// 其他classpath配置classpath 'com.huawei.agconnect:agcp:1.3.1.300' // 添加华为推送 gradle 插件依赖}// Set release signing and passwords in the same build configuration filesigningConfigs {release {storeFile file('<keystore_file>')storePassword '<keystore_password>'keyAlias '<key_alias>'keyPassword '<key_password>'}}buildTypes {// debug模式也要使用证书编译,否则华为指纹验证不通过debug {signingConfig signingConfigs.release}release {signingConfig signingConfigs.release}}}
3. 打开
android/build.gradle 文件,在allprojects>repositories下添加华为依赖仓库地址:allprojects {repositories {google()jcenter()maven {url 'https://developer.huawei.com/repo/'} // 添加华为 maven 仓库地址}}
4. 登录华为开放平台,进入我的项目 > 选择项目 > 项目设置,下载华为应用最新配置文件 agconnect-services.json。放置于
android/app目录下。应用层引入 HMS SDK gradle 插件
打开
android/app/build.gradle 文件,添加以下配置:// app 其他 gradle 插件apply plugin: 'com.huawei.agconnect' // HMS SDK gradle 插件android {// app 配置内容}
推送角标权限
打开
android/app/src/main/AndroidManifest.xml 文件,如下添加 uses-permission 。<uses-permission android:name = "com.huawei.android.launcher.permission.CHANGE_BADGE "/>
vivo
配置 APPID 及 APPKey
AppID 及 AppKey 来自vivo开放平台-推送运营平台。
打开
android/app/build.gradle 文件,如下配置 vivo 的 APPID 和 AppKey。android: {defaultConfig {manifestPlaceholders = [....vivo_APPID: "填入您申请的vivo AppKey"vivo_APPKEY:"填入您申请的vivo AppID",.....]}}
打开
android/app/src/main/AndroidManifest.xml 文件,在 <application> 中,如下添加meta-data。<meta-dataandroid:name="com.vivo.push.api_key"android:value="填入您申请的vivo AppKey" /><meta-dataandroid:name="com.vivo.push.app_id"android:value="填入您申请的vivo AppID" /></application>
VIVO 角标权限
打开
android/app/src/main/AndroidManifest.xml 文件,如下添加 uses-permission 。<uses-permission android:name="com.vivo.notification.permission.BADGE_ICON" />
新荣耀
打开
android/app/src/main/AndroidManifest.xml 文件,在 <application></application> 中,如下添加meta-data。<meta-dataandroid:name="com.hihonor.push.app_id"android:value="填入您申请的荣耀 AppID"" /></application>
打开
android/app/build.gradle 文件,添加如下代码。repositories {maven { url 'https://developer.hihonor.com/repo/' } // 新增}
推送角标权限
打开
android/app/src/main/AndroidManifest.xml 文件,如下添加 uses-permission 。<uses-permission android:name = "com.hihonor.android.launcher.permission.CHANGE_BADGE" />
小米/OPPO/魅族
1. 打开
android/app/build.gradle 文件,在 defaultConfig 中加入包名。defaultConfig {applicationId "${替换成您的包名}"...}
2. 打开
android/app/src/main/AndroidManifest.xml 文件,配置各厂商权限列表。<!--小米 开始--><permissionandroid:name="${替换成您的包名}.permission.MIPUSH_RECEIVE"android:protectionLevel="signature" /><uses-permission android:name="${替换成您的包名}.permission.MIPUSH_RECEIVE" /><!--小米 结束--><!--OPPO 开始--><uses-permission android:name="com.coloros.mcs.permission.RECIEVE_MCS_MESSAGE" /><uses-permission android:name="com.heytap.mcs.permission.RECIEVE_MCS_MESSAGE" /><!--OPPO 结束--><!--魅族 开始--><!-- 可选,用于兼容 Flyme5 且推送服务是旧版本的情况--><uses-permission android:name="android.permission.READ_PHONE_STATE" /><!-- 兼容 Flyme5 的权限配置--><uses-permission android:name="com.meizu.flyme.push.permission.RECEIVE" /><permission android:name="${替换成您的包名}.push.permission.MESSAGE"android:protectionLevel="signature"/><uses-permission android:name="${替换成您的包名}.push.permission.MESSAGE" /><!-- 兼容 Flyme3 的权限配置--><uses-permission android:name="com.meizu.c2dm.permission.RECEIVE" /><permission android:name="${替换成您的包名}.permission.C2D_MESSAGE" android:protectionLevel="signature"/><uses-permission android:name="${替换成您的包名}.permission.C2D_MESSAGE"/><!--魅族 结束-->
步骤3:IM 初始化成功后初始化本推送插件
1. 调用插件
init方法。该步骤会完成初始化各厂商通道,并申请厂商通知权限。2. 请确保 IM SDK 初始化成功后,才可初始化本插件。
final TimUiKitPushPlugin cPush = TimUiKitPushPlugin(isUseGoogleFCM: bool, // 是否启用Google Firebase Cloud Messaging,默认true启用。中国大陆版无此参数。);await cPush.init(pushClickAction: pushClickAction, // 单击通知后的事件回调,会在STEP6讲解appInfo: PushConfig.appInfo, // 传入STEP1做的appInfo);
3. 初始化结束后,需要为部分厂商创建消息通道,如 OPPO 和小米均需此配置。调用
createNotificationChannel方法即可。说明:
如果向厂商申请的 channel ID 一致,同一个 channel ID 调用一次即可。
cPush.createNotificationChannel(channelId: "new_message",channelName: "消息推送",channelDescription: "推送新聊天消息");
4. 部分厂商(如 OPPO)默认不提供推送权限,需要开发者手动申请。调用
requireNotificationPermission方法即可。说明:
申请权限的时机可由您自行决定,您可以在用户登录成功后再调用。
cPush.requireNotificationPermission();
步骤4:上报 Token 及证书 ID
需要将当前设备对应厂商的证书 ID 及 Device Token 上报至腾讯云即时通信后台,服务端才可正常使用厂商通道下行通知。
插件支持自动在 appInfo 内找到当前厂商的证书 ID,并自动完成 Token 上报。
说明:
根据个保法内隐私相关规定,请在用户 Login 及初始化推送插件成功后再调用该方法上报。
建议初始化推送插件成功后,间隔5秒,再上报 Token,以防偶发网络波动导致厂商 SDK 生成 Token 延误。
final TimUiKitPushPlugin cPush = TimUiKitPushPlugin(isUseGoogleFCM: true, // 中国大陆版无此参数);Future.delayed(const Duration(seconds: 5), () async {final bool isUploadSuccess =await ChannelPush.uploadToken(PushConfig.appInfo);print("Push token upload result: $isUploadSuccess");});
步骤5:前后台切换监听
需要在每次切换前后台时,通过 IM SDK 上报 IM 后端当前状态。
若为前台在线状态,则收到新消息不触发 notification 推送,反之则会进行推送。
建议:在应用切换到 inactive/paused 状态前,使用插件中
setBadgeNum( int badgeNum )方法,将最新未读数同步至桌面角标。此处本插件支持配置iOS, XIAOMI(MIUI6 - MIUI 11机型), HUAWEI, HONOR, vivo 及 OPPO 设备角标。说明:
OPPO 角标属于 OPPO 侧高级权益,不默认开放。如需使用,请自行联系 OPPO 应用推送权益对接人。
/// App@overridevoid didChangeAppLifecycleState(AppLifecycleState state) async {print("--" + state.toString());int? unreadCount = await _getTotalUnreadCount();switch (state) {case AppLifecycleState.inactive:TencentImSDKPlugin.v2TIMManager.getOfflinePushManager().doBackground(unreadCount: unreadCount ?? 0);if(unreadCount != null){cPush.setBadgeNum(unreadCount);}break;case AppLifecycleState.resumed:TencentImSDKPlugin.v2TIMManager.getOfflinePushManager().doForeground();break;case AppLifecycleState.paused:TencentImSDKPlugin.v2TIMManager.getOfflinePushManager().doBackground(unreadCount: unreadCount ?? 0);if(unreadCount != null){cPush.setBadgeNum(unreadCount);}break;}}
步骤6:发消息配置及单击通知跳转
发送消息
直接通过 SDK 发送
如您自行接入腾讯云 IM SDK,请在发消息时配置
OfflinePushInfo offlinePushInfo字段。OfflinePushInfo({this.title = '', // 推送通知标题。留空字符串时,按照优先级,IM后台自动替换成 sender的昵称 => sender ID。因此,如无特殊需求,该字段建议留空,可达到和微信一致的效果this.desc = '', // 推送第二行小字部分this.disablePush = false,this.ext = '', // 推送内额外信息,对方可于单击通知跳转时拿到。建议传含Conversation信息的JSON,用于收件方跳转至对应Chat。可参见下方TUIKit的实例代码。this.androidOPPOChannelID = '', // OPPO的channel ID});
接入TUIKit
如果您使用我们的 Flutter TUIKit 组件库,可直接在
TIMUIKitChat组件TIMUIKitChatConfig中,使用notificationTitle/notificationOPPOChannelID/notificationBody/notificationExt/notificationIOSSound定义自定义推送。详情如下:TIMUIKitChat(config: TIMUIKitChatConfig(notificationTitle: "",// 推送通知标题。留空字符串时,按照优先级,IM后台自动替换成sender的昵称 => sender ID。因此,如无特殊需求,该字段建议留空notificationOPPOChannelID: "", // 用于推送消息的OPPO配置Channel IDnotificationBody: (V2TimMessage message, String convID, ConvType convType) {return "您根据给出的参数自定义的第二行通知";},notificationExt: (V2TimMessage message, String convID, ConvType convType) {// 您根据给出的参数自定义的EXT字段:此处建议传conversation id,JSON格式,即如下所示String createJSON(String convID){return "{\\"conversationID\\": \\"$convID\\"}";}String ext = (convType == ConvType.c2c? createJSON("c2c_${message.sender}"): createJSON("group_$convID"));return ext;}))
处理单击回调
1. 此时填上 步骤3 初始化时,为 pushClickAction 埋的坑。
2. 初始化时,注册该回调方法,可拿到含推送本体及 ext 信息在内的 Map。
3. 如果上一步创建 OfflinePushInfo 时,在 ext 内传入了含 conversationID 的 JSON,此时即可直接跳转到对应 Chat。
说明:
在后台跳转情况下,此时 Flutter 首页可能已经 unmounted,无法为跳转提供 context,因此建议启动时缓存一个 context,保证跳转成功。
建议在跳转成功后,及时清除通知栏中其他本应用的通知,避免太多 IM 消息堆积其中。调用插件中
clearAllNotification()方法即可。BuildContext? _cachedContext;final TimUiKitPushPlugin cPush = TimUiKitPushPlugin(isUseGoogleFCM: true, // 中国大陆版无此参数);@overridevoid initState() {super.initState();_cachedContext = context;}void handleClickNotification(Map<String, dynamic> msg) async {String ext = msg['ext'] ?? "";Map<String, dynamic> extMsp = jsonDecode(ext);String convId = extMsp["conversationID"] ?? "";// 此处建议判断当前打开的页面是否是将要跳转的Conversation。// 如果是,建议阻止跳转,以避免进入多个相同页面。final targetConversationRes = await TencentImSDKPlugin.v2TIMManager.getConversationManager().getConversation(conversationID: convId);V2TimConversation? targetConversation = targetConversationRes.data;if(targetConversation != null){cPush.clearAllNotification();Navigator.push(_cachedContext ?? context,MaterialPageRoute(builder: (context) => Chat(selectedConversation: targetConversation,),));}}
步骤7:使用 TRTC 打单聊语音/视频通话,发送离线推送
Flutter 通话插件接入
1. 如果您使用到我们的 tim_ui_kit_calling_plugin 插件,请将其升级至0.2.0版本以上,即可使用离线推送能力。
2. 参见如下示例,直接在
call方法第三个参数中,传入offlinePush对象即可。final user = await sdkInstance.getLoginUser();final myId = user.data;OfflinePushInfo offlinePush = OfflinePushInfo(title: "",desc: "邀请您语音通话",ext: "{\\"conversationID\\": \\"c2c_$myId\\"}",disablePush: false,ignoreIOSBadge: false,androidOPPOChannelID: PushConfig.OPPOChannelID);_calling?.call(widget.selectedConversation.userID!, CallingScenes.Audio, offlinePush);
说明:
通话群邀请暂不支持离线推送。
使用插件跑通离线推送(iOS 增补)
本部分在使用插件跑通离线推送(Android)完成的基础上,补充对应步骤 iOS 端需要做的事情。
该部分没有提到过的步骤,和 Android 端一致。
步骤1:代码中添加 iOS 工程配置
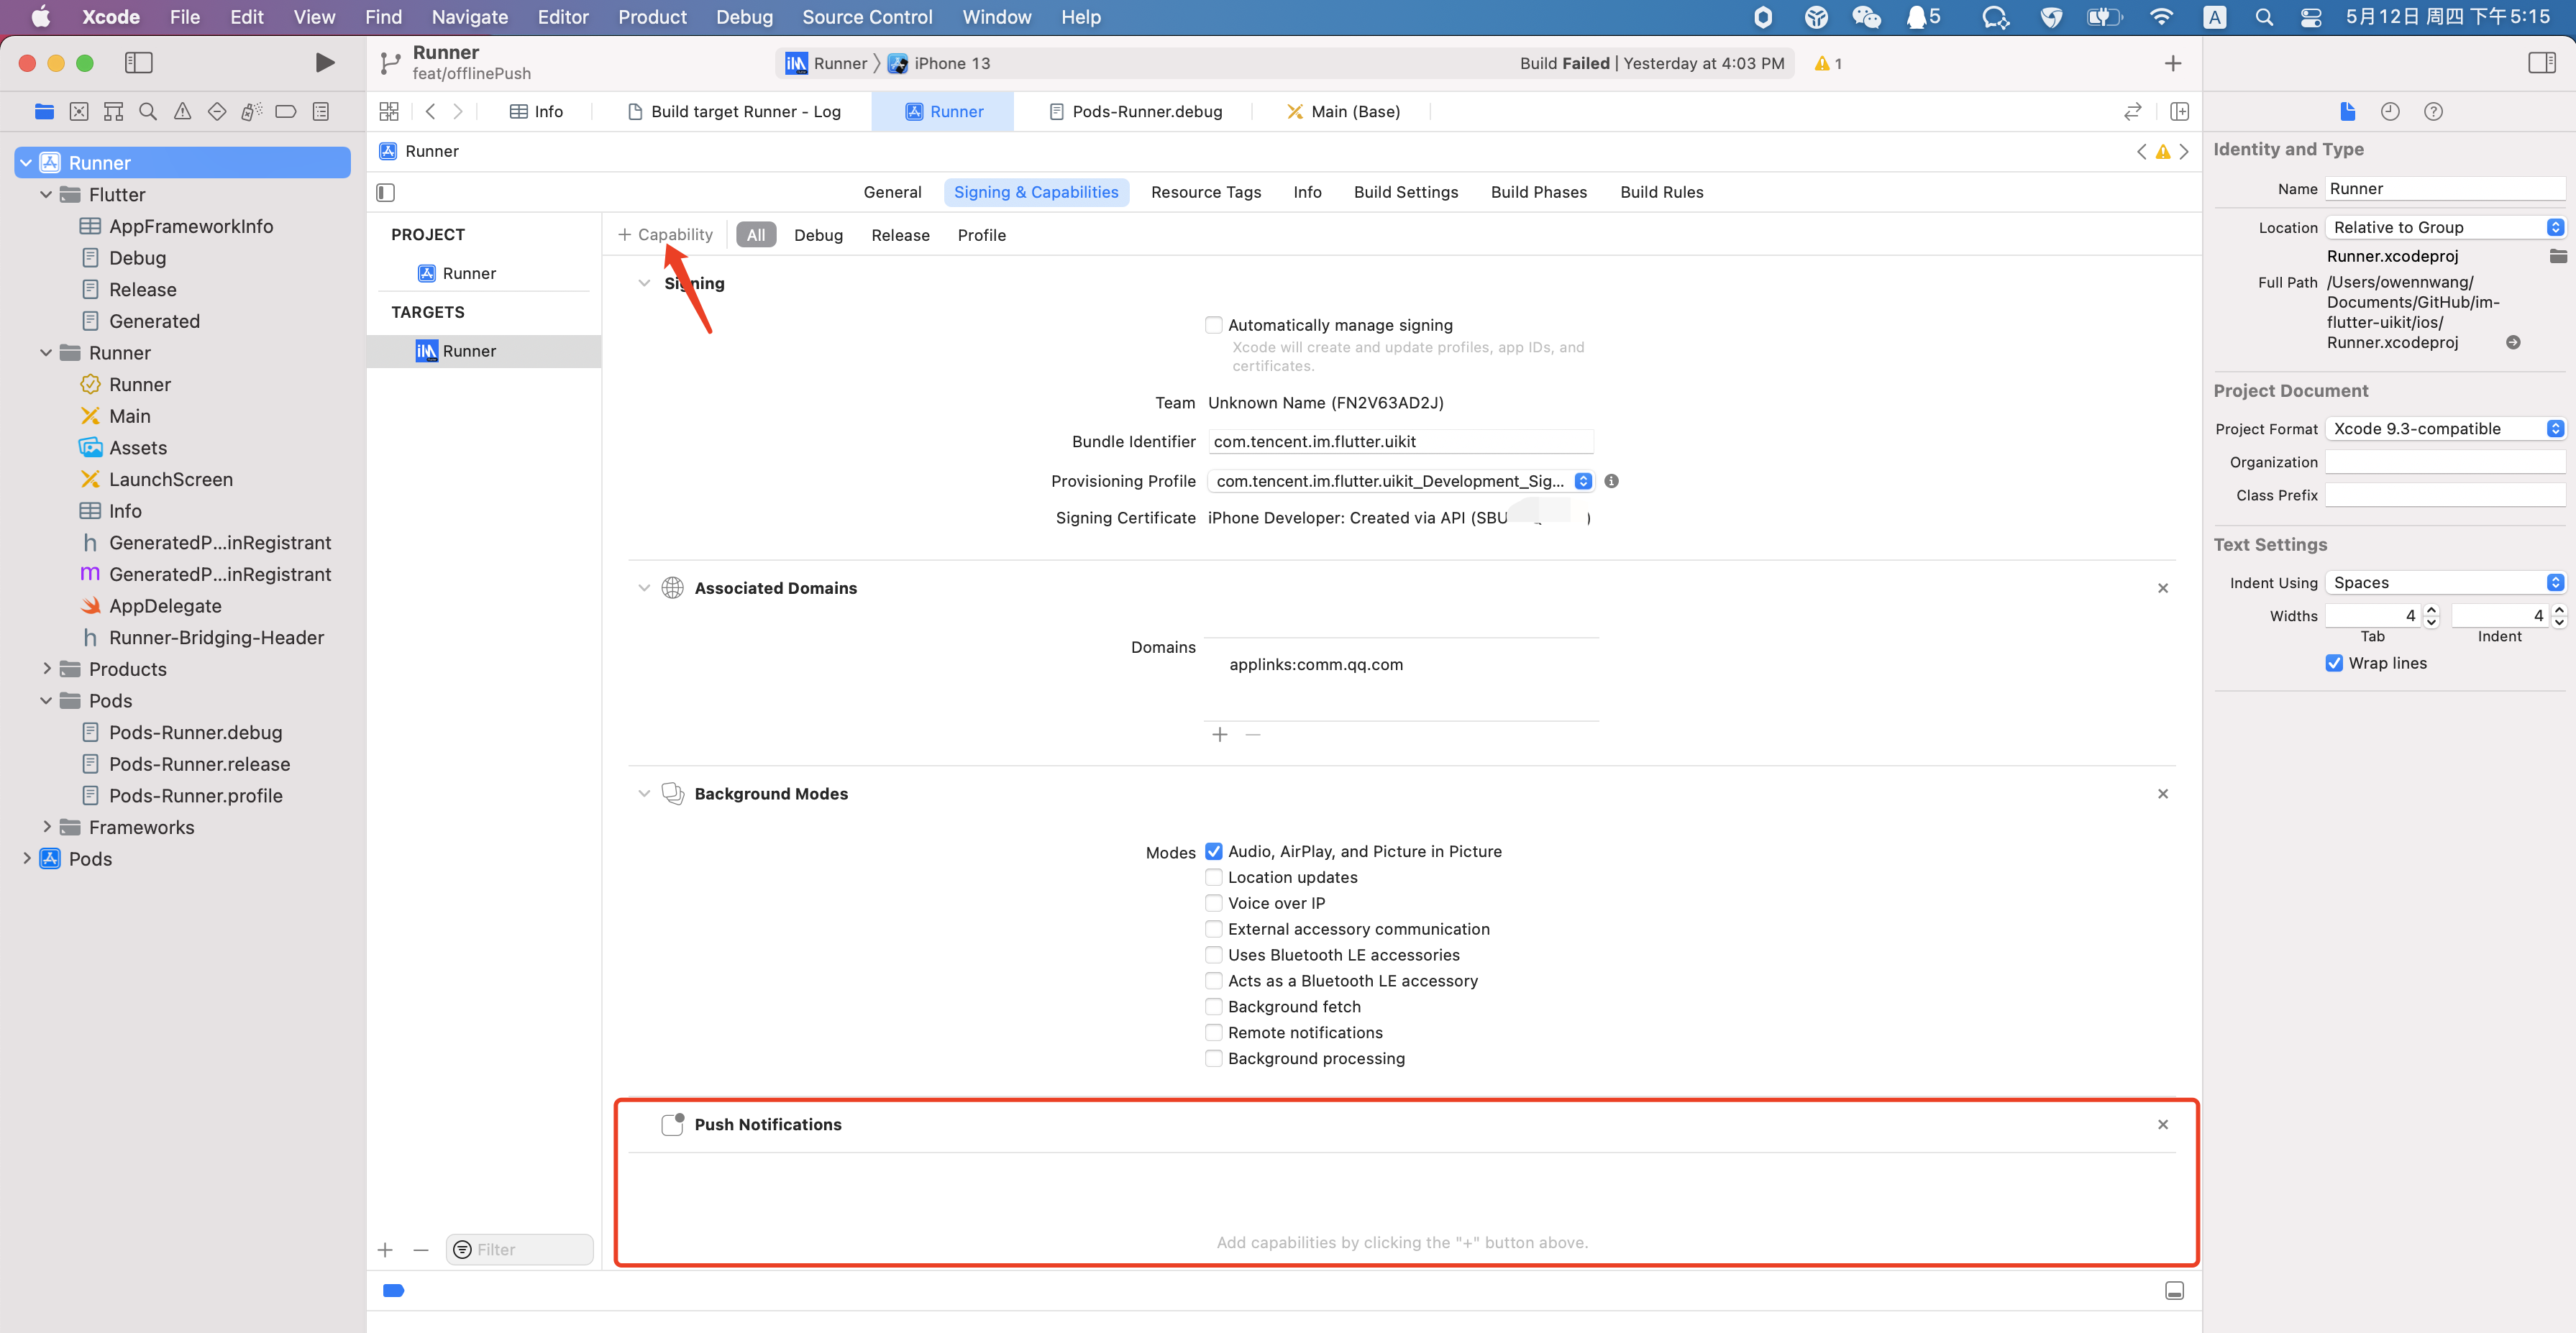
1. 使用 Xcode 打开您的项目,在 Runner>Target 中,配置支持 Push 的 Signing Profile。
2. 并在左上角新增
Push Notification的 Capability。

3. 执行
flutter pub get安装好插件后进入 iOS 目录,执行:pod install安装依赖库。4. 将以下代码添加到 iOS 工程下
ios/Runner/AppDelegate.swift文件didFinishLaunchingWithOptions方法中。可参考我们的 DEMO。
Objective-C:if (@available(iOS 10.0, *)) {[UNUserNotificationCenter currentNotificationCenter].delegate = (id<UNUserNotificationCenterDelegate>) self;}
Swift:
if #available(iOS 10.0, *) {UNUserNotificationCenter.current().delegate = self as? UNUserNotificationCenterDelegate}
5. 如果不使用 Google Firebase 套件,需要在
info.plist加入如下字段。<key>flutter_apns.disable_firebase_core</key><false/>
步骤2:应用启动时初始化
调用插件
init方法。该步骤会完成初始化各厂商通道,并申请厂商通知权限。该步骤建议在应用启动后就执行调用。final TimUiKitPushPlugin cPush = TimUiKitPushPlugin(isUseGoogleFCM: true, // 中国大陆版无此参数);cPush.init(pushClickAction: pushClickAction, // 单击通知后的事件回调,会在STEP6讲解appInfo: PushConfig.appInfo, // 传入STEP1做的appInfo);
步骤3:发消息配置及单击通知跳转
发送消息
直接通过 SDK 发送
如您自行接入腾讯云 IM SDK,请在发消息时配置
OfflinePushInfo offlinePushInfo字段。OfflinePushInfo({// ..其他配置this.iOSSound = "", // iOS离线推送声音设置, 当 iOSSound = kIOSOfflinePushNoSound,表示接收时不会播放声音。 当 iOSSound = kIOSOfflinePushDefaultSound,表示接收时播放系统声音。 如果要自定义 iOSSound,需要先把语音文件链接进 Xcode 工程,然后把语音文件名(带后缀)设置给 iOSSound。this.ignoreIOSBadge = false,});
接入TUIKit
如果您使用我们的 Flutter TUIKit 组件库,可直接在
TIMUIKitChat组件TIMUIKitChatConfig中,使用notificationTitle/notificationOPPOChannelID/notificationBody/notificationExt/notificationIOSSound定义自定义推送。详情如下:TIMUIKitChat(config: TIMUIKitChatConfig(// ..其他配置notificationIOSSound: "", // iOS离线推送声音设置, 当 iOSSound = kIOSOfflinePushNoSound,表示接收时不会播放声音。 当 iOSSound = kIOSOfflinePushDefaultSound,表示接收时播放系统声音。 如果要自定义 iOSSound,需要先把语音文件链接进 Xcode 工程,然后把语音文件名(带后缀)设置给 iOSSound。))
步骤5:前后台切换监听
本步骤整体方案与 Android 的步骤5一致,此处不再重复提及。
对于 iOS 平台,仅需额外关注。iOS 的 IM SDK 已自带设置应用 icon 角标能力。如果您需要设置自定义角标,除了调用
setBadgeNum 方法外,还需要禁用 IM SDK 的自动设置角标功能,避免冲突。代码如下:TencentImSDKPlugin.v2TIMManager.callExperimentalAPI(api: 'disableBadgeNumber',param: true);
本代码仅需在程序启动后,执行一次即可。
推送您的其他业务消息
如果您的业务中,有其他运营通知/订单通知等消息,需要推送,您可以参考本部分,使用服务端推送能力。
说明:
如果您在项目中,使用了其他推送 SDK,如 TPNS,会导致多个厂商底层 SDK 冲突,使得编译不通过。因此建议仅安装我们的推送插件即可,使用我们的服务端推送能力,下发 IM 消息和您的其他推送消息。
推送 API
1. 全员推送:可参见 本文档,使用服务端请求腾讯云 IM 的 API,完成全员推送。此方案,还可自动按标签/属性等内容,精细化推送。
2. 无需旗舰版针对特定成员的推送:可参见 本文档,使用服务端,请求腾讯云 IM 的 API,以批量发单聊消息的形式,给固定的用户 ID 列表,下发消息推送。该 API 上限500个用户,如果待发用户超过500人,可循环多次调用本 API。
推送方式
此处实际是向用户们发送了一条消息,消息内容不重要,如果您不希望这条消息呈现给用户,可在渲染会话列表的时候,过滤掉同此管理员账号的会话,仅使用其推送和跳转能力。
以全员推送的 JSON 包体举例:
{"From_Account": "Admin", // 建议配置成管理员账户"MsgRandom": 3674128,"MsgLifeTime": 120,"MsgBody": [{"MsgType": "TIMTextElem","MsgContent": {"Text": "Push Test"}}],"OfflinePushInfo": {"PushFlag": 0,"Title": "推送信息的标题","Desc": "离线推送内容","Ext": "这是透传的内容,会通过点击回调的方式,使您拿到,您可用于自定义跳转等操作。请使用JSON格式","AndroidInfo": { // Android设备推送配置"Sound": "android.mp3"},"ApnsInfo": { // 苹果iOS设备推送配置"Sound": "apns.mp3","BadgeMode": 1, // 这个字段缺省或者为 0 表示需要计数,为 1 表示本条消息不需要计数,即右上角图标数字不增加"Title":"apns title", // apns title"SubTitle":"apns subtitle", // apns subtitle"Image":"www.image.com" // image url}}}
调试
离线推送自查
vivo 调试
1. 获取测试设备(vivo 真机)的 regId(我们称做 Device Token)。
2. 在 vivo 控制台内,添加该设备为测试设备。
3. 此时可推送测试消息至测试设备。可参见 vivo 单播推送文档。
4. 由于腾讯云 IM 控制台的测试推送,和直接使用 IM SDK 发送聊天消息的推送,均不能修改推送模式为测试。因此请使用我们提供的,可触发测试消息的 JS 脚本,单击此处下载。
5. 下载后,请根据顶部五行注释,填入vivo相关参数。默认ext为
conversationID,如果在处理单击回调跳转(可参见 步骤6)时需要其他字段,请自行修改 JS 代码。

6. 执行脚本。
npm install axiosnpm install js-md5 后node testvivo。推送结果会显示在 log 最后一行。

7. 此时测试终端可收到测试消息推送,单击消息后,可触发 Dart 层回调。
厂商推送限制
1. 国内厂商都有消息分类机制,不同类型也会有不同的推送策略。如果想要推送及时可靠,需要按照厂商规则设置自己应用的推送类型为高优先级的系统消息类型或者重要消息类型。反之离线推送消息会受厂商推送消息分类影响,与预期会有差异。
2. 另外,一些厂商对于应用每天的推送数量也是有限制的,可以在厂商控制台查看应用每日限制的推送数量。
如果离线推送消息出现推送不及时或者偶尔收不到情况,需要考虑下这里:
华为:将推送消息分为服务与通讯类和资讯营销类,推送效果和策略不同。另外,消息分类还和自分类权益有关:
无自分类权益,推送消息厂商还会进行二次智能分类 。
有申请自分类权益,消息分类会按照自定义的分类进行推送。
具体请参见 厂商描述。
vivo:将推送消息分为系统消息类和运营消息类,推送效果和策略不同。系统消息类型还会进行厂商的智能分类二次修正,若智能分类识别出不是系统消息,会自动修正为运营消息,如果误判可邮件申请反馈。另外,消息推送也受日推总数量限制,日推送量由应用在厂商订阅数统计决定。
具体请参见 厂商描述1 或 厂商描述2。
OPPO:将推送消息分为私信消息类和公信消息类,推送效果和策略不同。其中私信消息是针对用户有一定关注度,且希望能及时接收的信息,私信通道权益需要邮件申请。公信通道推送数量有限制。
具体请参见 厂商描述1 或 厂商描述2。
小米:将推送消息分为重要消息类和普通消息类,推送效果和策略不同。其中重要消息类型仅允许即时通讯消息、个人关注动态提醒、个人事项提醒、个人订单状态变化、个人财务提醒、个人状态变化、个人资源变化、个人设备提醒这8类消息推送,可以在厂商控制台申请开通。普通消息类型推送数量有限制。
具体请参见 厂商描述1 或 厂商描述2。
魅族:推送消息数量有限制,具体可参见 魅族平台合约。
FCM:推送上行消息频率有限制。
具体请参见 厂商描述。
收不到离线推送怎么排查?
1、OPPO 手机
OPPO 手机收不到推送一般有以下几种情况:
按照 OPPO 推送官网要求,在 Android 8.0 及以上系统版本的 OPPO 手机上必须配置 ChannelID,否则推送消息无法展示。配置方法可以参见 OPPO 推送配置。
在消息中 透传的离线推送的自定义内容 不是 JSON 格式,会导致 OPPO 手机收不到推送。
OPPO 安装应用通知栏显示默认关闭,需要确认下开关状态。
2、发送消息为自定义消息
自定义消息的离线推送和普通消息不太一样,自定义消息的内容我们无法解析,不能确定推送的内容,所以默认不推送,如果您有推送需求,需要您在
sendMessage的时候设置offlinePushInfo的desc字段,推送的时候会默认展示 desc 信息。3、设备通知栏设置影响
离线推送的直观表现就是通知栏提示,所以同其他通知一样受设备通知相关设置的影响,以华为为例:
“手机设置-通知-锁屏通知-隐藏或者不显示通知”,会影响锁屏状态下离线推送通知显示。
“手机设置-通知-更多通知设置-状态栏显示通知图标”,会影响状态栏下离线推送通知的图标显示。
“手机设置-通知-应用的通知管理-允许通知”,打开关闭会直接影响离线推送通知显示。
“手机设置-通知-应用的通知管理-通知铃声” 和 “手机设置-通知-应用的通知管理-静默通知”,会影响离线推送通知铃音的效果。
4、按照流程接入完成,还是收不到离线推送
首先在 IM 控制台通过 离线测试工具 自测下是否可以正常推送。
推送异常情况,设备状态异常,需要检查下 IM 控制台配置各项参数是否正确,再者需要检查下代码初始化注册逻辑,包括厂商推送服务注册和 IM 设置离线推送配置相关逻辑是否正确设置。
推送异常情况,设备状态正常,需要看下是否需要正确填写 channel ID 或者后台服务是否正常。
离线推送依赖厂商能力,一些简单的字符可能会被厂商过滤不能透传推送。如 OPPO 则对 ext 字段限制为 JSON 格式。
如果离线推送消息出现推送不及时或者偶尔收不到情况,需要看下厂商的推送限制。
在线推送-在本地创建新消息通知
本文以上部分介绍了,如何使用本插件,结合腾讯云IM后端的推送服务,实现通过厂商通道的离线推送。
但是,在某些情况下,厂商离线推送并不适用。例如您的目标客户端机型非我们兼容的厂商,使用华强北定制的 Android 设备等。
此时,您只得通过在线监听收到新消息回调,在客户端上,手动触发创建通知。这仅适用于,应用未被 kill 掉,还处于前后台状态,能正常与IM服务端通信。
为此种情况,本插件在0.3版本中,新增两个本地创建消息的方法,
displayNotification 自定义通知,及 displayDefaultNotificationForMessage 根据消息生成默认通知,您可按需使用。接入前准备
在您的项目中安装 IM Flutter 推送插件:
// 国内版flutter pub add tencent_chat_push_for_china// 国际版flutter pub add tim_ui_kit_push_plugin
并根据该指南,在插件市场,启用推送插件。
Android
确保 
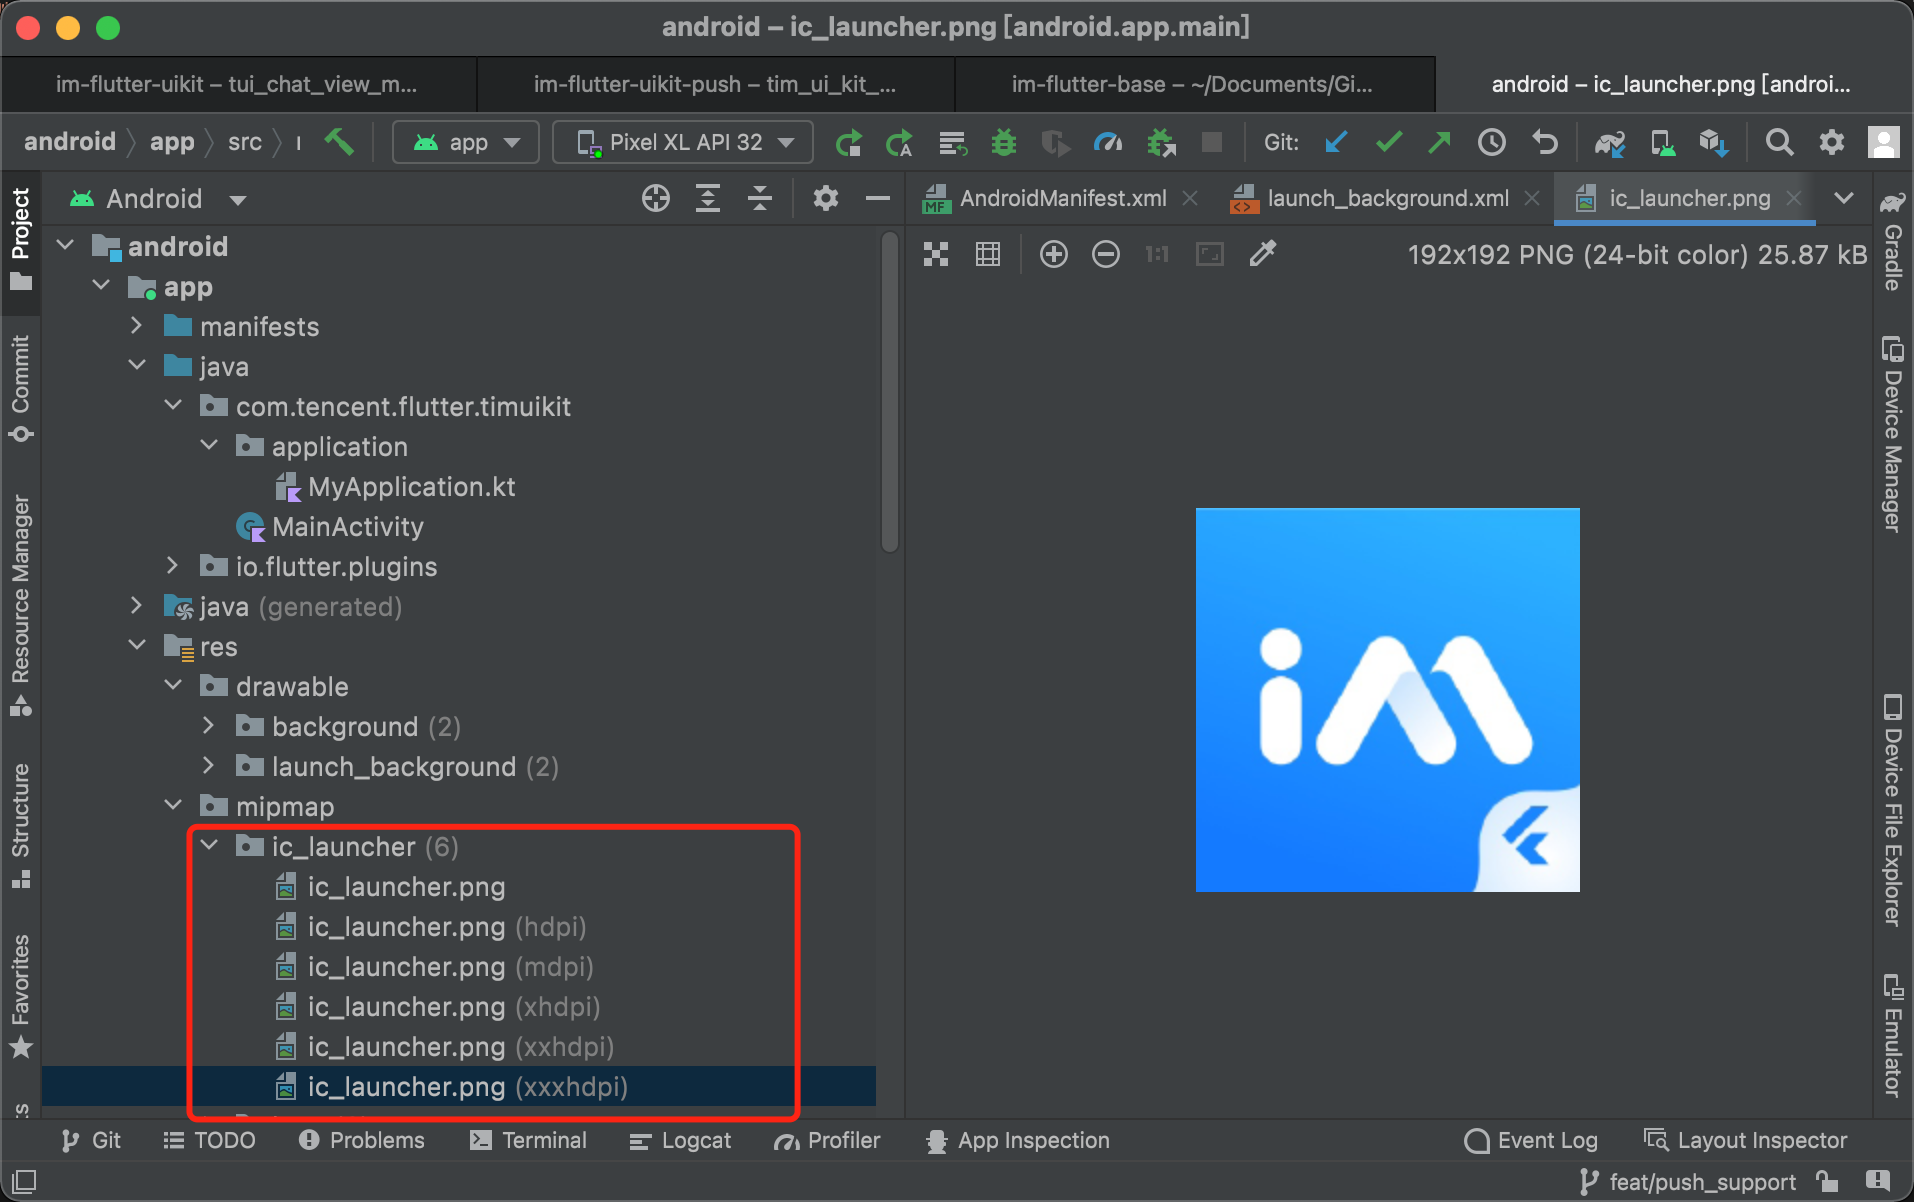
@mipmap/ic_launcher 存在且为您的应用 Icon。完整路径:android/app/src/main/res/mipmap/ic_launcher.png
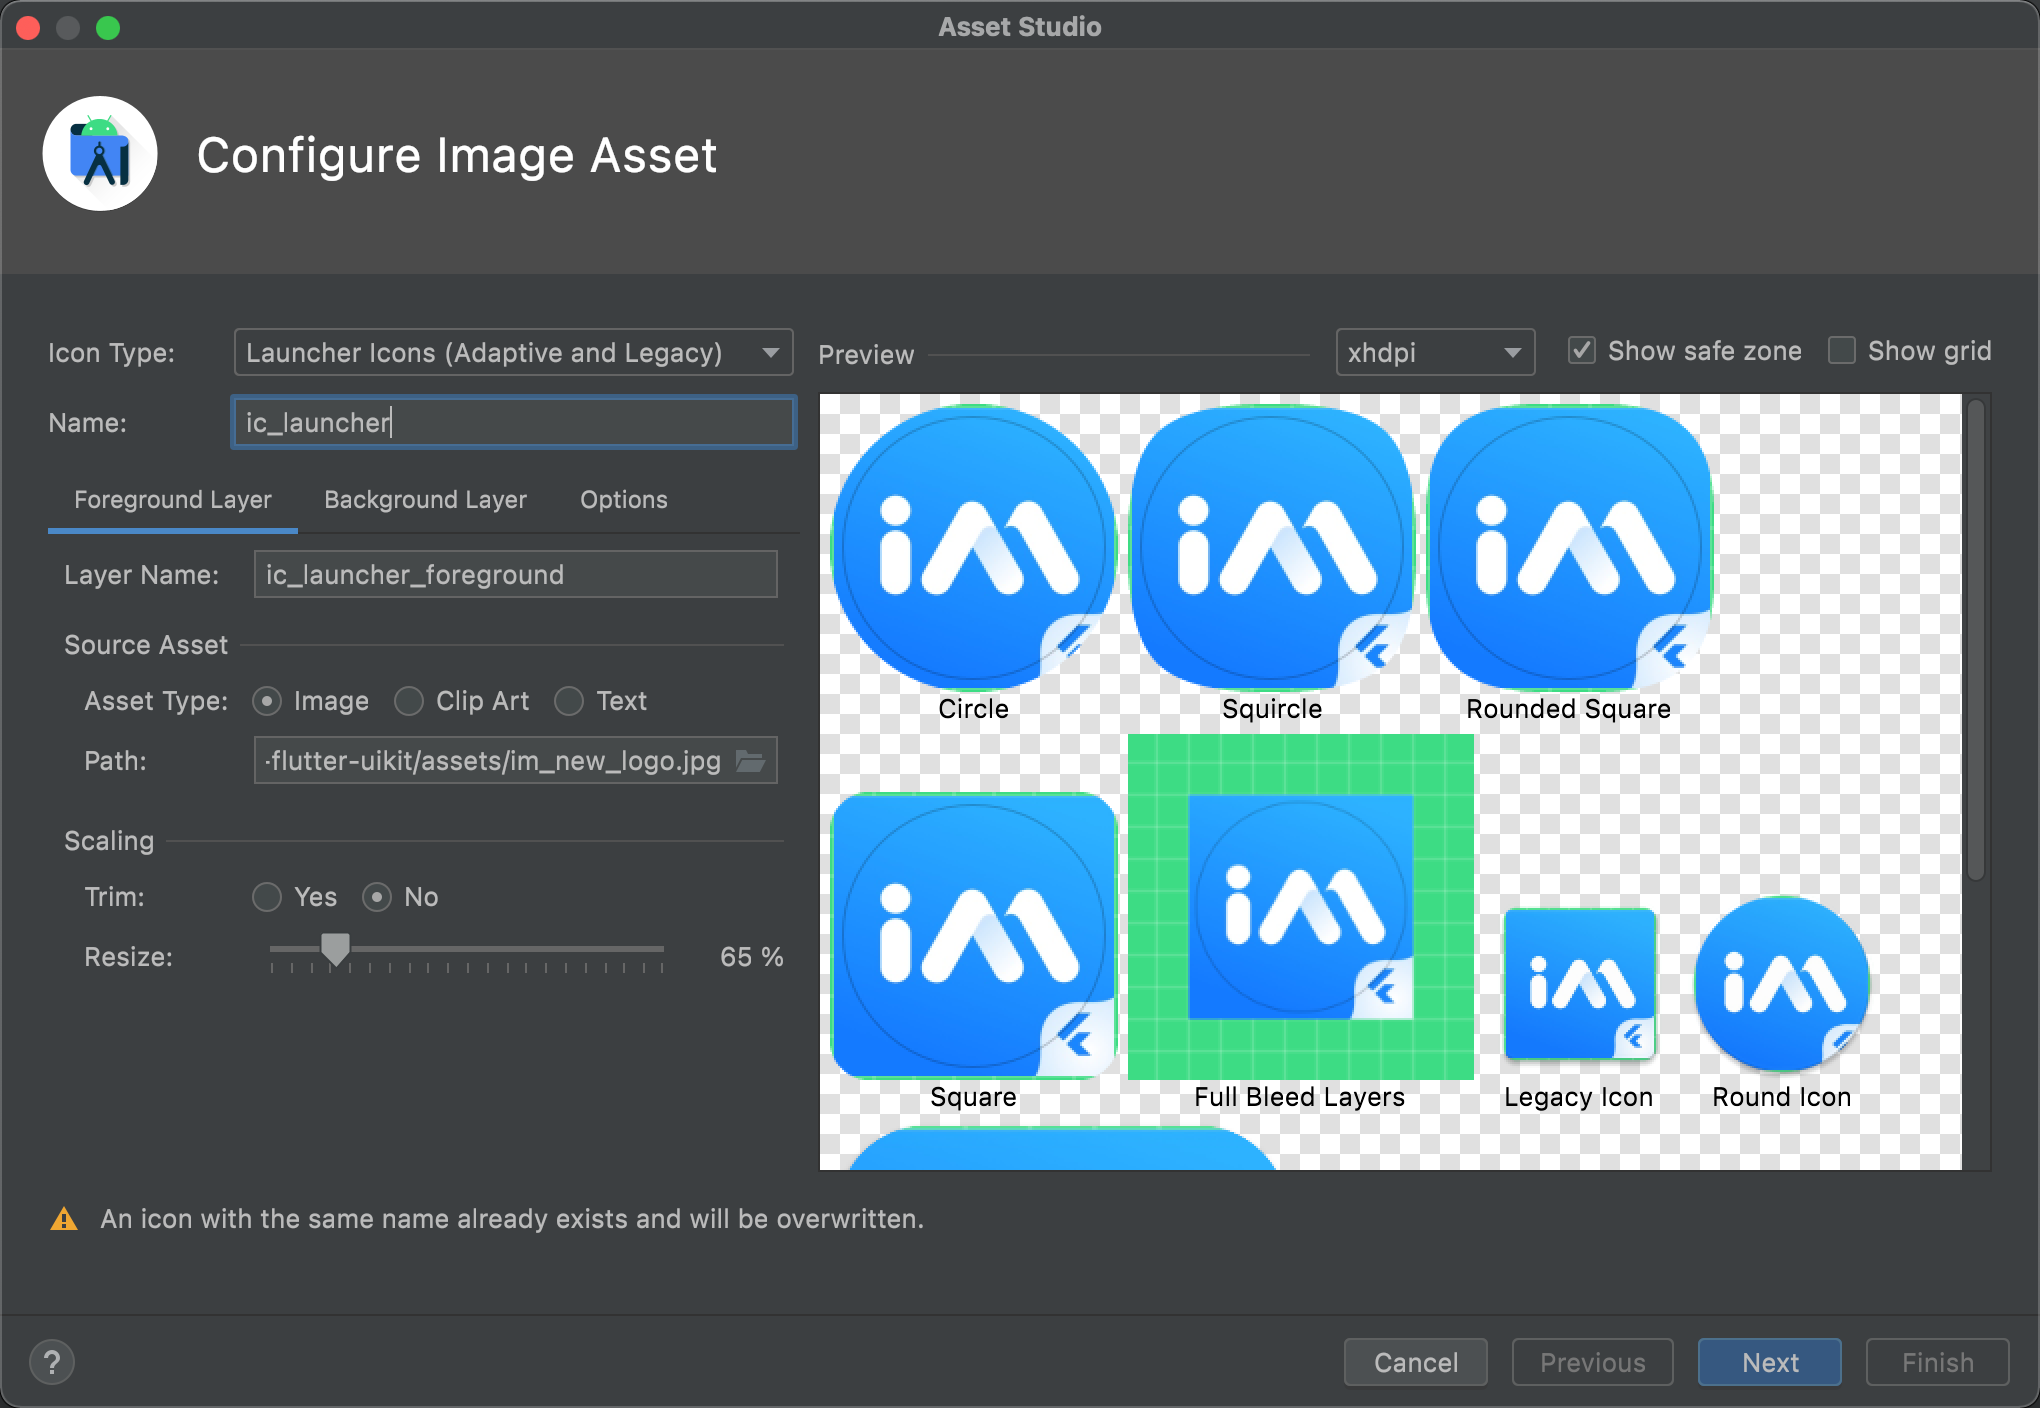
如果不存在,可手动将您的应用 Icon 复制进去,或通过 Android Studio 自动创建不同分辨率版本(
mipmap 目录右键,New => Image Asset)。

iOS
如果您已经配置 iOS 端离线推送,可忽略本部分。若无,请在
ios/Runner/AppDelegate.swift 或 ios/Runner/AppDelegate.m文件中, didFinishLaunchingWithOptions 函数内,添加如下代码。可参考我们的 DEMO。Objective-C:
if (@available(iOS 10.0, *)) {[UNUserNotificationCenter currentNotificationCenter].delegate = (id<UNUserNotificationCenterDelegate>) self;}
Swift:
if #available(iOS 10.0, *) {UNUserNotificationCenter.current().delegate = self as? UNUserNotificationCenterDelegate}
初始化插件
请在 IM SDK 初始化完成后,初始化本 Push 插件。实例化一个
cPush 插件类,供后续调用。final TimUiKitPushPlugin cPush = TimUiKitPushPlugin(isUseGoogleFCM: true, // 中国大陆版无此参数);cPush.init(// 此处绑定点击通知的跳转函数,下文会介绍pushClickAction: onClickNotification,);
监听新消息回调触发通知
监听 V2TimAdvancedMsgListener
如果您已经挂载监听
V2TimAdvancedMsgListener ,可忽略本部分;若无,请在 IM login 后,挂载监听。代码如下:
final advancedMsgListener = V2TimAdvancedMsgListener(onRecvNewMessage: (V2TimMessage newMsg) {// 这里完成监听回调触发事件// 请在这里调用下一步提及的触发本地消息通知API},});TencentImSDKPlugin.v2TIMManager.getMessageManager().addAdvancedMsgListener(listener: advancedMsgListener);
触发本地消息通知
请从我们提供的两个 API 中,
displayNotification 自定义通知,及 displayDefaultNotificationForMessage 根据消息生成默认通知,选一个合适的API。对于Android端,这两个API均需传入
channelID 及 channelName。若还未创建 Android Push Channel ,请使用插件 createNotificationChannel API创建。cPush.createNotificationChannel(channelId: "new_message",channelName: "消息推送",channelDescription: "推送新聊天消息");
displayNotification
本API需要您提供
title, body, 及 ext 用于点击跳转信息,三个参数。您可以根据需要自行解析收到的 V2TimMessage,生成这三个字段。为便于跳转,此处ext的生成规则可查看
displayDefaultNotificationForMessage 的代码。cPush.displayNotification(channelID: "new_message",channelName: "消息推送",title: "",body: "",ext: "");
displayDefaultNotificationForMessage
为了方便,推荐您使用此API,自动根据
V2TimMessage,生成通知。您只需传入一个
V2TimMessage 即可。cPush.displayDefaultNotificationForMessage(message: message, channelID: "new_message", channelName: "消息推送");
点击通知跳转
如果您在上一步使用
displayDefaultNotificationForMessage,或在 displayNotification 中使用与default相同的ext生成函数,此时的ext结构为:"conversationID": "对应的conversation"。此时,填上初始化时,为 pushClickAction 埋的坑。
初始化时,注册该回调方法,可拿到含推送本体及 ext 信息在内的 Map。
说明:
在后台跳转情况下,此时 Flutter 首页可能已经 unmounted,无法为跳转提供 context,因此建议启动时缓存一个 context,保证跳转成功。
建议跳转成功后,清除通知栏中其他通知消息,避免太多IM消息堆积在通知栏中。调用插件中
clearAllNotification()方法即可。BuildContext? _cachedContext;final TimUiKitPushPlugin cPush = TimUiKitPushPlugin(isUseGoogleFCM: true, // 中国大陆版无此参数);@overridevoid initState() {super.initState();_cachedContext = context;}void onClickNotification(Map<String, dynamic> msg) async {String ext = msg['ext'] ?? "";Map<String, dynamic> extMsp = jsonDecode(ext);String convId = extMsp["conversationID"] ?? "";// 若当前的会话与要跳转至的会话一致,则不跳转// 此处建议您自行判断下,用户当前打开的页面final targetConversationRes = await TencentImSDKPlugin.v2TIMManager.getConversationManager().getConversation(conversationID: convId);V2TimConversation? targetConversation = targetConversationRes.data;if(targetConversation != null){cPush.clearAllNotification();Navigator.push(_cachedContext ?? context,MaterialPageRoute(builder: (context) => Chat(selectedConversation: targetConversation,),));}}
如果您自定义了
ext 结构,则需自实现点击跳转函数。此时,您已完成在线推送的接入。测试通过后,您可以在
onRecvNewMessage 内定义,触发推送通知的时机及场景。

 是
是
 否
否
本页内容是否解决了您的问题?