- 动态与公告
- 产品简介
- 购买指南
- 开发指引
- Demo 专区
- 下载中心
- 聊天互动(含 UI)
- 视频通话(含 UI)
- 推送服务(Push)
- 智能客服
- 更多实践
- 无 UI 集成
- 客户端 API
- 服务端 API
- 控制台指南
- 常见问题
- 协议与认证
- IM 政策
- 平滑迁移方案
- 错误码
- 联系我们
- 动态与公告
- 产品简介
- 购买指南
- 开发指引
- Demo 专区
- 下载中心
- 聊天互动(含 UI)
- 视频通话(含 UI)
- 推送服务(Push)
- 智能客服
- 更多实践
- 无 UI 集成
- 客户端 API
- 服务端 API
- 控制台指南
- 常见问题
- 协议与认证
- IM 政策
- 平滑迁移方案
- 错误码
- 联系我们
本文会引导您构建聊天界面。
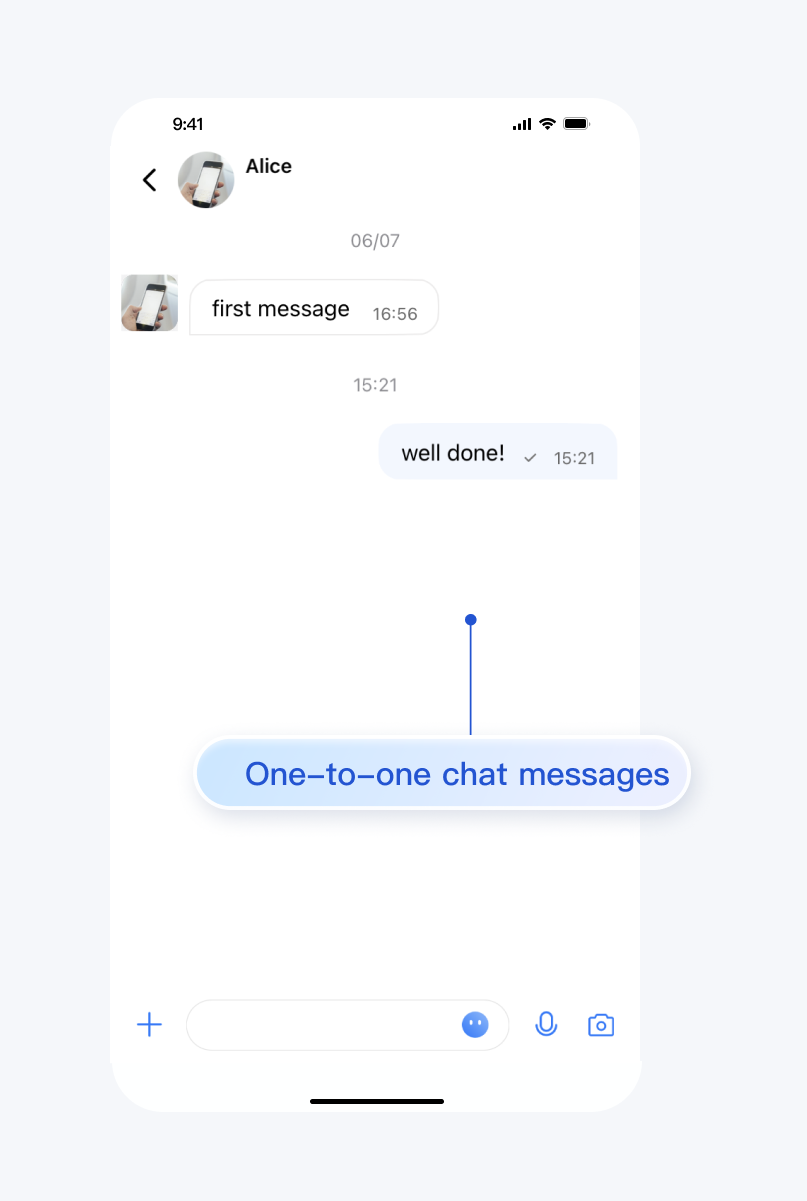
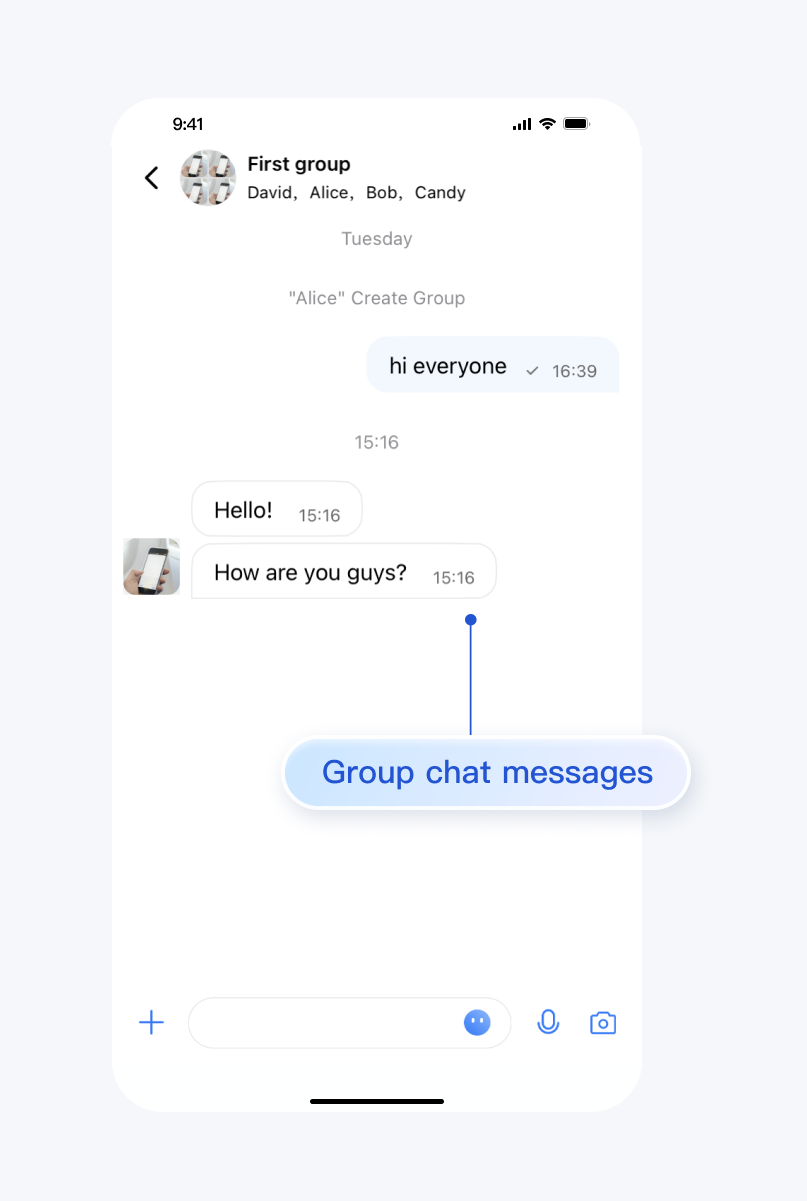
效果展示
聊天界面发送消息效果如下所示:
单聊界面 | 群聊界面 |
 |  |
开发环境要求
Xcode 10 及以上
iOS 9.0 及以上
前置条件
在构建界面之前,请确保您已经完成了以下 4 件事:
1. 在控制台创建了一个应用。
2. 在控制台创建了一些用户账号。
3. 集成了
TUIKit 或 TUIChat。4. 调用
TUILogin 的 login 接口登录组件。注意:
1. 所有组件都是这个登录接口。每次启动应用,登录一次即可。
2. 请确保登录成功,我们建议您在登录成功的回调里进行下文的操作。
如果您已经完成,请继续阅读下文。
步骤说明
如果跳转群聊界面,需要传入有效 groupID。这里的前提是您有一个已经存在群组的 groupID。有两种简便方式可获取:
1. 去控制台创建一个 group,操作路径:Applications > Your App > Chat > Groups > Group Management > Add Group。创建成功后,您可以直接在当前页看到 groupID。
2. 按照文档 创建群聊 的指引,手动在 TUIKit 里创建一个群组,群组详情页中会展示 groupID。
跳转群聊界面示例代码如下所示:
#import "TUIBaseChatViewController_Minimalist.h"#import "TUIC2CChatViewController_Minimalist.h"#import "TUIGroupChatViewController_Minimalist.h"// ChatViewController is your own ViewController@implementation ChatViewController- (void)viewDidLoad {// Create conversation data.TUIChatConversationModel *conversationData = [[TUIChatConversationModel alloc] init];// Pass userID for 1v1 chat, while groupID for group chat.conversationData.userID = @"userID";conversationData.groupID = @"groupID";// Create chatVC by groupID or userID.TUIBaseChatViewController_Minimalist *chatVC = nil;if (conversationData.groupID.length > 0) {chatVC = [[TUIGroupChatViewController_Minimalist alloc] init];} else if (conversationData.userID.length > 0) {chatVC = [[TUIC2CChatViewController_Minimalist alloc] init];}[chatVC setConversationData:conversationData];// Option 1: push chatVC.[self.navigationController pushViewController:chatVC animated:YES];// Option 2: add chatVC to your own ViewController.// [self addChildViewController:vc];// [self.view addSubview:vc.view];}@end
#import "TUIBaseChatViewController.h"#import "TUIC2CChatViewController.h"#import "TUIGroupChatViewController.h"// ChatViewController is your own ViewController@implementation ChatViewController- (void)viewDidLoad {// Create conversation data.TUIChatConversationModel *conversationData = [[TUIChatConversationModel alloc] init];// Pass userID for 1v1 chat, while groupID for group chat.conversationData.userID = @"userID";conversationData.groupID = @"groupID";// Create chatVC by groupID or userID.TUIBaseChatViewController *chatVC = nil;if (conversationData.groupID.length > 0) {chatVC = [[TUIGroupChatViewController alloc] init];} else if (conversationData.userID.length > 0) {chatVC = [[TUIC2CChatViewController alloc] init];}[chatVC setConversationData:conversationData];// Option 1: push chatVC.[self.navigationController pushViewController:chatVC animated:YES];// Option 2: add chatVC to your own ViewController.// [self addChildViewController:chatVC];// [self.view addSubview:chatVC.view];}@end
更多实践
联系我们

 是
是
 否
否
本页内容是否解决了您的问题?